IBM MobileFirst Platform for iOS (Beta) Security Overview
Simon Kapadia December 12, 2017
MobileFirst_Playground iOS


Introduction
This document describes, at a high level, the security model for the IBM MobileFirst Platform for iOS (beta). It covers the IBM Cloud-based platform whose primary documentation is available here:
This document does not cover IBM MobileFirst Platform Foundation, which is a separate on-premises product.
The goal of this document is to explain not only how to configure and use the security functionality, known as the Advanced Mobile Access service, but also why things should be configured the way they are, and a little about how the internals work. IBM believes that security should be open and clearly communicated; the concepts of "security through obscurity" have failed multiple times throughout history, and only by providing clarity and understanding can a security model be established and mature.
Feedback is very important to us! In the beta release, we put together a security model which we think works well and is secure, but we want to know what specifically, you as customers, want to do with it. If there’s something that you think we should be doing but aren’t, if you think we could do something differently to better fit in with your real world use cases, we want to hear from you — please get in touch with us.
Creating Mobile Applications
The goal of the security infrastructure in the IBM MobileFirst Platform for iOS (beta) is to provide secure access for mobile apps to mobile back-end services and other back-end services running in Bluemix. The basic flow to create your app and back-end is as follows:
- Create an app on Bluemix as the back-end for your iOS8 mobile app.
- Register the mobile app to use the Advanced Mobile Access service, supplying the bundle ID and version to identify the app.
- Configure how you would like your users to be authenticated.
- Download the SDK (as a .zip file or using CocoaPods) and use it to write your mobile client app.
- Develop a server-side node.js component as part of your Bluemix app back-end, and protect it by using a passport strategy provided for this purpose; use the server SDK to propagate identity if required.
- Develop other applications in node.js on Bluemix and protect them by using the passport strategy provided for service protection; use the server SDK to propagate identity if required.
At this stage you can use the app and have secure access to the Data and Push services that IBM MobileFirst Platform for iOS provides. However, if you plan to deploy your own server-side code, you should extend that security to your own custom back-end application and services by following the remaining steps.
As a result of following all of the steps, you will have:
- A mobile app that you have written.
- A mobile back-end on Bluemix that provides services (Push and Data) to your app.
- Optionally, a server-side component to your mobile back-end that you have written to run any business logic you choose to run.
- Optionally, other applications running on Bluemix which you choose to write for your mobile app to call.
Actors
Terminology is extremely important in security, so first we need to define the terminology that we will use for the rest of this document. In particular, before we start discussing the security flows, we need to agree on what names we are going to use for the various actors involved. Actors are the participants from a security point of view; so, this section describes the actors in the IBM MobileFirst Platform for iOS.
The Client
The word “client” can mean many different things, especially in a mobile context. When we say “client", do we mean the mobile application itself? A component of the mobile application? The device on which the application is deployed? The end user of the application? The technical implementation of the client code within an SDK? Generically any code which is making a call to a server? As you can see, getting the terminology right really matters!
Because “client” has so many meanings, throughout this document we will try not to use the word “client”. Instead, we will use the terms “Mobile App” and “OAuth Client”. The Mobile App is the code that you as a developer write that runs on the mobile device; it will display a user interface to the end user, and will make service calls to the mobile back-end and other services. The OAuth Client is code, provided and injected by the SDK and transparent to you as a developer, that is called to when you invoke a call to the back-end or to a service to add security tokens to secure the service calls made by the mobile app.
The Mobile Back-end
The mobile back-end is the server-side component that your mobile app talks to. In the simplest use case, with no custom server side code, the server-side component consists of the MobileFirst services for Push notifications, for Data using the Cloudant NoSQL DB, and for the Advanced Mobile Access service itself. This is a powerful combination: It allows you to focus on building your mobile app and provide the back-end infrastructure without the need for complex deployment and configuration, and provides direct access to prebuilt, manageable and scalable cloud services directly and securely from your iOS mobile app. However, when you choose to deploy a custom node.js application within your Mobile back-end, the mobile back-end really comes into its own, allowing your own server-side code to run and perform functions over and above what is possible with your mobile application. For example, your custom node.js app could run tasks offline, while the app is not connected, and then send a Push notification to the app when something happens that it needs to know about.
Other Server-side Applications
The third important actor under the control of the app developer is other server-side applications that you can write and deploy to Bluemix. Of course, writing applications and deploying them to Bluemix is not new, but with the IBM MobileFirst Platform for iOS (beta) you can take advantage of the Advanced Mobile Access service to integrate with them securely. The APIs that the applications expose can detect who the authenticated user is, what device the application is running on, the application and version, and make decisions based on that information. For example, you could create a service-side application which integrates with your own on-premises systems, and protect that application’s API such that only users that you have allowed will be able to invoke it. Since your applications will have knowledge of which application is calling in, you can create shared applications with APIS to use with multiple apps; for example an API which provides read access to live stock information which needs to be available internal sales applications, consumer shopping apps and business partner ordering apps. Being able to write this application once and invoke its API securely from multiple client apps gives a high level of control while minimising implementation costs.
(A server-side application which exposes an API can also be called a service, and will be referred to as a service or “node.js service” in this document. This bears explanation, because the term service is another overloaded one. Specifically, we are not referring to a Bluemix service, which has a special meaning in Bluemix. The custom services that you integrate with here are Bluemix applications, which happen to expose an API that can be called by client apps. Again, terminology matters!).
The Authorisation Server
The final actor we will discuss is the Advanced Mobile Access authorisation server. The Advanced Mobile Access authorisation server is the actual endpoint that performs the security functionality. When you configure the Advanced Mobile Access service in your mobile back-end configuration, you are actually issuing instructions to the authorisation server for how to behave with your applications. It is responsible for registering your applications, configuring authentication mechanisms, and dealing with all of the server-side low-level protocols to secure your connections.
Security Flows
Let’s look at the security flows between our actors. How do the various IBM MobileFirst-provided components (SDK, passport strategy, etc) secure the interactions between the actors?
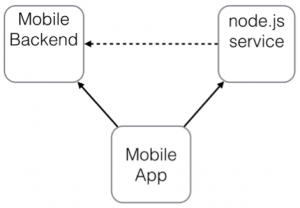
There are three basic flows between the actors that are under your control as a developer. The mobile app makes calls to the mobile back-end to access Push and Data services. The Mobile App also makes calls to one or more node.js services, and those services can make calls to the mobile back-end. These calls are all under your control as a programmer; your mobile app invokes the service calls using IMFResourceRequest (which is part of the client SDK), and your node.js service can call the mobile back-end as a RESTful service. These three flows are depicted by the arrows in the image below.
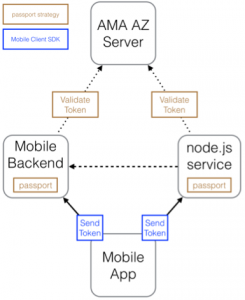
Now, let’s add in the Advanced Mobile Access Authorisation server (AZ server). We know that the mobile app will need to send tokens on the requests, and both the mobile back-end and the node.js service will need to validate the tokens that are sent in. So, on the mobile back-end and the node.js service, the developer will use the passport.io framework with strategies that we provide which will enforce the requirement to send a token with the requests. The passport code will retrieve the token from the inbound request and validate it against the AZ server (details of the actual validation are given later in this document). On the mobile app, the IMFResourceRequest and IMFURLProtocol functions from the client SDK will obtain a token and add it in to the request. This is completely transparent to you, as the developer. (Remember that your code had to perform authentication previously; however, sending the token on requests requires no additional work). The situation that we have now is shown in the following diagram.
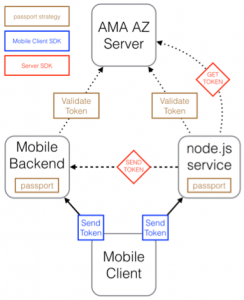
There is one piece still missing: On the node.js service, your code needs to obtain an authorisation header to send to the mobile back-end if you want to call it. The server SDK provides an easy-to-use API to obtain this header, so our final flow diagram is as follows:
Tokens
When we say “send a token”, what do we actually mean? Well, for the IBM MobileFirst Platform we have created our own IBM MobileFirst security tokens. These tokens provide a consistent way of accessing services by IMF clients (by which we mean clients of the IBM MobileFirst Platform for iOS), irrespective of how they originally authenticated. This lets us support multiple forms of authentication (in the beta release we support Facebook, Google and Custom as authentication mechanisms) without you having to change your service code. The consistency is important — in fact, it provides a number of benefits:
- Common access control mechanism. To protect, for example, a node.js resource accessed by the app, you can simply use the passport strategy (a common mechanism for securing node.js applications) that we provide. The passport strategy will ensure that the user is correctly authenticated before allowing the request.
- Common concept of user identity. The IMF token provides a consistent interface to access information about the end user in your application — rather than requiring you to manually work out whether the user authenticated using Facebook or Google and identifying the appropriate parts of their tokens, all information is accessed in the same manner.
- More than just user identity. The IMF tokens and surrounding security infrastructure provide assertions to the services about not only the user, but also about the application that is being run and the device on which it is being run.
This directly benefits your back-end application, and of course we get the same benefits for the functionality that IBM provides — your app can access our Push and Data services using IMF tokens no matter what form of authentication you use for your users.
User Authentication
So how does one obtain an IMF token in a mobile app? Well, as mentioned above, there are multiple ways in which clients can authenticate. Rather than repeating what is in the documentation, I will provide links.
First of all, on the Bluemix side, you have to register your app with the Advanced Mobile Access service; details are given here:
https://www.ng.bluemix.net/docs/#services/mobileaccess/security/client/t_register_app.html
During this registration, you choose the kind of authentication you want to use. In the beta you can currently choose between Facebook, Google and custom authentication mechanisms. For Facebook and Google, you specify the app ID or client ID (your application must be already registered with Facebook or Google), and for custom you specify the URL of the IDP (Identity Provider).
Next, you have to configure your client code to perform the authentication with your chosen authentication provider. The details are provided here:
https://www.ng.bluemix.net/docs/#services/mobileaccess/security/id_provs/index-gentopic2.html
In summary, you import both the SDK for your authentication provider and an IBM MobileFirst SDK provided for working with that provider, add an annotation and update the delegate, and register an IBM MobileFirst authentication handler (a construct we use to handle authentication) for the provider. We provide a delegate for both Facebook and Google, but you are free to write your own which performs more complex Facebook or Google logins if preferred.
Once authentication is configured correctly as per the documentation, the IBM MobileFirst Security SDK will authenticate the user when needed and will automatically send IMF tokens on calls.
Protecting Other Server-side Applications
Once your app is configured to use an authentication mechanism and tokens are being sent, the Data and Push services can be accessed. However, your own mobile back-end deployed code and other node.js services that you deploy on Bluemix must be written to validate the tokens as they are received. To do this, we use the popular passport.io framework.
Passport enables you to add IMF token validation in a few easy lines of code that define the URLs that you want protected and the functions to be called when access is granted or denied.
Details of the passport configuration are available here:
https://www.ng.bluemix.net/docs/#services/mobileaccess/security/resource_server/r_oauth_filter.html
Note that we provide two passport strategies for validation. The ImfBackendStrategy protects applications bound to Advanced Mobile Access and obtains all of its configuration parameters from VCAP variables, while the ImfResourceStrategy protects unbound applications where configuration parameters should be explicitly configured. The passport strategy encapsulates all of the validation code logic; it will extract the tokens from the request, validate token signature and expiry, and check that the token is intended for your application and not someone else’s. (Otherwise an attacker could just set up his own mobile back-end, obtain tokens and send them to access your resources!)
Propagating Tokens
We’ve covered how tokens flow across most of the calls in the flow diagram from above. The one we are missing is the dashed arrow in the middle — what happens if one of your other Node.js Bluemix Server-side applications wants to make a call in to your mobile back-end? Since we’ve configured the mobile back-end to require tokens, we need to have a token on that call.
There are two options here. The first is to obtain a token representing the node.js service itself. This means that your mobile back-end will simply know that the request it receives is coming from a service it trusts. However, it will not know who the user was that initiated the call, nor will it get any of the token information about the device or application. If you want this information, you have to instead propagate the token to the mobile back-end.
To help with this, we provide a server-side SDK which you can use in your node.js application. The SDK supports both use cases: simple service authentication and propagation. The details are here:
https://www.ng.bluemix.net/docs/#services/mobileaccess/security/resource_server/r_oauth_sdk.html
To obtain a token for your node.js app, use the getAuthorizationHeader() function. This function takes the clientid and client secret from your application’s Bluemix environment variables (VCAP) and uses them to obtain an access token. The token is returned in the form of an authorization header, ready for you to attach to the outgoing request. For propagation, instead use the getAuthorizationHeaderFromIncomingRequest() function, which does exactly what it says — it takes the header from the incoming request for you to easily attach it to the outgoing one.
Token Protocols
We use standards-based mechanisms for sending and receiving tokens over the wire, which are described in this section.
OAuth
The protocol we use to send and receive tokens is called OAuth 2.0. This is an open specification for authorisation, originally designed to allow client applications to access server resources on behalf of a resource owner. The canonical OAuth client is actually a server side application, which communicates with the user via a browser-based interface.
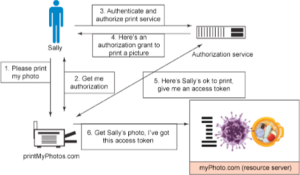
Let’s quickly look at an example of a server-side OAuth application. A user Sally uses a web browser to allow a website printMyPhotos.com to print her photos, which are stored on another website myPhoto.com. Sally does not want to give her myPhoto.com username and password to the printing website; she just wants to grant access to print specific photos. The actors are the Resource Owner, who is the end user that owns the photos, the the OAuth Client, which is the printing website, the Resource Server which hosts the photos, and the Authorisation Server which handles the tokens and authentication. This scenario is shown in the image below.
This is very different from our mobile use case! There is no web browser and no intermediate third party web site — our OAuth client is actually embedded in the mobile app itself. As we will see below, this introduces challenges.
There are actually multiple levels of authentication involved in OAuth. First of all, the OAuth client has to authenticate itself to the authorisation server. In the canonical use case, the authorisation service needs to know that the OAuth client really is the printMyPhotos.com web site and not some other site trying to steal photos. In our mobile use case, the authorisation service needs to know that the OAuth client is a valid instance of our application, and not some other application.
OAuth clients typically authenticate using a Client ID and Client Secret. These are analogous to a username and password — a piece of information identifying who you are, and a piece of secret information proving that you are who you say you are. For the canonical use case, this is relatively safe — there is one Client ID and Client Secret representing the OAuth Client and they are stored securely on the printMyPhotos.com Web server where they are protected and safe. In the mobile use case, however, storing the Client ID and Client Secret in the mobile app is not really secure; it is very hard to protect a secret embedded within a piece of code which you ship to all client devices, since an attacker can easily analyse that code. Moreover, there is no way to distinguish between a legitimate application and one which has simply extracted the secret data from the app. There exist many mobile applications that do work in this manner, where a static Client ID and Client Secret are embedded within the mobile app, however we do not consider this to be secure.
The way that we deliver OAuth Credentials to our mobile applications is during the provisioning stage. When device provisioning occurs, a secret that is specific to that mobile device is generated and issued; this is what is stored on the device and used by the OAuth client. With this mechanism we can be sure that the app in question has been provisioned correctly to the mobile device; more importantly, if the particular credentials are compromised (through, say, malicious software on the device) we can revoke just those credentials without affecting other users.
(In fact, we don’t actually use Client ID and Client Secret for the OAuth credentials. Instead we chose to use cryptography; a public-private key pair is generated and stored on the device, so that the private key never actually leaves the device. The client registers its public key with the server during the provisioning stage, and after successful registration the OAuth Client authenticates using a digital signature).
Open ID Connect (OIDC)
The second token protocol we use is called Open ID Connect. As mentioned above, an OAuth 2 token (known as an access_token), grants authorisation to access a specific resource. OIDC as defined uses the OAuth 2 protocol to send tokens across the wire, and it defines identity tokens; assertions which claim the identity of a specific user. The IBM MobileFirst for iOS tokens use the OIDC format for identity tokens.
Again there are differences in how we use OIDC tokens from the ‘canonical’ Web browser based use case. OIDC was originally written to allow the OAuth Client the ability to validate, in a standard manner, the identity information of end users who authenticate to the authorisation server. The OAuth Client accepts the assertion of identity (by performing a series of checks) and is able to know the identity of the end user, and various assertions about them, without ever having seen his user information; this is not something that the OAuth 2 protocol by itself provides.
We use OIDC for more, in that we use the OIDC token format as our primary format for identity tokens. Not only are they sent to and validate on the mobile app, they are also sent to the resource servers on the token flows described above. In addition, our identity tokens also contain details of the device on which the application is run, and the application instance itself.
Summary
In this article we have described the IBM MobileFirst for iOS (beta) security model at a high level, with pointers on how to configure and use the Advanced Mobile Access service security functionality, the capabilities available, and an explanation of token flows and how the internals work. Feedback is extremely important to us, especially for the beta release, and we are very interested in hearing from you — please do get in touch.
(c)2015 Simon Kapadia, MobileFirst Security Architect, IBM
Inclusive terminology note: The Mobile First Platform team is making changes to support the IBM® initiative to replace racially biased and other discriminatory language in our code and content with more inclusive language. While IBM values the use of inclusive language, terms that are outside of IBM's direct influence are sometimes required for the sake of maintaining user understanding. As other industry leaders join IBM in embracing the use of inclusive language, IBM will continue to update the documentation to reflect those changes.