An overview of using the Ionic Framework with MobileFirst Hybrid Mobile Applications
Raymond Camden May 01, 2016
Ionic MobileFirst_Platform


For the past few weeks, I've been spending a lot of time exploring hybrid mobile applications with IBM MobileFirst. I have a lot of experience with hybrid mobile applications using Cordova, but as a new IBMer, I'm still getting up to speed with MobileFirst. As part of exploration, I did some tests to see how difficult it would be to use the Ionic framework with MobileFirst. If you have not yet heard of Ionic, I strongly urge you to check it out. Ionic provides numerous services that are useful for hybrid developers. These include:
- A UI framework to easily create mobile-friendly designs.
- A UX framework to easily add features common to mobile apps, like "pull to refresh."
- Debugging enhancements to more easily test your apps on devices.
- Visual design services with Ionic Creator.
- And more - head to ionicframework.com for more.
Ionic makes use of Angular, so some Angular experience is definitely required, but you don't need to be an expert. (In fact, I consider myself still somewhat poor at Angular. I'm trying to get better of course. But it has not impacted my use of Ionic!)
So how do we make use of Ionic with a hybrid MobileFirst application? The process involves a few manual steps that I'll walk you through below, but note that fellow IBM Carlos Santana has created starter templates that you can use to skip this process entirely. I still recommend noting what's going on here (and Carlos and I do things a bit differently) just so you can be aware of the changes. You will also need to follow this manual process if you are porting an existing Ionic project to MobileFirst.
I'm assuming you have an existing MobileFirst server set up and that you've created a new hybrid application. If you haven't done so, then go ahead and do that now. I'm also using the MobileFirst command line for this post.
Preparing the Folders
For your first step, go ahead and get rid of the common folder. You can delete it or rename it, it doesn't matter.
Next, you need to create a new Ionic project. By default, Ionic creates a complete Cordova project, but we don't need that. You can tell Ionic to just create the web assets by passing --no-cordova at the command line. Here is an example:
ionic start --no-cordova ioniccode blank
Note that I told it to use a folder called ioniccode and that I asked it to use the blank template. Ionic ships with a few different templates but to keep this guide simpler, we'll use blank. I mentioned earlier that Carlos created templates you can use out of the box and his includes one for each of the default Ionic templates.
Open the folder you just created and you'll see something like the following:
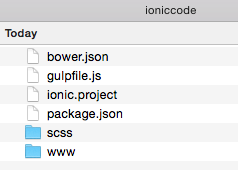
Even with telling Ionic not to create a "full" Cordova project, it will add some files that you won't need for your MobileFirst project. Simply take that www folder and copy it out as common. Your app directory may look something like this now:
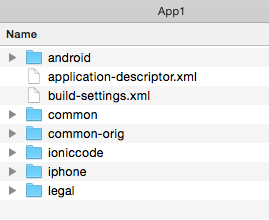
In the shot above, common-orig was the folder MobileFirst created and ioniccode is the Ionic project we just made. (You can delete that.)
Updating the Code
Go ahead and open up your favorite editor and point it to your common folder. We're now going to make a few changes to the Ionic template to make it run properly as a MobileFirst project.
First - remove this line from index.html:
MobileFirst injects in the Cordova JavaScript file automatically.
Next - you need to create a new script to include the MobileFirst initialization code. In theory, you don't need to create a new file, you could just modify Ionic's app.js file, but I like to keep things organized so I'm recommending you make a new file. I called mine wlInit.js to match the "wl" naming style used for most of the MobileFirst JavaScript API. Add a call to load this script in your index.html as well:
index.html file:
1
2
3
4
5
6
7
8
9
10
11
12
13
14
15
16
17
18
19
20
21
22
23
24
25
26
27
28
<!DOCTYPE html>
<html>
  <head>
    <meta charset="utf-8">
    <meta name="viewport" content="initial-scale=1, maximum-scale=1, user-scalable=no, width=device-width">
    <title></title>
    <link href="lib/ionic/css/ionic.css" rel="stylesheet">
    <link href="css/style.css" rel="stylesheet">
    <!-- IF using Sass (run gulp sass first), then uncomment below and remove the CSS includes above
    <link href="css/ionic.app.css" rel="stylesheet">
    -->
    <!-- ionic/angularjs js -->
    <script src="lib/ionic/js/ionic.bundle.js"></script>
    <!-- cordova script (this will be a 404 during development) -->
    <!-- your app's js -->
    <script src="js/app.js"></script>
	<script src="js/wlInit.js"></script>
  </head>
  <body ng-app="starter">
    <ion-pane>
      <ion-header-bar class="bar-stable">
        <h1 class="title">Ionic Blank Starter</h1>
      </ion-header-bar>
      <ion-content>
      </ion-content>
    </ion-pane>
  </body>
</html>
Now open style.css. This is blank (except for a comment) in the Ionic template, but we need to add the following style declaration:
1
2
3
html, body {
    height: 100%;
}
This is required because the application ends up with a 0% height when run under MobileFirst. Odd - but just go with it. (For more details, see this StackOverflow post.)
Now open app.js. In the run() portion there is code that works with the Ionic keyword plugin. For now, we're going to simply disable it.
1
2
3
4
5
6
7
8
9
10
11
12
13
14
15
16
17
18
19
// Ionic Starter App
// angular.module is a global place for creating, registering and retrieving Angular modules
// 'starter' is the name of this angular module example (also set in a <body> attribute in index.html)
// the 2nd parameter is an array of 'requires'
angular.module('starter', ['ionic'])
.run(function($ionicPlatform) {
  $ionicPlatform.ready(function() {
    // Hide the accessory bar by default (remove this to show the accessory bar above the keyboard
    // for form inputs)
	  /*
    if(window.cordova && window.cordova.plugins.Keyboard) {
      cordova.plugins.Keyboard.hideKeyboardAccessoryBar(true);
    }
	*/
    if(window.StatusBar) {
      StatusBar.styleDefault();
    }
  });
})
Ok, so for the last part, we need to create wlInit.js. As I said, this is code that handles initializing MobileFirst stuff. You can copy and paste the contents of initOptions.js and main.js from the original common folder directly into your new file. (And again, this is a personal preference. If you want to keep them in two separate files, that's fine too, just be sure to include them both back in index.html.)
We need to do two more small tweaks. When using Ionic and a "regular" Cordova project, there is a hook that applies a style for Android and iOS. We don't have those hooks under MobileFirst, so we have to do it by hand, but that's easy enough. The MobileFirst JavaScript API has a getEnvironment function that returns information about the running environment. We can use that to sniff iPhone and iPad versus Android. (And again, credit for this goes to Carlos.) The next tweak applies to a styling issue with iOS7. We will modify wlInitOptions to include showIOS7StatusBar.
Here is the entire file with these modifications within wlCommonInit.
1
2
3
4
5
6
7
8
9
10
11
12
13
14
15
16
17
18
19
20
21
22
23
24
25
26
27
28
29
// Uncomment the initialization options as required. For advanced initialization options please refer to IBM MobileFirst Platform Foundation Knowledge Center
 var wlInitOptions = {
	showIOS7StatusBar: false
};
if (window.addEventListener) {
	window.addEventListener('load', function() { WL.Client.init(wlInitOptions); }, false);
} else if (window.attachEvent) {
	window.attachEvent('onload',  function() { WL.Client.init(wlInitOptions); });
}
function wlCommonInit(){
	/*
	 * Use of WL.Client.connect() API before any connectivity to a MobileFirst Server is required.
	 * This API should be called only once, before any other WL.Client methods that communicate with the MobileFirst Server.
	 * Don't forget to specify and implement onSuccess and onFailure callback functions for WL.Client.connect(), e.g:
	 *
	 *    WL.Client.connect({
	 *    		onSuccess: onConnectSuccess,
	 *    		onFailure: onConnectFailure
	 *    });
	 *
	 */
	// Common initialization code goes here
	var env = WL.Client.getEnvironment();
    if(env === WL.Environment.IPHONE || env === WL.Environment.IPAD){
        document.body.classList.add('platform-ios');
    } else if(env === WL.Environment.ANDROID){
        document.body.classList.add('platform-android');
    }
}
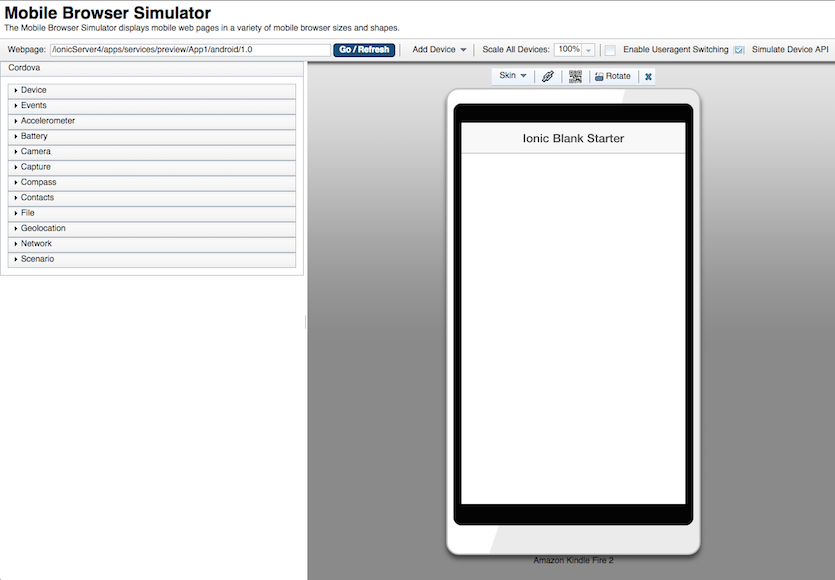
And that's basically it - for now. If you do a quick mfp bd and open your app in the console, you should see Ionic-awesomeness running within MobileFist-epicness.
So, what next? Probably the biggest issue we haven't covered here is properly "bootstrapping" the application. By that I mean, creating a way to delay application logic until both Cordova'a deviceReady event has fired as well as MobileFirst's init process. I've covered that on my blog and will link to it below. Of course, you can skip worrying about that and just get Carlos' templates, but as I said above, you probably want to know a bit about the thinking behind how we do the bootstrapping as well. Of course, one of the biggest benefits of using MobileFirst is the ability to call different adapters. I've got demos showing two of them (Database and HTTP) within the Ionic framework.
Resources
Inclusive terminology note: The Mobile First Platform team is making changes to support the IBM® initiative to replace racially biased and other discriminatory language in our code and content with more inclusive language. While IBM values the use of inclusive language, terms that are outside of IBM's direct influence are sometimes required for the sake of maintaining user understanding. As other industry leaders join IBM in embracing the use of inclusive language, IBM will continue to update the documentation to reflect those changes.