Since Apple recently announced they've achieved over $1B in sales with the Apple Watch and taken over 75% of the smartwatch market, I figured a friendly reminder that you can power the Apple Watch (and other wearable platforms) easily, securely, and efficiently with the IBM MobileFirst Platform can't hurt... All those great features that the MobileFirst Platform brings to your mobile development process are also easily accessible to your wearable apps, including (but not limited to) data adapters, remote logging, operational analytics, push notification management, and more.
In this post I'm going to demonstrate how to consume data from a MobileFirst Adapter to power a recreation of the Stocks app on the Apple Watch. This demonstrates how you can deliver a solution today using WatchOS, and it is also possible to deliver on other wearable platforms platforms including Android Wear using a similar process.
If you're already familiar with consuming data using MobileFirst Adapters, then guess what... consuming data from an Adapter for the Apple Watch is exactly the same as consuming an Adapter in a native iOS project. Since the logic for a WatchKit app is executed in the WatchKit extension, which is actually an executable that runs on the phone, there is no difference between between the two (for WatchOS 1 - the options will be different in WatchOS 2, but the same technique will still apply).
If you aren't familiar with Adapters, they are server-side code that is used to transfer and retrieve information from back-end systems to client applications and cloud services. You can write them in either Java or JavaScript, they can be consumed in any MobileFirst app, and they offer security, data transformation, and reporting metrics out of the box.
In the video below I walk through the process of recreating the Apple Watch Stocks app using data delivered from a MobileFirst Platform Foundation server instance. The data is simulated, so don't use it for any investments. :)
The basic process was this: build out the Apple Watch apps user interface in Xcode/Interface Builder, build the adapters to expose the data, then start consuming the data within the WatchKit extension to deliver it to the watch app interface.
Full source code for this project is available at: https://github.com/triceam/MobileFirst-WatchKit/tree/master/Stocks
The User Interface
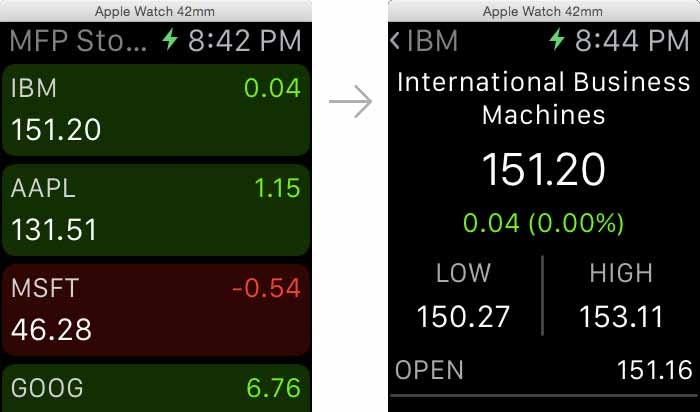
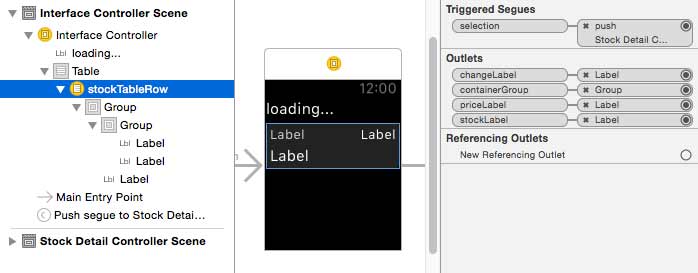
So, lets first look at the app interface. I have two views that were built in Interface Builder. One is a table that displays rows of data, one is a details screen which has lots of labels used to display data.
In the main interface I have a "loading..." label (that is hidden once the data is loaded) and a table that is used to display data. For each row in the table there are 3 labels to display specific data fields. These were connected to IBOutlet references in the view controller class. All of these are straightforward WatchKit development practices. Be sure to check out the WKInterfaceTable class reference for more detail on working with WatchKit tables.
For displaying the details screen, I also used very similar pattern. I added labels for displaying data, and linked them to IBOutlet references in my view controller so I can change their values once the data is loaded.
Serving Data
Loading data into a WatchKit extension is identical to making a request to the MobileFirst server adapter from a native iOS app, which can be done in either Objective-C or Swift.
So, here's how we can create an adapter using the MobileFirst Command Line Interface. Use the "mfp add adapter" command and follow the prompts to create a new Adapter. The one I created in this sample is a HTTP Adapter that I modified to return stub data:
$ mfp add adapter
[?] What do you want to name your MobileFirst Adapter? StocksAdapter
[?] What type of adapter would you like?
 Cast Iron
❯ HTTP
 Java
 JMS
 SAP JCo
 SAP Netweaver Gateway
 SQL
 [?] Create procedures for offline JSONStore? No
 A new sql Adapter was added at /Users/andrewtrice/Documents/dev/MobileFirst-Stocks/server/MFStocks/adapters/StocksAdapter
Adapters can be used to easily connect back end systems to mobile clients. You can quickly and easily expose data from a relational database, or even consume data from http endpoints and easily serialize it into a more compact mobile-friendly format. You should definitely read more about MobileFirst adapters through the platform documentation for more detail.
What's also great about the MobileFirst platform is that you get operational analytics for all adapters out of the box, with no additional configuration. You can see the number of requests, data payload sizes, response times, devices/platforms used to consumes, and much more. Plus, you can also remotely access client log messages from the mobile devices. Take a look at the screenshots below for just a sample (these are from my dev instance on my laptop):
[gallery ids="15070,15071,15072"]
All of the data I am displaying is simulated. I'm not actively pulling from a relational database or live service. However, you could use a very similar method to connect to a live data repository.
I exposed two pretty basic procedures on the MobileFirst server: getList - which returns a stripped down list of data, and getDetail - which returns complete data for a stock symbol:
Once these are deployed to the server using the CLI "mfp bd" command, you can invoke the adapter procedures from a client application, regardless of whether it is native iOS, native Android, or hybrid application.
Consuming the Data
OK, now we're back to the native iOS project. In either Objective-C or Swift you can invoke an adapter directly using the WLResourceRequest or invokeProcedure mechanisms. In my sample I used the WLResoruceRequest API so that I could leverage code blocks to define the response/failure handlers directly inline in my code. So, in my code, I invoke the adapters like so:
1
2
3
4
5
6
7
8
9
10
11
12
13
14
[objc]-(void)getList:(void(^)(NSArray*))callback{NSURL*url=[NSURLURLWithString:@"/adapters/StockAdapter/getList"];WLResourceRequest*request=[WLResourceRequestrequestWithURL:urlmethod:WLHttpMethodGet];</p>[requestsendWithCompletionHandler:^(WLResponse*response,NSError*error){if(error!=nil){//you should do better error handling than thiscallback(nil);}else{NSDictionary*responseJSON=response.responseJSON;callback([responseJSONobjectForKey:@"stocks"]);}}];}
Once you have the data within the WatchKit extension, we can use it to update the user interface.
For the data table implementation, you simply need to set the number of rows, and then loop over the data to set values for each row based on the WKInterfaceTable specification.
For the detail screen we're also doing things even more straightforward. When the screen is initialized, we request detail data from the server. Once we receive that data, we're simply assigning label values based upon the data that was returned.
[self.nameLabelsetText:[stockDataobjectForKey:@"name"]];NSNumber*change=[stockDataobjectForKey:@"change"];NSNumber*price=[stockDataobjectForKey:@"price"];NSNumber*high=[stockDataobjectForKey:@"high"];NSNumber*low=[stockDataobjectForKey:@"low"];NSNumber*high52=[stockDataobjectForKey:@"high52"];NSNumber*low52=[stockDataobjectForKey:@"low52"];NSNumber*open=[stockDataobjectForKey:@"open"];NSNumber*eps=[stockDataobjectForKey:@"eps"];floatpercentChange=[changefloatValue]/[pricefloatValue];[self.priceLabelsetText:[NSStringstringWithFormat:@"%-.2f",[pricefloatValue]]];[self.changeLabelsetText:[NSStringstringWithFormat:@"%.02f (%.02f%%)",[changefloatValue],percentChange]];if([changefloatValue]>0.0){[self.changeLabelsetTextColor:[UIColorgreenColor]];}elseif([changefloatValue]<0.0){[self.changeLabelsetTextColor:[UIColorredColor]];}else{[self.changeLabelsetTextColor:[UIColorwhiteColor]];}//update change with percentage[self.highLabelsetText:[NSStringstringWithFormat:@"%-.2f",[highfloatValue]]];[self.lowLabelsetText:[NSStringstringWithFormat:@"%-.2f",[lowfloatValue]]];[self.high52LabelsetText:[NSStringstringWithFormat:@"%-.2f",[high52floatValue]]];[self.low52LabelsetText:[NSStringstringWithFormat:@"%-.2f",[low52floatValue]]];[self.openLabelsetText:[NSStringstringWithFormat:@"%-.2f",[openfloatValue]]];[self.epsLabelsetText:[NSStringstringWithFormat:@"%-.2f",[epsfloatValue]]];[self.volLabelsetText:[stockDataobjectForKey:@"shares"]];
Inclusive terminology note: The Mobile First Platform team is making changes to support
the IBM® initiative to replace racially biased and other discriminatory language in our code and content
with more inclusive language. While IBM values the use of inclusive language, terms that are outside of
IBM's direct influence are sometimes required for the sake of maintaining user understanding. As other
industry leaders join IBM in embracing the use of inclusive language, IBM will continue to update the
documentation to reflect those changes.


 In the main interface I have a "loading..." label (that is hidden once the data is loaded) and a table that is used to display data. For each row in the table there are 3 labels to display specific data fields. These were connected to IBOutlet references in the view controller class. All of these are straightforward WatchKit development practices. Be sure to check out the WKInterfaceTable class reference for more detail on working with WatchKit tables.
 For displaying the details screen, I also used very similar pattern. I added labels for displaying data, and linked them to IBOutlet references in my view controller so I can change their values once the data is loaded.
