Integrating MQA into Xamarin.Android app
Vidyasagar MSC May 01, 2016
Android MobileFirst_Quality_Assurance MobileFirst_Platform Xamarin


It all started when I received an email seeking help on using MQA or to be more precise integrating MQA into Xamarin based android app. Before jumping into addressing the problem, let's define MQA.
What is MQA?
MQA stands for "Mobile Quality Assurance" and is part of the IBM MobileFirst Platform.
IBM MQA provides line of business professionals and development teams with insightful and streamlined quality feedback and metrics from both pre-production and production, enabling them to prioritize and take action to support a dynamic mobile app strategy.
The Features of MQA are
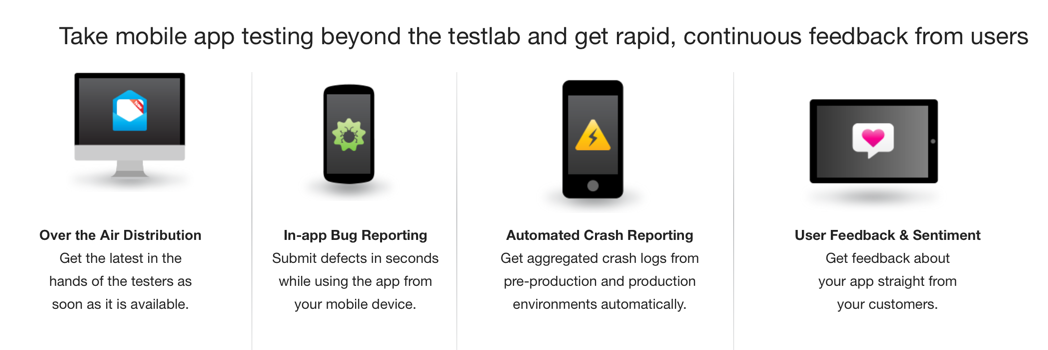
Note: To understand more about MQA, visit IBM Mobile Quality Assurance
So, by now we should be good with the first part of our blog title that is MQA. So, the next question is
What is Xamarin.Android?
Xamarin is a platform to create native iOS, Android, Mac and Windows apps in C#. Xamarin.Android allows us to create native Android applications using the same UI controls we would in Java, except with the flexibility and elegance of a modern language (C#).
As we are good with the definitions, let's address the problem.
What's the problem in integrating MQA into Xamarin Android app?
At the time of this blog post, the available MQA SDKs are iOS native SDK, Android native SDK and Javascript SDK.
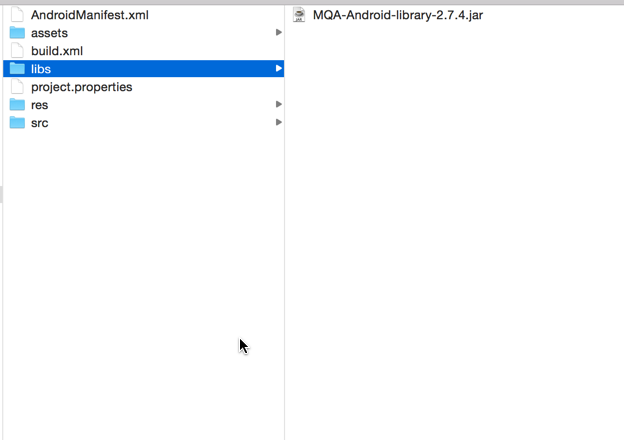
So, we have to find a workaround to address this use-case. The initial step is to download the Android MQA SDK and see what's provided. you can download it from here. Once successfully downloaded and unzipped, we should see a jar file namely MQA-Android-library-
As Xamarin is C# based, What can we do with this jar file?
We have Xamarin bindings to our rescue, which helps using in consuming .JARs from C#.
Note: Steps to consume MQA Android JAR in a Xamarin.Android app is mentioned here
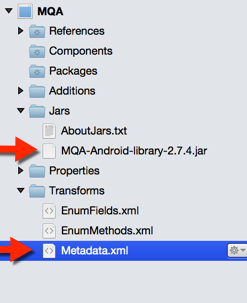
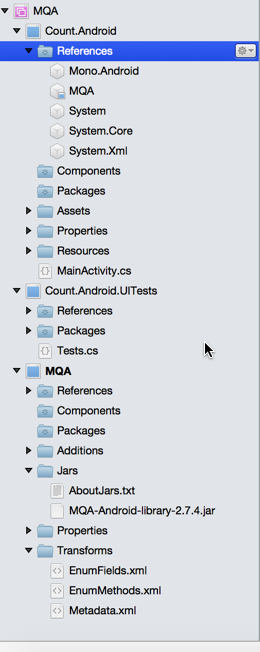
The files of our interest here are MQA-Android-library-2.7.4.jar (Version number may vary) and Metadata.xml.
- MQA-Android-library-2.7.4.jar file will have all the MQA related classes and methods required for us to start an Android MQA session.
- Metadata.xml- Allows changes to be made to the final API, such as changing the namespace of the generated binding.
Based on the errors thrown while building the project, Metadata.xml in my case looks like this:
1
2
3
4
5
6
7
8
9
10
11
12
13
14
15
16
17
<metadata>
  <!--
    This sample removes the class: android.support.v4.content.AsyncTaskLoader.LoadTask:
  <remove-node path="/api/package[@name='android.support.v4.content']/class[@name='AsyncTaskLoader.LoadTask']" />
  This sample removes the method: android.support.v4.content.CursorLoader.loadInBackground:
  <remove-node path="/api/package[@name='android.support.v4.content']/class[@name='CursorLoader']/method[@name='loadInBackground']" />
  -->
<remove-node path="/api/package[@name='ext.com.google.inject.spi']/class[@name='InjectionPoint.Factory.1']"/>
  <remove-node path="/api/package[@name='ext.com.google.inject.spi']/class[@name='InjectionPoint.Factory.2']"/>
  <remove-node path="/api/package[@name='com.applause.android.log']/interface[@name='LoggerInterface']"/>
  <remove-node path="/api/package[@name='ext.com.google.inject.internal']"/>
  <remove-node path="/api/package[@name='ext.com.google.inject.matcher']"/>
  <remove-node path="/api/package[@name='com.applause.android.util']/class[@name='AbstractRequest']"/>
  <remove-node path="/api/package[@name='ext.com.google.inject.spi']/class[@name='Elements.RecordingBinder']/method[@name='bind' and count(parameter)=1 and parameter[1][@type='ext.com.google.inject.Key']]"/>
<attr path="/api/package[@name='com.applause.android.messages']/class[@name='Message']/field[@name='message']" name="managedName">Message1</attr>
<attr path="/api/package[@name='com.applause.android.log']" name="managedName">log</attr>
</metadata>
Now, let's start MQA android session in our Count.Android app. Before doing this, we should create a MQA service on IBM Bluemix. You can follow the instructions mentioned at Getting started with Mobile Quality Assurance- Bluemix or watch this video.
Starting a Mobile Quality Assurance session with the Android SDK entails three steps. First, build a configuration to define how Mobile Quality Assurance works with your app. Second, start the session itself. Third, add tracking to your activities. Open MainActivity.cs file (Android Project) and paste the code provided below:
using System;
using Android.App;
using Android.Content;
using Android.Runtime;
using Android.Views;
using Android.Widget;
using Android.OS;
//MQA references
using Com.Ibm.Mqa.Config;
using Com.Ibm.Mqa;
namespace Count.Android
{
	[Activity (Label = "Count.Android", MainLauncher = true, Icon = "@drawable/icon")]
	public class MainActivity : Activity
	{
		int count = 1;
		//Use your own generated APP KEY
		const string APP_KEY="1g59b7d884f9fdf5426162e5cb1f87a700648bce4fg0g1g379e0d3a";
		protected override void OnCreate (Bundle bundle)
		{
			base.OnCreate (bundle);
			//MQA Android session configuration
			Configuration configuration = new Configuration.Builder(this)
				.WithAPIKey(APP_KEY) //Provides the quality assurance application APP_KEY
				.WithMode(MQA.Mode.Qa) //Selects the quality assurance application mode
				.WithReportOnShakeEnabled(true) //Enables shake report trigger
				.WithDefaultUser("default_user@email.com") //Sets a default user and user selection
				.Build();
			//Starting MQA Android Session
			MQA.StartNewSession (this, configuration);
			// Set our view from the "main" layout resource
			SetContentView (Resource.Layout.Main);
			// Get our button from the layout resource,
			// and attach an event to it
			Button button = FindViewById<Button> (Resource.Id.myButton);
			button.Click += delegate {
				button.Text = string.Format ("{0} clicks!", count++);
			};
		}
	}
}
Now, MQA is integrated into Xamarin.Android app and we are good to go. What we have implemented above is just a drop in the Ocean of MQA, to know more about MQA and its features - Visit MQA Knowledge Centre
Happy Coding!Inclusive terminology note: The Mobile First Platform team is making changes to support the IBM® initiative to replace racially biased and other discriminatory language in our code and content with more inclusive language. While IBM values the use of inclusive language, terms that are outside of IBM's direct influence are sometimes required for the sake of maintaining user understanding. As other industry leaders join IBM in embracing the use of inclusive language, IBM will continue to update the documentation to reflect those changes.