Getting Started With IBM MobileFirst and Node.js APIs built with LoopBack
Andrew Trice August 17, 2016
StrongLoop LoopBack MobileFirst_Platform Node.js


IBM recently announced the acquisition of StrongLoop, creators of the LoopBack enterprise Node.js framework and active contributors to the Node.js community.

Developers need the ability to rapidly integrate data sources and build the API infrastructure required to deliver great app experiences. The acquisition of StrongLoop helps IBM provide tools that enable rapid and efficient delivery on this ability. StrongLoop's LoopBack framework and composer tools enable developers to build APIs that expose data from back-end systems with minimal effort. Not only does it enable rapid API creation, but it also allows developers to tie into the rich Node.js ecosystem to leverage existing community code and assets to include in their projects.
MobileFirst Platform Foundation Server has been able to manage APIs delivered on Node.js since version 7.0, including both user authentication, app management, and analytics collection.
This gives developers the freedom to mix and match services across technologies, including the best each platform has to offer, all managed by the MobileFirst Platform Foundation infrastructure. It also gives developers the option to reuse existing community, resources, and skills across two of most popular languages among developers. Node.js and Java are the two most common languages on GitHub.
Put the two of these together, and it means that you are able to create and deliver secure and reliable applications faster, and more efficiently.
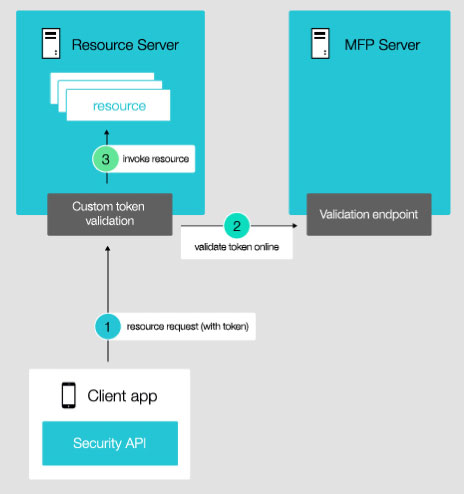
How it works
The mobile client application makes a request to the protected resource on the Node.js server. The Node.js server will validate that the user's auth tokens are valid with the MobileFirst Platform Foundation server.
If the authenitcation is valid, the Node.js service will handle the request and return results as appropriate.
If the auth token is not valid, then the Node.js service returns a HTTP 401 Unauthorized response.
Why
This gives you the ability to manage service interactions within your app in a single place - the MobileFirst Platform Foundation server. The MobileFirst integration provides authentication and app management, and also hooks into the same analytics engine used when invoking a MFP adapter. This gives you the flexibility to reuse resources from existing platforms and communities without compromise, plus you get the added bonus of shorter time from concept to delivery.
Setting Up The Server
This works on any Node.js resource, so you can protect an app built using the Express.js framework as easily has you can protect an API developed using StrongLoop's LoopBack framework.
For an overview of StrongLoop's LoopBack framework, be sure to check out this related example that demonstrates how you can quickly and easily build a LoopBack API on top of IBM Cloudant.
The following assumes that you already have a LoopBack API in place on Node.js and a MFP server with authentication configured (based on the Cloudant sample mentioned above). If you don't have a LoopBack API in place yet, start here. If you don't have authentication on a MobileFirst Platform Foundation Server, be sure to check out the "MobileFirst Authentication" section below.
From a command line terminal cd into the directory containing your Node.js project, and use npm to install the Passport Strategy for IBM MobileFirst.
npm install passport-mfp-token-validationNext, open up the LoopBack application's server/server.js file in a text/JavaScript editor.
First you'll need to add the passport and MFP strategy for use within the server.js file.
1
2
var passport = require('passport-mfp-token-validation').Passport;
var mfpStrategy = require('passport-mfp-token-validation').Strategy;
Next, configure and initialize passport for use with your existing LoopBack app. The publicKeyServerUrl value is that of your MobileFirst Platform Foundation Server project. The analytics URL will be that of your MobileFirst analytics server, with the appropriate credentials.
In the sample below, I have a project called "MobileFirstLoopBack", which was created using the CLI command "mfp create MobileFirstLoopBack".
1
2
3
4
5
6
7
8
9
10
11
passport.use(new mfpStrategy({
    publicKeyServerUrl:'http://localhost:10080/MobileFirstLoopBack',
    analytics : { // The analytics item is optional and only required if you wish to log analytics events to MFP.
    	onpremise: {
    		url : 'http://localhost:10080/analytics-service/data',
    		username : 'admin',
    		password : 'admin'
		}

}));
app.use(passport.initialize());
Next, we'll add some helper functions to keep things simple. The cont function is simply a callback to the LoopBack/Express.js next() function, which invokes the next step of the API request chain. Calling next() after the authentication request is very important, otherwise the generated service endpoint will be overwritten. The auth function is a helper function to simplify authentication of endpoints. You pass in the security realm string to which you want to authenticate.
1
2
3
4
5
6
7
8
9
var cont = function(req, res){
    next();
};
var auth = function(scope) {
    return passport.authenticate('mobilefirst-strategy', {
        session: false,
        scope: scope
    });
}
With these helper functions in place we are now ready to protect endpoints. You can globally protect all api endpoints, or you have the flexibility to protect individual REST method endpoints with different authentication realms.
1
2
3
4
5
6
7
8
9
10
//globally protect everything under "/api" with a single authentication realm
app.use('/api', auth('MyAuthRealm'), cont)
//OR protectect all API endpoints for a particular path
//globally protect everything under "/api" with a single authentication realm
app.use('/api/Companies', auth('CompaniesRealm'), cont);
//OR protect individual REST endpoints with different auth realms
app.get('/api/Employees', auth('GetRealm'), cont);
app.put('/api/Employees', auth('UpsertRealm'), cont);
app.post('/api/Employees', auth('UpsertRealm'), cont);
app.delete('/api/Employees/:id', auth('DeleteRealm'), cont);
1
2
3
4
5
6
7
8
9
10
11
12
13
14
15
16
17
18
19
20
21
22
23
24
25
26
27
28
29
30
31
32
33
34
35
36
37
38
39
40
41
42
43
44
45
46
47
48
var loopback = require('loopback');
var boot = require('loopback-boot');
var passport = require('passport-mfp-token-validation').Passport;
var mfpStrategy = require('passport-mfp-token-validation').Strategy;
var app = module.exports = loopback();
passport.use(new mfpStrategy({
    publicKeyServerUrl:'http://localhost:10080/MobileFirstLoopBack',
    analytics : { // The analytics item is optional and only required if you wish to log analytics events to MFP.
    	onpremise: {
    		url : 'http://localhost:10080/analytics-service/data',
    		username : 'admin',
    		password : 'admin'
		}
	}
}));
app.use(passport.initialize());
// Helper functions
var cont = function(req, res){
    next();
};
var auth = function(scope) {
    return passport.authenticate('mobilefirst-strategy', {
        session: false,
        scope: scope
    });
}
//protect everything under "/api/Companies" with a single authentication realm
app.use('/api/Companies', auth('CompaniesRealm'), cont);</p>
//protect different REST endpoints with different authentication realms
app.get('/api/Employees', auth('GetRealm'), cont);
app.put('/api/Employees', auth('UpsertRealm'), cont);
app.post('/api/Employees', auth('UpsertRealm'), cont);
app.delete('/api/Employees/:id', auth('DeleteRealm'), cont);</p>
app.start = function() {
  // start the web server
  return app.listen(function() {
    app.emit('started');
    console.log('Web server listening at: %s', app.get('url'));
  });
}
// Bootstrap the application, configure models, datasources and middleware.
// Sub-apps like REST API are mounted via boot scripts.
boot(app, __dirname, function(err) {
  if (err) throw err;
  // start the server if `$ node server.js`
  if (require.main === module)
    app.start();
});
Calling Protected APIs from the Client App
From the client-side mobile application, you can invoke these protected APIs the exact same way that you might invoke a call to a MobileFirst adapter. After authenticating a user, you make a request to the protected resource using the WLResourceRequest API. The only difference is that you use the full URL to the proetected Node.js resource instead of a URL to a MobileFirst adapter.
Again, If you don't have authentication on a MobileFirst Platform Foundation Server you will need it to call these protected services. Be sure to check out the "MobileFirst Authentication" section below to get started with MobileFirst authentication.
In a HTML/Hybrid implementation, you would use the WLResourceRequest api:
1
2
3
4
5
6
7
8
9
10
var url = "http://myserver/api/Companies";
var request = new WLResourceRequest(url, WLResourceRequest.GET);
request.send().then(
  function(response){
    //do something with successful response
  },
  function(error){
    //handle error
  }
);
For iOS applications, you call the WLResourceRequest sendWithURL method. This can be done in either Objective-C or Swift. An Objective-C snipped is shown below:
1
2
3
4
5
6
7
8
9
NSURL* url = [NSURL URLWithString:@"http://myserver/api/Companies"];
WLResourceRequest* request = [WLResourceRequest requestWithURL:url method:WLHttpMethodGet];
[request sendWithCompletionHandler:^(WLResponse *response, NSError *error) {
  if(error) {
    //handle error
  } else {
    //do something with successful response
  }
}];
For native Android applications, you would use the WLResourceRequest Java API, as shown in the next snippet:
1
2
3
4
5
6
7
8
9
10
WLResourceRequest req = new WLResourceRequest(new URI("http://myserver/api/Companies"), WLResourceRequest.GET);
req.send(new WLResponseListener(){
  @Override
 public void onSuccess(WLResponse response) {
    //do something with successful response
  }
  @Override
  public void onFailure(WLFailResponse response) {
    //handle error
  }});
MobileFirst Authentication
If you aren't already familiar with setting up authentication realms here are a few resources to get started.
- MobileFirst Authentication & Security
- MobileFirst Form-based authentication
- Using the MobileFirst Server to authenticate external resources
The easiest way to setup and test user authentication for a Node.js service is to first setup a form-based authentication sample and make sure it is working for a MobileFirst Adapter on the MFP server. Once you have guaranteed that authentication is working between the client application and the MFP server, then you can simply swap out the URL in the WLResourceRequest invocation with that of your protected resource on the Node.js server.
Related Content
For more information, be sure to check out these resources:
Inclusive terminology note: The Mobile First Platform team is making changes to support the IBM® initiative to replace racially biased and other discriminatory language in our code and content with more inclusive language. While IBM values the use of inclusive language, terms that are outside of IBM's direct influence are sometimes required for the sake of maintaining user understanding. As other industry leaders join IBM in embracing the use of inclusive language, IBM will continue to update the documentation to reflect those changes.