Hybrid Mobile Development and MobileFirst 7.1 - Increasing the Awesome
Raymond Camden May 01, 2016
MobileFirst_Platform


Working with hybrid mobile apps and MobileFirst 7.0 was a bit complex as the process was somewhat removed from what Cordova developers were used to. The good news is that MobileFirst 7.1 makes it dramatically easier to integrate hybrid mobile apps. As a hybrid mobile developer myself, this was music to my ears.
In this post, I'll briefly describe how this process has been updated and how to get started. You can find a deeper installation guide here: Setting up the MobileFirst development environment. I'm going to assume you've downloaded MobileFirst and got the command line interface installed. (That's what the cool kids use - honest.) I'm also assuming you've got a server up and running locally on your machine. Now let's discuss how you can start working with hybrid mobile apps.
Creating a Project
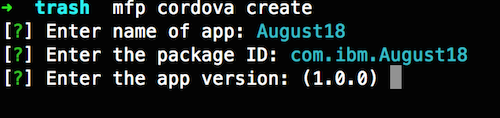
To create a new hybrid project, you begin by running mfp cordova create. You’ll be prompted for the name and given a default package ID and version:
Next you’ll be prompted to select platforms. Like any other Cordova project, you can change this later.
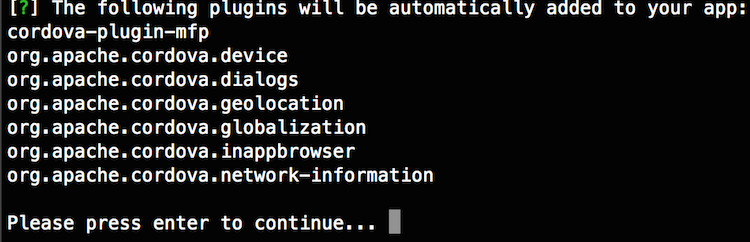
Next, the CLI lets you know that some plugins are installed by default. These plugins are required for Cordova apps running with MobileFirst:
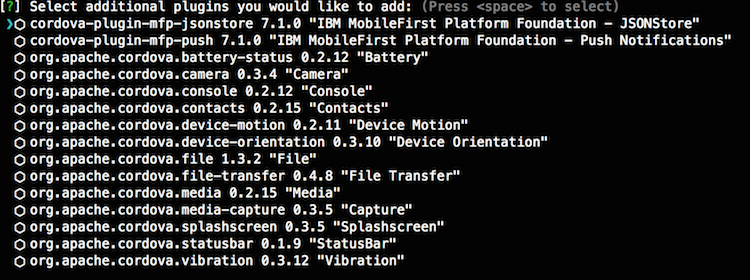
Now the CLI prompts you about other plugins you may want to install. Note that you can easily add, remove, and list plugins later on so don’t stress too much over this.
Finally, the CLI prompts you to select a template to use for your app. You can pass in other templates via the -t argument and you’ll see this in action tomorrow when I blog about Ionic:

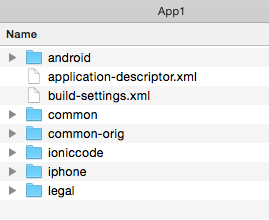
At this point, the CLI will start generating your project as well as push a copy to your MobileFirst server. If everything went well, the last thing you’ll see is: “MFP Cordova project created successfully.” Let’s look at the folder created by the CLI.
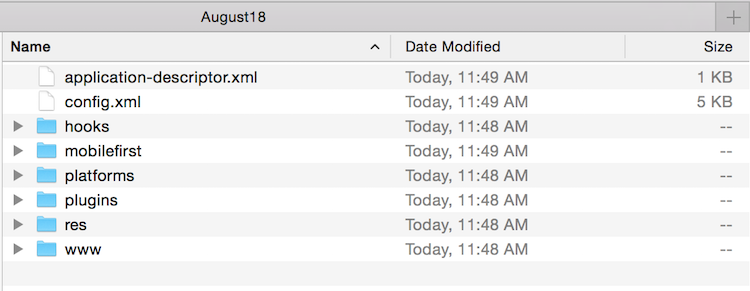
For the most part, this should look very similar to a regular Cordova project. Notable differences include:
- application-descriptor.xml: This allows you to tweak some settings for the application under MobileFirst. In general, you won’t need to tweak this and when you do, do not edit it by hand, use mfp config.
- mobilefirst: The files in this folder are what get pushed up to the MobileFirst server. You won’t need to mess with this.
And that’s it – the rest of this is vanilla Cordova stuff.
Working with the MobileFirst/Cordova Project
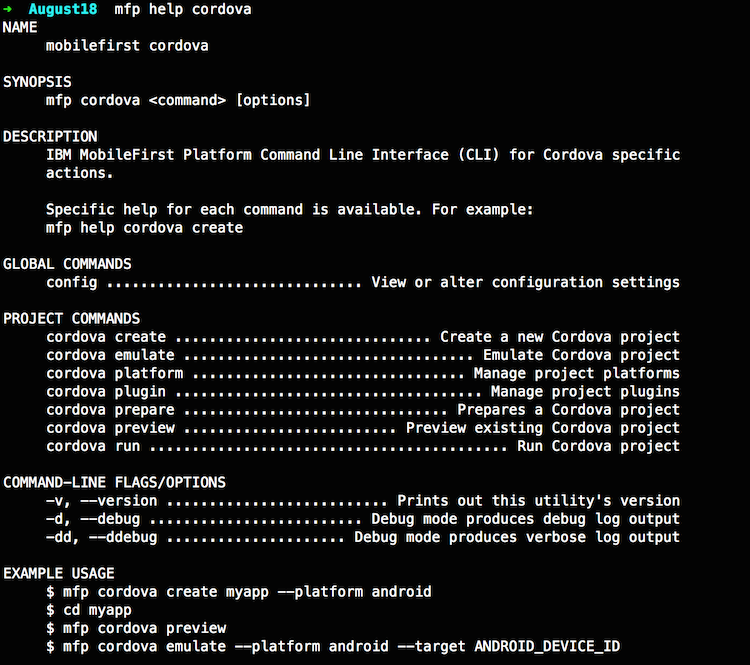
So now that you’ve got a project, how do you use it? The MobileFirst CLI wraps calls to the Cordova CLI, much like Ionic does. So for example, to add a platform, you would do: mfp cordova platform add android. In general, the commands are very similar, but sometimes there are small differences. So for example, to emulate, you need to pass a -p flag: mfp cordova emulate -p ios. In this case, -p stands for platform. You can easily see the syntax by typing mfp help cordova:
So the process to code/test is pretty similar. You can open up the www folder, edit, and then see your changes by doing: mfp cordova emulate -p ios:
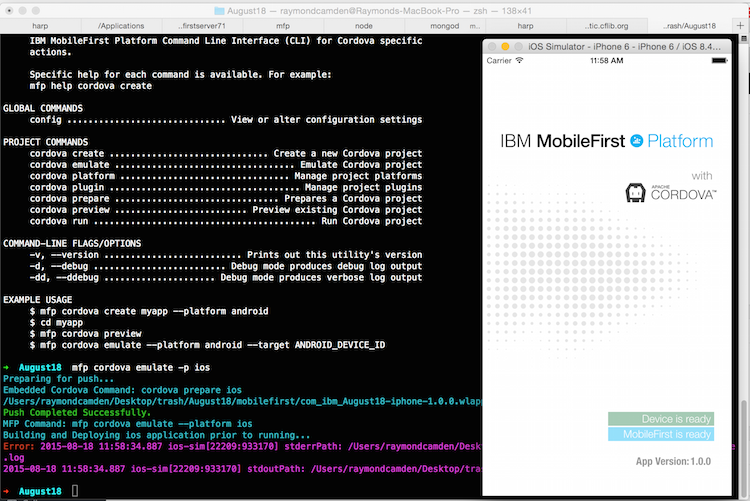
At the time I write this blog post, we have a small bug with the CLI that impacts this process. When working with a MobileFirst server, you need to deploy the bits to the server so it is aware of it. (There’s more reasons than that, but let’s keep it simple for now.) That command is: mfp push. The emulate command is supposed to do a push automatically, but right now it does not. Again, this is a bug, and a known one that is already being worked on. (I’ll try to remember to edit this post once the fix is released.) For now, I recommend doing both commands at once. In OSX, this would be: mfp push && mfp cordova emulate -p ios. You could automate all of this with Grunt/Gulp of course.
Outside of that – you’re done. Build your app. Make use of the cool features of MobileFirst, iterate, deploy, and be successful.
Migrating an Existing Application
So what do you do if you’ve got an existing application? First, begin by creating a new MFP Cordova project as I outline above. You’ll want to match the ID and application name. You can also tell the CLI to install the plugins your app needs, but if you forget, you can always add the plugins later. You can then simply copy the www folder from your existing project into the new MFP www folder.
Ok, so at this point, you need to make one very small tweak to your application code. As you know, Cordova applications need to wait for the deviceready event before they do anything related to the device itself. Most folks treat deviceready as their main application “bootstrap” – i.e., they don’t really do squat till after it has fired.
In a MFP Cordova application, you have another event as well – the initialization of the MobileFirst client-side framework. By default, your code can (probably should) have a function called wlCommonInit. When this function is run, you can then do “MobileFirst stuff”, much like how deviceready implies device readiness. You can simply include this function in your application so you can begin doing things like remote logging, or other utilities. Here is an example:
1
2
3
4
5
6
7
8
function wlCommonInit(){

}

document.addEventListener("deviceready", init, false);
function init() {

}
If you use the default MFP Cordova project, you’ll see some additional bits:
1
2
3
4
5
6
7
8
9
10
var Messages = {
    // Add here your messages for the default language.
    // Generate a similar file with a language suffix containing the translated messages.
    // key1 : message1,
};

var wlInitOptions = {
    // Options to initialize with the WL.Client object.
    // For initialization options please refer to IBM MobileFirst Platform Foundation Knowledge Center.
};
These are optional and can be left out if you don’t need them.
And that’s it. Heck, technically you don’t even need wlCommonInit, it won’t throw an error without it, but the assumption here is that you actually want to use MobileFirst.
Inclusive terminology note: The Mobile First Platform team is making changes to support the IBM® initiative to replace racially biased and other discriminatory language in our code and content with more inclusive language. While IBM values the use of inclusive language, terms that are outside of IBM's direct influence are sometimes required for the sake of maintaining user understanding. As other industry leaders join IBM in embracing the use of inclusive language, IBM will continue to update the documentation to reflect those changes.