Multi-line GCM notification in Android
Vivin Krishnan May 01, 2016
Android Push_notifications MobileFirst_Platform


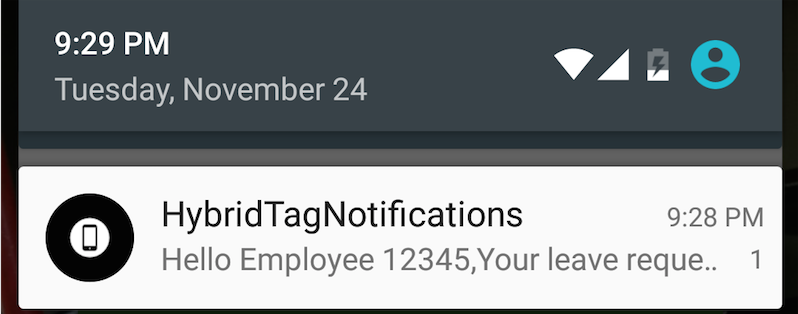
Isn’t it frustrating that even with a big screen Android phone, you cannot read a Google Cloud Messaging (GCM) push notification send from MobileFirst server , in its entirety in the notification shade. Changing the orientation to landscape does not help as this has no effect on the notification shade in your Android phone. You quickly want to copy a coupon code or OTP (One time password) but cannot, since you do not see the complete text.
Take the example of an office that sends out leave approval status as push notifications. You are looking forward to a leave approval to start a much postponed vacation. With great anticipation you check the notification in your Android device’s notification shade and see this:
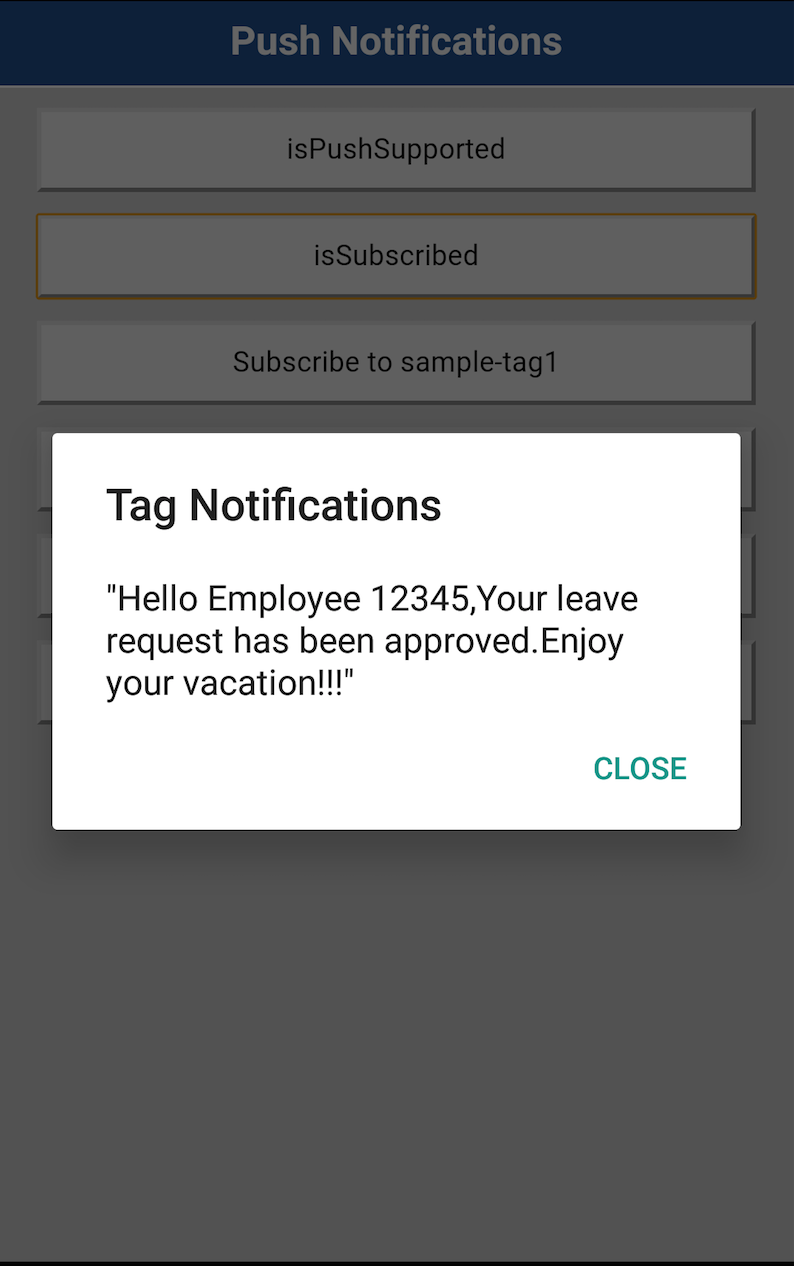
How frustrating that you have to launch the application to see the rest. When the application launches , you see the lines you have been waiting for.
How good it would have been if the notification showed the complete text and wraps it to fit device width. Starting Android API Level 16 this can be achieved using the BigText style for notification. Here is how you do it:
The key is to override the default implementation of GCMIntentService in your Android project. Navigate to the Android Project generated by MobileFirst in your workspace.
Open “src/com/yourapplication/GCMIntentService.java”.
Override the default notify methods by adding your own.
1
2
3
4
5
6
7
8
9
10
11
12
13
14
15
16
17
18
19
20
21
22
23
24
25
26
27
28
29
30
31
32
33
34
35
36
37
38
39
40
41
42
43
44
45
46
47
@Override
    public void notify(Context context, String alert, int badge, String sound,
            Intent intent) {

        Notification notification = createNotification(context, alert, getNotificationTitle(context), alert, badge, true, 0, intent);

        NotificationManager notificationManager = (NotificationManager) context
                .getSystemService(Context.NOTIFICATION_SERVICE);
        notificationManager.notify(1, notification);

    }

    @Override
    public void notify(Context context, String tickerText) {

        Notification notification = createNotification(context, tickerText, getNotificationTitle(context), tickerText, 0, true, 0, null);

        NotificationManager notificationManager = (NotificationManager) context
                .getSystemService(Context.NOTIFICATION_SERVICE);
        notificationManager.notify(1, notification);
    }

    @Override
    public void notify(Context context, Message message, Intent intent) {
        JSONObject props= message.getProps();
        String alert="";
        int badge=0;
        int priority=0;

        try {
            alert=props.getString("alert");
            badge=props.getInt("badge");
            priority=props.getInt("priority");

        } catch (JSONException e1) {
            // TODO Auto-generated catch block
            e1.printStackTrace();
        }

        Notification notification = createNotification(context, alert, getNotificationTitle(context), alert , badge , true, priority, intent);

        NotificationManager notificationManager = (NotificationManager) context
                .getSystemService(Context.NOTIFICATION_SERVICE);

        notificationManager.notify(1, notification);
    }
}
Implement the createNotification method in which you will define your notifications to be of BigText style:
1
2
3
4
5
6
7
8
9
10
11
12
13
14
15
16
17
18
19
20
21
22
23
24
private Notification createNotification(Context context, String ticker, String title, String msg, int badge, boolean bridge, int priority, Intent intent) {
    int icon = RES_PUSH_NOTIFICATION_ICON;
    long when = System.currentTimeMillis();
    Notification notification = null;

    PendingIntent pendingIntent = PendingIntent.getActivity(context, 0, intent, PendingIntent.FLAG_UPDATE_CURRENT);

    Notification.Builder notificationBuilder = new Notification.Builder(this)
                                    .setSmallIcon(icon)
                                    .setTicker(ticker)
                                    .setWhen(when)
                                    .setContentTitle(title)
                                    .setContentText(msg)
                                    .setStyle(new Notification.BigTextStyle().bigText(msg))
                                    .setContentIntent(pendingIntent);

    notification = notificationBuilder.build();
    notification.priority = priority;

    notification.number = badge;
    notification.flags |= Notification.FLAG_AUTO_CANCEL;

    return notification;
}
For more details on the Notification styles available, refer the Android documentation.
Thats’all. Run your application and try sending a rather long text in your GCM notification. Your leave approval status should now look like:
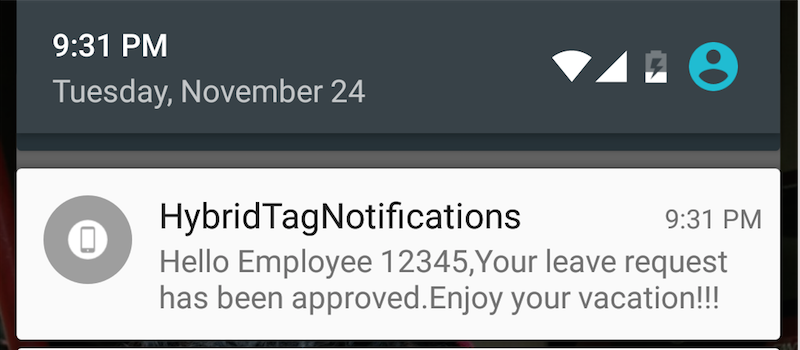
You now see the complete notification in your notification shade, wrapped to fit the device width. Note that, the override will apply to all incoming GCM notifications to your application.
If you would like to achieve InboxStyle notifications, refer to this blog.
Complete project with modified GCMIntentService is available here.
Inclusive terminology note: The Mobile First Platform team is making changes to support the IBM® initiative to replace racially biased and other discriminatory language in our code and content with more inclusive language. While IBM values the use of inclusive language, terms that are outside of IBM's direct influence are sometimes required for the sake of maintaining user understanding. As other industry leaders join IBM in embracing the use of inclusive language, IBM will continue to update the documentation to reflect those changes.