Event Source Notifications in MFP 7.1 Cordova Applications
Theodora Cheng November 09, 2016
MobileFirst_Platform Push_Notifications


Overview
Prerequisite: Make sure to read the Push Notifications in Hybrid Applications tutorial first.
This blogpost is here to show you how to write Cordova applications with event source notification functionality.
Event source notifications are notification messages that are targeted to devices with a user subscription. While the user subscription exists, MobileFirst Server can produce push notifications for the subscribed user. These notifications can be delivered by the adapter code to all or some of the devices from which the user subscribed.
To learn more about the architecture and terminology of event-source push notifications refer to the Push notification overview tutorial.
Implementation of the push notification API consists of the following main steps:
On the server side:
- Creating an event source
- Sending notification
On the client side:
- Sending the token and initializing the
WLPushclass - Registering the event source
- Subscribing to/unsubscribing from the event source Displaying a received notification
Agenda
Notification API - Server-side
Creating an event source
To create an event source, you declare a notification event source in the adapter JavaScript code at a global level (outside any JavaScript function):
WL.Server.createEventSource({
    name: 'PushEventSource',
    onDeviceSubscribe: 'deviceSubscribeFunc',
    onDeviceUnsubscribe: 'deviceUnsubscribeFunc',
    securityTest:'PushApplication-strong-mobile-securityTest'
});name– a name by which the event source is referenced.onDeviceSubscribe– an adapter function that is invoked when the user subscription request is received.onDeviceUnsubscribe– an adapter function that is invoked when the user unsubscription request is received.securityTest– a security test from theauthenticationConfig.xmlfile, which is used to protect the event source.
An additional event source option:
poll: {
    interval: 3,
    onPoll: 'getNotificationsFromBackend'
}-
poll– a method that is used for notification retrieval. The following parameters are required: interval– the polling interval in seconds.onPoll– the polling implementation. An adapter function to be invoked at specified intervals.
Sending a notification
As described previously, notifications can be either polled from the back-end system or pushed by one. In this example, a submitNotifications() adapter function is invoked by a back-end system as an external API to send notifications.
function submitNotification(userId, notificationText) {
    var userSubscription = WL.Server.getUserNotificationSubscription('PushAdapter.PushEventSource', userId);

    if (userSubscription === null) {
        return { result: "No subscription found for user :: " + userId };
    }

    var badgeDigit = 1;
    var notification = WL.Server.createDefaultNotification(notificationText, badgeDigit, {custom:"data"});

        WL.Server.notifyAllDevices(userSubscription, notification);

    return {
        result: "Notification sent to user :: " + userId
    };
}
The submitNotification function receives the userId to send notification to and the notificationText.
function submitNotification(userId, notificationText) {A user subscription object contains the information about all of the user’s subscriptions. Each user subscription can have several device subscriptions. The object structure is as follows:
{
    userId: 'bjones',
    state: {
        customField: 3
    },
    getDeviceSubscriptions: function()[}
};
Next line:
var userSubscription = WL.Server.getUserNotificationSubscription('PushAdapter.PushEventSource', userId);If the user has no subscriptions for the specified event source, a null object is returned.
if (userSubscription === null) {
        return { result: "No subscription found for user :: " + userId };
}
The WL.Server.createDefaultNotification API method creates and returns a default notification JSON block for the supplied values.
var badgeDigit = 1;
var notification = WL.Server.createDefaultNotification(notificationText, badgeDigit, {custom:"data"});notificationText- The text to be pushed to the device.Badge(number) - A number that is displayed on the application icon or tile (available only in iOS and Windows Phone).custom- Custom, or Payload, is a JSON object that is transferred to the application and that can contain custom properties.
The WL.Server.notifyAllDevices API method sends notification to all the devices that are subscribed to the user.
WL.Server.notifyAllDevices(userSubscription, notification);Several APIs exist for sending notifications:
WL.Server.notifyAllDevices(userSubscription, options)- to send notification to all user’s devices.WL.Server.notifyDevice(userSubscription, device, options)- to send notification to a specific device that belongs to a specific user subscription.WL.Server.notifyDeviceSubscription(deviceSubscription, options)- to send the notification to a specific device.
Notification API - Client-side
WL.Client.Push.isPushSupported()– returnstrueif push notifications are supported by the platform, orfalseotherwise.WL.Client.Push.isSubscribed(alias)– returns whether the currently logged-in user is subscribed to a specified event source alias.
Set up push notifications, with the callback function defined in WL.Client.Push.onReadyToSubscribe to notify that a device is ready to subscribe to push notifications:
if (WL.Client.Push) {
    WL.Client.Push.onReadyToSubscribe = function() {

        WL.SimpleDialog.show("Push Notifications", "onReadyToSubscribe",
        [{
            text : 'Close',
            handler : function() {}
        }]);

        $('#SubscribeButton').removeAttr('disabled');
        $('#UnsubscribeButton').removeAttr('disabled');

        WL.Client.Push.registerEventSourceCallback(
            "myPush",
            "PushAdapter",
            "PushEventSource",
            pushNotificationReceived
        );
   };
}
When a push notification is received by a device, the callback function defined in WL.Client.Push.registerEventSourceCallback is invoked:
WL.SimpleDialog.show("Push Notifications", "Provider notification data: " + JSON.stringify(props), [{
    text: 'Close',
    handler: function() {
        WL.SimpleDialog.show("Push Notifications", "Application notification data: " + JSON.stringify(payload), [{
            text: 'Close',
            handler: function() {}
        }]);
    }
}]);
If the application was in background mode (or inactive) when the push notification arrived, this callback function is invoked when the application returns to the foreground.
Sample application
Click to download the sample project.
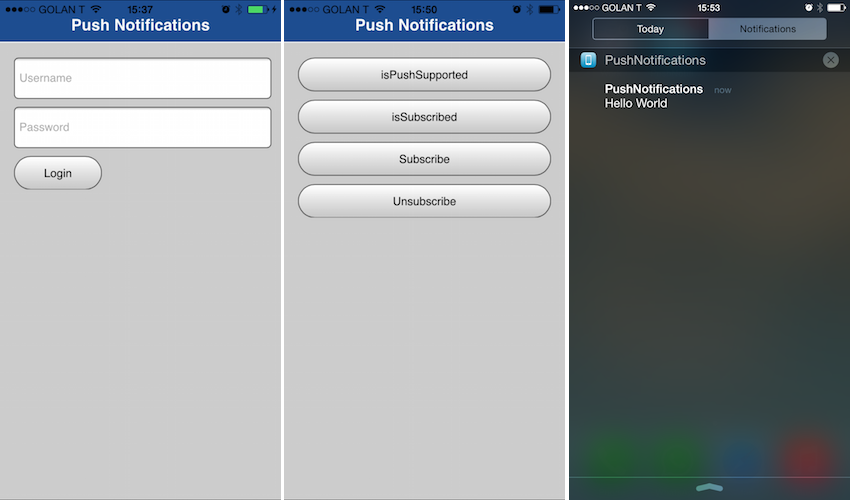
Sending a notification
To get the app running:
- Create a MFP Cordova Application and select the platforms you would like to be supported by your app
$ mfp cordova create
[?] Enter name of app: PushNotifications
[?] Enter the package ID: com.ibm.PushNotifications
[?] Enter the app version: 1.0.0
[?] Select platforms to be supported by your app: android, ios
[?] Select additional plugins you would like to add:
  ⬡ cordova-plugin-mfp-jsonstore 8.0.0 "IBM MobileFirst Platform Foundation - JSONStore"
 ❯⬢ cordova-plugin-mfp-push 8.0.0
[?] Enter a path to an app template to be added: cordova-hello-world-mfp
$ cd PushNotifications-
Copy contents in sample app to your Cordova app (PushNotifications/www/, application-descriptor.xml)
-
Follow instructions in Push Notifications Overview to set up corresponding platform
-
Create Local MFP Server, or Use Remote MFP Server
$ cd ..
$ mfp create backendServer
$ cd backendServer
$ mfp start- Create http adapter
$ mfp add adapter PushAdapter -t http-
Copy contents in sample app to your Cordova app (backendServer/PushAdapter/, backendServer/server/conf/authenticationConfig.xml)
-
Push Adapter to server
$ mfp push- Run app on corresponding device
$ cd ..
$ cd PushNotifications
$ mfp cordova run- To test the sample, go into
/backendServerto call the adapter in the CLI. Use the username you entered to login to the app:
$ mfp adapter call
[?] Which endpoint do you want to use? PushAdapter/submitNotification
[?] Enter the comma-separated parameters: "the-user-name", "hello!"
[?] How should the procedure be called? GET
Note that for push notifications to work on an emulator, it must be using one of the “Google APIs…” targets, as opposed to the regular “Android x.x.x” targets. You can check what target an emulator is using by opening the AVD manager and looking at the value in the “Target Name” column.
Inclusive terminology note: The Mobile First Platform team is making changes to support the IBM® initiative to replace racially biased and other discriminatory language in our code and content with more inclusive language. While IBM values the use of inclusive language, terms that are outside of IBM's direct influence are sometimes required for the sake of maintaining user understanding. As other industry leaders join IBM in embracing the use of inclusive language, IBM will continue to update the documentation to reflect those changes.