Integrating IBM MobileFirst Foundation 8.0-based iOS applications with IBM Bluemix Push Services
Josephine E. Justin May 02, 2018
MobileFirst_Foundation Mobile_Foundation_Service iOS Bluemix Bluemix_Push_Service


Overview
Applications using the MobileFirst Foundation 8.0 SDK can be integrated with the Bluemix Push Services for the app to receive notifications.
Learn more about IBM Bluemix Push Notificaitons service and IBM Bluemix Mobile Foundation service
Prerequisites
- Running a MobileFirst Server either locally or Mobile Foundation service on Bluemix.
- Instance of IBM Bluemix Push Notification
- Push Notification instance created at step 2 should be configured with APNS credentials and certificate.
- Push Notification instance created at step 2 should contain few tags.
Setting up the iOS application
For the purpose of this blog post, the RememberMe Android sample application is used. Download the sample application and follow the instructions in the README.md file to setup and run the app.
Adding the IBM Bluemix Push Service SDK
With the application setup and working, we will add the push functionalities into the app using the IBM Bluemix Push Service SDK.
- Open the podfile of the Xcode project (located at the root folder of the app)
- To the list of existing dependency of
pod 'IBMMobileFirstPlatformFoundation', add the below dependencies:
pod 'BMSAnalyticsAPI'
pod 'BMSPush'
pod 'BMSCore'
Adding Push Related artifacts into the App
Initializing the IBM Bluemix Push Service
Modify the application() the AppDelegate.swift to initialize BMS client and BMS Push Client. This initialization happens only once per application.
let bmsClient = BMSClient.sharedInstance
let push =  BMSPushClient.sharedInstance;

func application(application: UIApplication, didFinishLaunchingWithOptions launchOptions: [NSObject: AnyObject]?) -> Bool {
	_ = RememberMeChallengeHandler()

	bmsClient.initialize(bluemixAppRoute: "Your bluemix push app route", bluemixAppGUID: "app guid", bluemixRegion: "region")

	push.initializeWithAppGUID(appGUID:"app guid", clientSecret:"client secret")
        // Check if application was opened from a notification
        if let userInfo = launchOptions?[UIApplicationLaunchOptionsRemoteNotificationKey] as? [NSObject: AnyObject] {
            //handle your notification
            print("Received Notification in didFinishLaunchingWithOptions \(userInfo)")
        }
        registerForPush()
        return true
    }
where registerForPush() is as follows:
func registerForPush () {
    let settings = UIUserNotificationSettings(forTypes: [.Alert, .Badge, .Sound], categories: nil)
    UIApplication.sharedApplication().registerUserNotificationSettings(settings)
    UIApplication.sharedApplication().registerForRemoteNotifications()
}
Notification Receiving related artifacts
To retrieve the device token value, post the app registration for notifications, add the below method in AppDelegate.swift:
func application(application: UIApplication, didRegisterForRemoteNotificationsWithDeviceToken deviceToken: NSData) {
	print("didRegisterForRemoteNotificationsWithDeviceToken: Registered device successfully")
	deviceTokenValue = deviceToken;
}
Once the notification is received by the application, it has to display the notification content as an alert. Add the below code to show the alert:
func application(application: UIApplication, didReceiveRemoteNotification userInfo: [NSObject : AnyObject]) {
    // display the alert body
    if let notification = userInfo["aps"] as? NSDictionary,
        let alert = notification["alert"] as? NSDictionary,
        let body = alert["body"] as? String {
        showAlert(body)
    }
}

func showAlert(message: String) {
	let alertDialog = UIAlertController(title: "Push Notification", message: message, preferredStyle: UIAlertControllerStyle.Alert)
	alertDialog.addAction(UIAlertAction(title: "Okay", style: UIAlertActionStyle.Default, handler: nil))
	window!.rootViewController?.presentViewController(alertDialog, animated: true, completion: nil)
    }
Implementing the Push Functionality using SDK
This section guides you through how the Push functionality can be added to the app which uses the IBM Bluemix Push Notification Services.
Using the Main.storyboard, add a new button “Register & Subscribe Push”. This button on click would register for push and subscribes to the list of tags.
For more details on the SDK refer here
As part of this blog, ProtectedViewController.swift is added with the registerPushClicked which is called when the button “Register & Subscribe Push” is clicked.
let appDelegate = UIApplication.sharedApplication().delegate as! AppDelegate
@IBAction func registerPushClicked(sender: UIButton) {
	let push =  appDelegate.push
	print("after initialize with app guid ")
	print("username is \(defaults.stringForKey("displayName"))")
	let tagsArray: [AnyObject] = ["holiday"]

	push.registerWithDeviceToken(appDelegate.deviceTokenValue, WithUserId: defaults.stringForKey("displayName")) { (response, statusCode, error) -> Void in
		if error.isEmpty {
			print(statusCode)
			self.appDelegate.showAlert("Registered successfully")
			// Subscribe to tags
			push.subscribeToTags(tagsArray,completionHandler: { (response, statusCode, error) -> Void in
				if error.isEmpty {
					self.appDelegate.showAlert("Subscribed successfully")
					print("Subscribed successfully response: \(response)")
				} else {
					self.appDelegate.showAlert("Failed to subscribe")
					print("Error \(error)")
				}
			})
		} else {
			print(error)
			self.appDelegate.showAlert("Registrations failed.  Error \(error)")
		}
	}
}
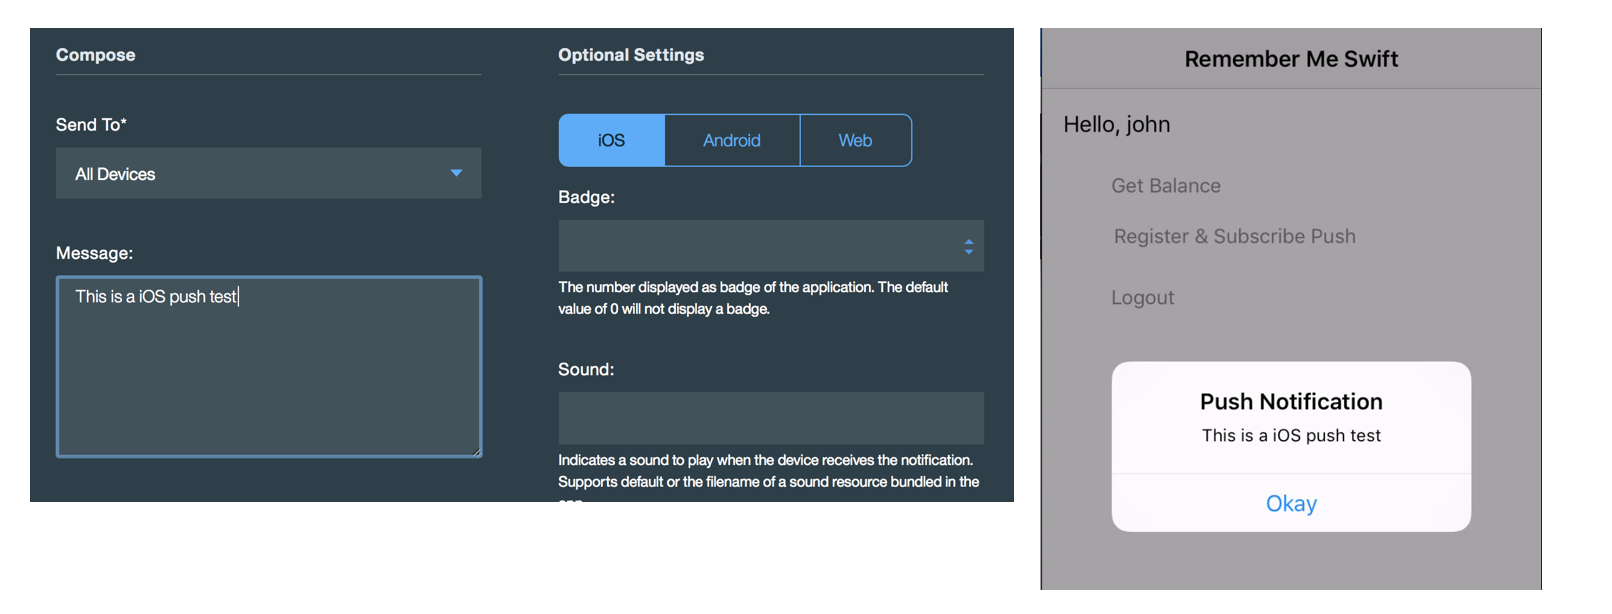
Sending the Notification
To send the notification, one can use the Push Notification dashboard on the IBM Bluemix. See the send API for more details on sending the notification.
Inclusive terminology note: The Mobile First Platform team is making changes to support the IBM® initiative to replace racially biased and other discriminatory language in our code and content with more inclusive language. While IBM values the use of inclusive language, terms that are outside of IBM's direct influence are sometimes required for the sake of maintaining user understanding. As other industry leaders join IBM in embracing the use of inclusive language, IBM will continue to update the documentation to reflect those changes.