Running Mobile Foundation Server on ICP deployed on IBM SoftLayer
Krishna K Chandrasekar May 09, 2019
MobileFirst_Foundation IBM_Cloud_Private Softlayer Mobile_Foundation


This blog focuses on setting up of MobileFirst Server running on an IBM Cloud Private (ICP) on SoftLayer VMs or baremetal hosts. The topology that is targeted is an ICP Host with 2 Workers and one master/boot node as represented in the following diagram.
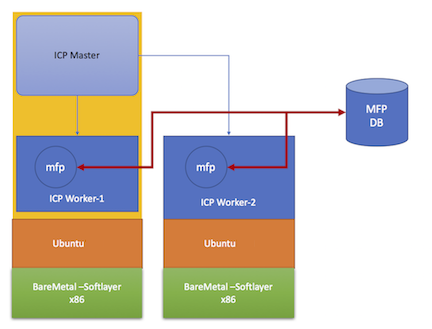
Note: The instructions in this blog post are documented with ICP 2.1.0.3 in place, one can also follow the same instructions for ICP 3.1 with suitable binaries for ICP.
Prequisites
This blog post focuses on how to use the Apache Directory Server as an LDAP Registry with Mobile Foundation Server on ICP and assumes having the following:
- IBM SoftLayer Account
- IBM Mobile Foundation Passport Advantage Archive
- IBM DB2 Server with Database configured (either community edition, enterprise or DB2 service on IBM Cloud)
Procedure
Instructions below lists the steps required to set up the Mobile Foundation Server on ICP installed on SoftLayer VM.
A. Setting up of Bare metal Machines (x86) running Ubuntu 16.04 on IBM SoftLayer
- Log in to your SoftLayer Account.
- Create two new Baremetal x86_64 bits machine with Ubuntu 16.04 installed in the required Region/Data Center (Recommended: 16Gig Memory, Quad Core, 250GB Storage).
- Wait for a few minutes for IBM SoftLayer to provision a Ubuntu 16.04 VM.
B. Setting up the Master / Proxy / Worker Nodes for Installing ICP
For both master node (boot, master and proxy) and two worker nodes, both running Ubuntu 16.04 and SSH enabled for root user.
- From Terminal, log in to the Worker Node-1 as root user
-
Disable the firewall.
[root@ home]# /usr/sbin/ufw disable -
Enable NTP.
[root@ home]# /usr/bin/timedatectl set-ntp on -
Set vm.max_map_count to at least 262144.
[root@ home]# /sbin/sysctl -w vm.max_map_count=262144 [root@ home]# /bin/echo "vm.max_map_count=262144" | /usr/bin/tee -a /etc/sysctl.conf -
Prepare the system for updates, install Docker and install Python
[root@ home]# /usr/bin/apt update [root@ home]# /usr/bin/apt-get --assume-yes install docker.io [root@ home]# /usr/bin/apt-get --assume-yes install python [root@ home]# /usr/bin/apt-get --assume-yes install python-pip [root@ home]# /bin/systemctl start docker -
Ensure the hostname is resolvable.
[root@ home]# ifconfig -aMake a note of interface name the IP is bound to “eth0” or “ens7” or “eth1” etc.
[root@ home]# IP=<IP_address_of_this_worker_machine> [root@ home]# /bin/echo "${IP} $(hostname)" >> /etc/hosts -
Check docker status to make sure there are no errors.
[root@ home]# /bin/systemctl status docker -
Check no docker containers exist at present.
docker container listThis should not list any containers
-
Run Docker pull hyperkube command.
docker pull ibmcom/hyperkube:v1.10.0
Note: Please repeat this for all the nodes. At this point the manual configuration of the worker nodes is complete.
C. Installation of the Master Node
Further configuration is required on the master node (please note this node is running boot, master and proxy functions). Log in to the Master Node as root user.
-
Download ibm-cloud-private-*.tar.gz from IBM Passport Advantage - do not unzip/untar as this gz file is used for the installation.
-
Unpack the ICP binary downloaded above, and load into docker.
[root@ home]# TMP_DIR="$(/bin/mktemp -d)" [root@ home]# cd "${TMP_DIR}" -
Move the ibm-cloud-private-x86_64-2.1.0.tar.gz file to the current directory.
[root@ home]# mv <download_location>/ibm-cloud-private-x86_64-2.1.0.3.tar.gz . [root@ home]# ls -l *.gz -
Unzip the file and load into docker.
[root@ home]# /bin/tar xf *.tar.gz -O | /usr/bin/docker load -
Set the ICP parameters needed for installation and prepare the environment by running following commands from the terminal
ICP_DOCKER_IMAGE="ibmcom/icp-inception" ICP_VER="2.1.0.3" ICP_ROOT_DIR="/opt/ibm-cloud-private-ee" mkdir "${ICP_ROOT_DIR}-${ICP_VER}" cd "${ICP_ROOT_DIR}-${ICP_VER}" /usr/bin/docker run -e LICENSE=accept -v "$(pwd)":/data ${ICP_DOCKER_IMAGE}:${ICP_VER}-ee cp -r cluster /data mkdir -p cluster/images mv ${TMP_DIR}/*.tar.gz ${ICP_ROOT_DIR}-${ICP_VER}/cluster/images/ # moves the image to the image directory rm -rf "${TMP_DIR}" # clean up the tmp directory -
Create the cluster/hosts file ready for installation
 /bin/echo "[master]"  > cluster/hosts
 /bin/echo "${IP}"    >> cluster/hosts
 /bin/echo "[proxy]"  >> cluster/hosts
 /bin/echo "${IP}"    >> cluster/hosts
Add the worker node IPs
 /bin/echo "[worker]"     >> cluster/hosts
 echo "x.x.x.x" >> cluster/hosts
 echo "z.z.z.z" >> cluster/hosts
Here x.x.x.x is the IP of the WorkerNode-1 (here for this topology, MasterNode IP) and z.z.z.z is the IP of the WorkerNode-2
-
Check the cluster/hosts file.
[root@ home]# cat cluster/hosts Output [master] y.y.y.y [proxy] y.y.y.y [worker] x.x.x.x z.z.z.z -
Setup SSH keys from master node (boot, master and proxy) to remaining the nodes.
ssh-keygen -b 4096 -f ~/.ssh/id_rsa -N "" cat ~/.ssh/id_rsa.pub | sudo tee -a ~/.ssh/authorized_keys ssh-copy-id -i ~/.ssh/id_rsa.pub root@x.x.x.x # copy key to worker nodes ssh-copy-id -i ~/.ssh/id_rsa.pub root@y.y.y.y # copy key to worker nodes chmod 400 /root/.ssh/id_rsa.pub -
Test if ssh login works without a password.
-
Move the key to ICP config
cp ~/.ssh/id_rsa ${ICP_ROOT_DIR}-${ICP_VER}/cluster/ssh_key -
From Master Node, test you can ssh to the worker nodes without a password.
ssh root@<worker_node_ip> -
Configure the cluster/config.yaml file to suit to your environment. You might want to consider changing the following options:
cluster_name: mycluster
calico_ip_autodetection_method: interface=<your primary interface e.g. eth0>
cluster_access_ip: y.y.y.y   # The primary IP address of your master node
D. Deploying ICP Enterprise Edition
You are now ready to run the ICP installation process, which are a set of Ansible playbooks.
	cd "${ICP_ROOT_DIR}-${ICP_VER}/cluster"
	/usr/bin/docker run -e LICENSE=accept --net=host -t -v "$(pwd)":/installer/cluster ${ICP_DOCKER_IMAGE}:${ICP_VER}-ee install | /usr/bin/tee install.log
This will take between 30-50 minutes, depending on your machine size and network speed. The installation script has to copy code to the worker nodes and install into containers.
If you face any challenges during the installation that leads to failure, uninstall ICP, run the following command and retry the previous installation step.
cd "${ICP_ROOT_DIR}-${ICP_VER}/cluster"
/usr/bin/docker run -e LICENSE=accept --net=host -t -v "$(pwd)":/installer/cluster ${ICP_DOCKER_IMAGE}:${ICP_VER}-ee uninstall | /usr/bin/tee uninstall.log
Sample Output:
PLAY RECAP *********************************************************************
y.y.y.y          : ok=201  changed=66   unreachable=0    failed=0
z.z.z.z          : ok=123  changed=51   unreachable=0    failed=0
x.x.x.x          : ok=123  changed=51   unreachable=0    failed=0
localhost        : ok=216  changed=114  unreachable=0    failed=0

POST DEPLOY MESSAGE ************************************************************

UI URL is https://<master_ip>:8443 , default username/password is admin/admin

Playbook run took 0 days, 0 hours, 41 minutes, 35 seconds
E. Setting up of MobileFirst Server on ICP
Instructions below shows the complete list of steps to deploy MFP helm on ICP.
Setup the ibmcloud cli environment
Run the following instructions from the client terminal from which ICP environment can be accessed (here Mac OSX).
-
Install the ibmcloud cli by using following command.
curl -sL http://ibm.biz/idt-installer | bash -
Install the bx pr plugin.
curl -O https://<myicphost>:8443/api/cli/icp-darwin-amd64 --insecure bx plugin install icp-darwin-amd64 -
Appending the IP hostname to the
/etc/hostsfile.echo "<icp_master_node_ip> mycluster.icp" >> /etc/hosts -
Make sure the hostname is correct.
cat /etc/hosts # to make sure hostname is set correctly -
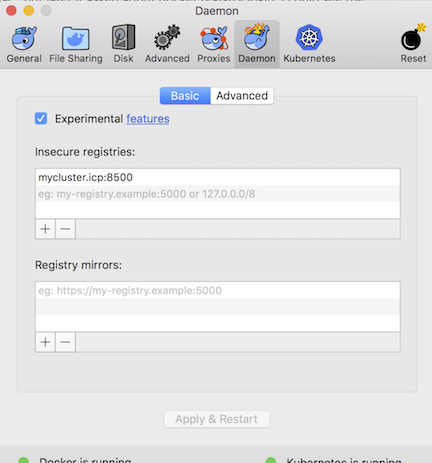
Open the Docker Preferences > Daemon > Click Tab Basic > Under insecure-registries, add mycluster.icp:8500 as shown in the following image.
-
Click Apply & Restart.
Load the MFP PPA archive to the ICP repo
- Download the IBM Mobile Foundation for ICP archive from IBM Passport Advantage.
-
Log in to the ICP cluster
bx pr login -a https://mycluster.icp:8443 -u admin -p admin -c id-mycluster-account --skip-ssl-validation -
Load the PPA Archive of Mobile Foundation using the following command: (This takes around 30-40 minutes, depending on the network speed).
bx pr load-ppa-archive --archive <archive_name>Example:
bx pr load-ppa-archive --archive 8.0.0.0-MFPF-Server-ICp-XXXXX.tar.gz - After you load the PPA Archive, synch the repositories, which ensures the listing of Helm Charts in the Catalog. You can do this in IBM Cloud Private management console. Select Admin > Repositories > Synch Repositories
- View the Docker images and Helm Charts in the IBM Cloud Private management console. To view Docker images, Select Platform > Images
Install and configure IBM Mobile Foundation Helm Charts
- [Mandatory] DB2 database configured and ready to use. Before you begin the installation of MobileFirst Server ensure that you have pre-configured a DB2 database. Following details are required to configure the Helm.
MFPF_ADMIN_DB2_SERVER_NAME=dashdb-txn-small-sample-service-dal01-services.dal.bluemix.net MFPF_ADMIN_DB2_PORT=50000 MFPF_ADMIN_DB2_DATABASE_NAME=BLUDB MFPF_ADMIN_DB2_USERNAME=admin MFPF_ADMIN_DB2_PASSWORD=thisisadummypassword MFPF_ADMIN_DB2_SCHEMA=<any_Schema_name> - From the ICP Catalog choose ibm-mfpf-server-prod helm chart to configure and click Install. Deployment takes around 10-15 minutes for the services to come up after completing the health checks and pod running.
Verifying the MFP deployment
-
Locate the deployed MFP Server Helm Chart on the ICP Console Menu > Workloads > Helm Releases. Select the mfp server’s helm.
-
Make sure the pods are in Running State as show in the screenshot below:

-
Run the commands shown in the Notes page, to view the console URL.
References
Inclusive terminology note: The Mobile First Platform team is making changes to support the IBM® initiative to replace racially biased and other discriminatory language in our code and content with more inclusive language. While IBM values the use of inclusive language, terms that are outside of IBM's direct influence are sometimes required for the sake of maintaining user understanding. As other industry leaders join IBM in embracing the use of inclusive language, IBM will continue to update the documentation to reflect those changes.