Setting up a High Available (HA) Mobile Foundation environment on IBM Cloud Private (ICP)
Yathendra Prasad May 09, 2019
MobileFirst_Foundation IBM_Cloud_Private Customization High_Availability Mobile_Foundation


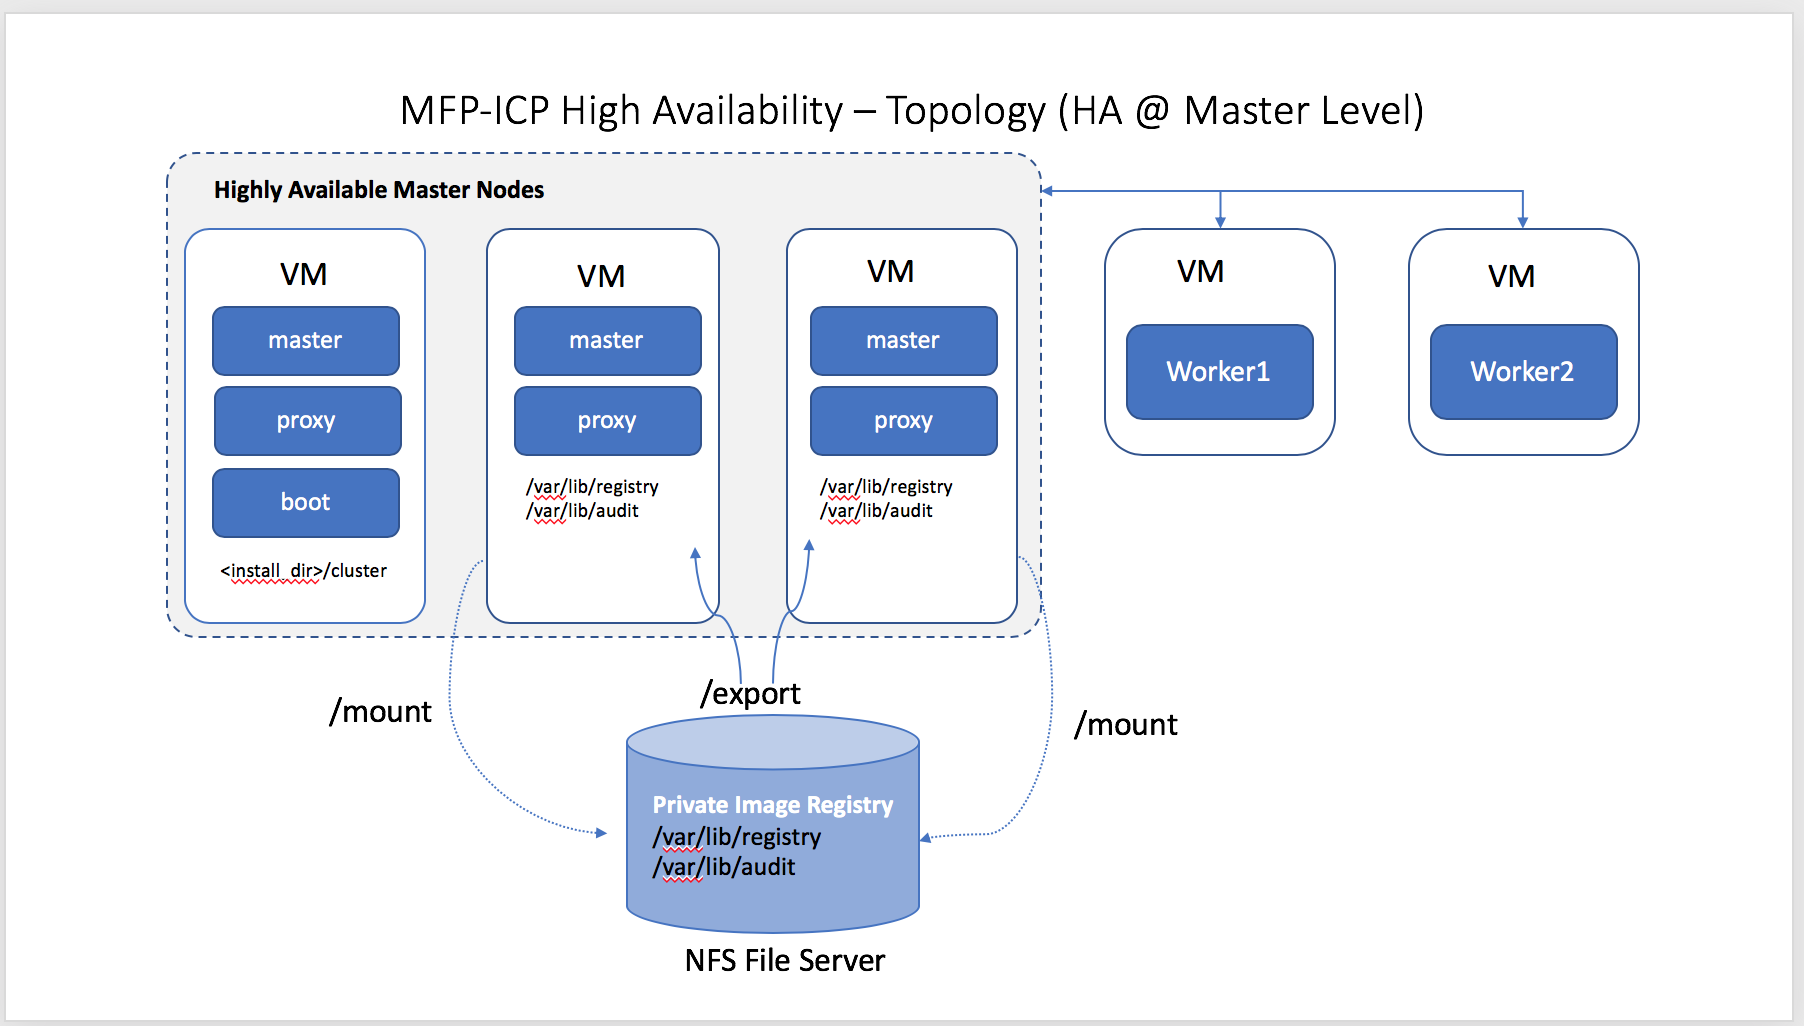
This post focuses on High Availability (HA) of Mobile Foundation on IBM Cloud Private, particularly about having Highly Available Master Nodes in the ICP topology. We will discuss about the HA setup with 3 Masters and 2 Worker Nodes topology. One of the three master nodes acts like a boot node here. This setup also considers having the proxy on the master nodes itself.
In the following sections we discuss the instructions and settings, which are to be incorporated before setting up the ICP environment.
Configuration
On two master nodes (which doesn’t act like boot), create the following directories and mount on your shared storage . We will discuss more on the shared storage later in this post.
- /var/lib/registry - This directory stores images in the private image registry and keeps the images synchronized on all master nodes.
- /var/lib/icp/audit - This stores Kubernetes audit logs. Audit logs track and store data that is related to your IBM Cloud Private usage.
You must set the file permissions to 0755 for the above directories. In addition to that create a hidden file with name .file-check. This hidden file creation is mandatory for HA configuration on ICP, if not set correctly the installation fails with below error message.
Error Message**:**set shared storage for /var/lib/registry
Note : You can use the command below to create hidden file under
/var/lib/registrytouch .file-check
For enabling Highly Available Master nodes on ICP, you must set up shared storage across your master nodes. The storage must be a POSIX-compliant shared file system that is located outside of your IBM Cloud Private cluster. The file system must be accessible by the master nodes. We can configure to have storage provider’s like NFS, GlusterFS, vSphere, etc. In this blog post we will use NFS as the file storage provider.
Setting Up of NFS File Server and mount NFS shared directories
-
On NFS Server : Follow the below instructions to install nfs server and configure NFS shared directories on seperate node.
- Install these packages.
apt-get update apt-get install nfs-kernel-server -
Create directories
/var/lib/registryand/var/lib/icp/audit.mkdir -p /var/lib/registry mkdir -p /var/lib/icp/audit -
Change the ownership of the directory as follows:
chown nobody:nogroup /var/lib/registry chown nobody:nogroup /var/lib/icp/audit - Now we will share the NFS directory over the network by adding the below mount entries in the exports file (
/etc/exports)./var/lib/registry *(rw,sync,fsid=0,crossmnt,no_subtree_check,no_root_squash) /var/lib/icp/audit *(rw,sync,fsid=0,crossmnt,no_subtree_check,no_root_squash)Note: : Instead of
*in the above command , you can specify the hostname that requires access to NFS mount directories. - Next update the NFS table with the new sharing points by running the following command:
exportfs -a - Finally, start the NFS service as follows:
service nfs-kernel-server start
- Install these packages.
-
At the NFS client end : In our case it is the 2 Master Nodes that act as NFS client, where we have created the shared directories. The below steps has to be carried out on both the master nodes.
sudo apt-get update sudo apt-get install nfs-common- Create the NFS directory mount point:
sudo mkdir -p /var/lib/registry sudo mkdir -p /var/lib/icp/audit - Next, we will mount the NFS shared content in the client machine as shown below:
mount -t nfs <NFS_ServerIP>:/var/lib/registry /var/lib/registry/ mount -t nfs <NFS_ServerIP>:/var/lib/icp/audit /var/lib/icp/audit/ - We are now connected with NFS Share and run the below command :
mount -t nfs root@mastericp721:~# mount -t nfs 9.204.168.113:/var/lib/registry on /var/lib/lib/registry type nfs (rw,relatime,vers=3,rsize=1048576,wsize=1048576,namlen=255,hard,proto=tcp,timeo=600,retrans=2,sec=sys,mountaddr=9.204.168.113,mountvers=3,mountport=50736,mountproto=udp,local_lock=none,addr=9.204.168.113) 9.204.168.113:/var/lib/icp/audit on /var/lib/icp/audit type nfs (rw,relatime,vers=3,rsize=1048576,wsize=1048576,namlen=255,hard,proto=tcp,timeo=600,retrans=2,sec=sys,mountaddr=9.204.168.113,mountvers=3,mountport=50736,mountproto=udp,local_lock=none,addr=9.204.168.113) - Create a sample file using touch command to make sure the file is created on all the shared repositories.
touch /var/lib/registry/testnfssahre -
Permanent NFS Mouting :
We need to mount the NFS share at client end permanently so that the directories are mounted even after the reboot. So, we need to add the NFS-share in /etc/fstab file of client machine as follows:
  9.aaa.bbb.ccc:/var/lib/registry  /var/lib/registry       nfs     defaults        0       0
  9.aaa.bbb.ccc:/var/lib/icp/audit  /var/lib/icp/audit        nfs     defaults        0       0
This sets a permanent mount of the NFS-share. Now you can reboot the machine.
Next make the drives active by giving input as:
mount -a
- Create the NFS directory mount point:
Configure hosts file and config.yaml in boot node
-
Changes to hosts file: Below is the sample of the host file entires for our topology.
[master] 9.xxx.177.210 9.xxx.180.159 9.xxx.180.164 [worker] 9.xxx.180.212 9.xxx.181.13 [proxy] 9.xxx.177.210 9.xxx.180.159 9.xxx.180.164 -
Changes in
config.yaml:-
Under
config.yaml, set the ansible_user as root.default_admin_user: admin default_admin_password: admin ansible_user: root -
High Availability settings.
vip_manager: etcdHigh Availability settings for master nodes.
 vip_iface: ens7
cluster_vip: 9.202.181.230
High Availability settings for Proxy nodes.
 proxy_vip_iface: ens7
 proxy_vip: 9.xxx.168.96
Let us understand what etcd,vip_iface,cluster_vip and proxy_vip are.
-
etcdis vip manager which is responsible for electing one of the active master as leader when one of the master node is down. -
Parameter vip_iface is the Network interface Controller (NIC) .
-
You can run the command
ip ato know the NIC value . -
cluster_vip and proxy_vip are valid IP address present in the subnet.
-
Disable image-security-enforcement under management_services
image-security-enforcement: disabled
-
Now run the install command from the boot node where you install ICP. Please refer to IBM Cloud Private documentation for ICP setup and make sure you follow all the necessary steps.
For setting up of IBM Mobile Foundation using the steps above, please refer to the IBM Mobile Foundation Platform documentation.
Testing the HA
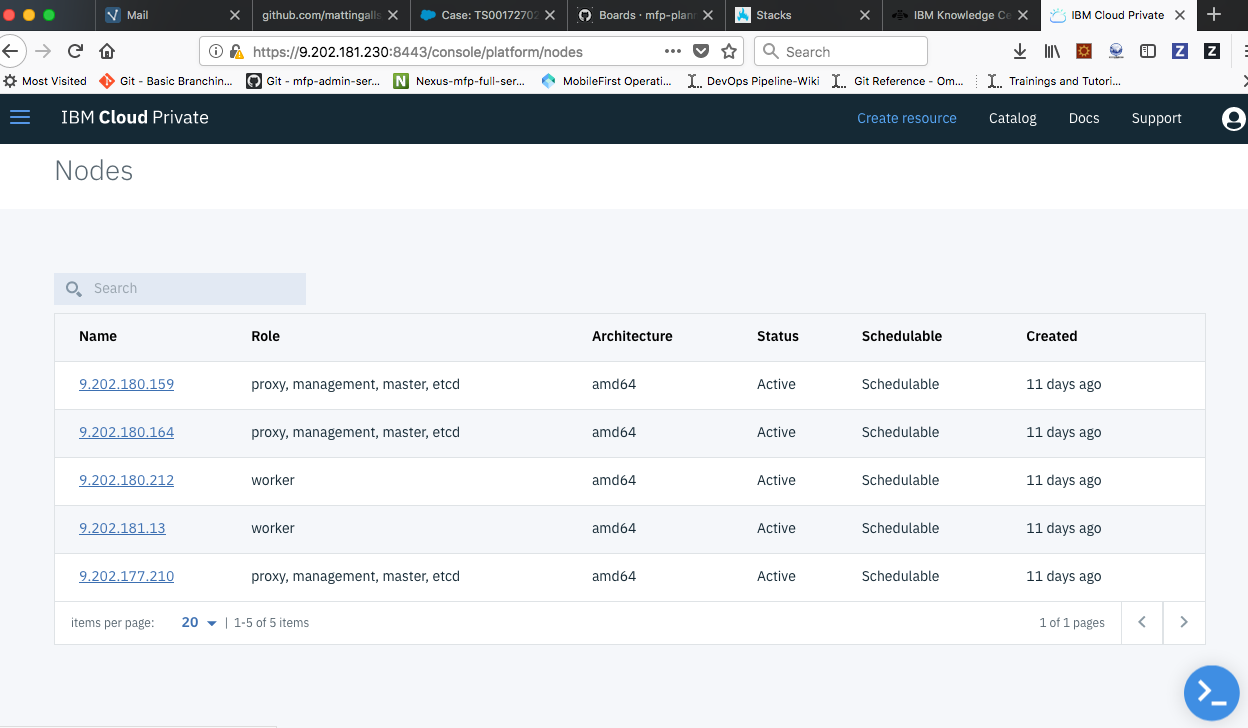
After the installation is successful, access the ICP console and follow the below procedure to validate the HA scenario
- See the list of active nodes which includes master, proxy and worker nodes under platform -> Nodes.
- Bring down active master which is currently acting as the leader and is assigned with cluster_vip address. The leader can be identified by running
ip aon each master node.
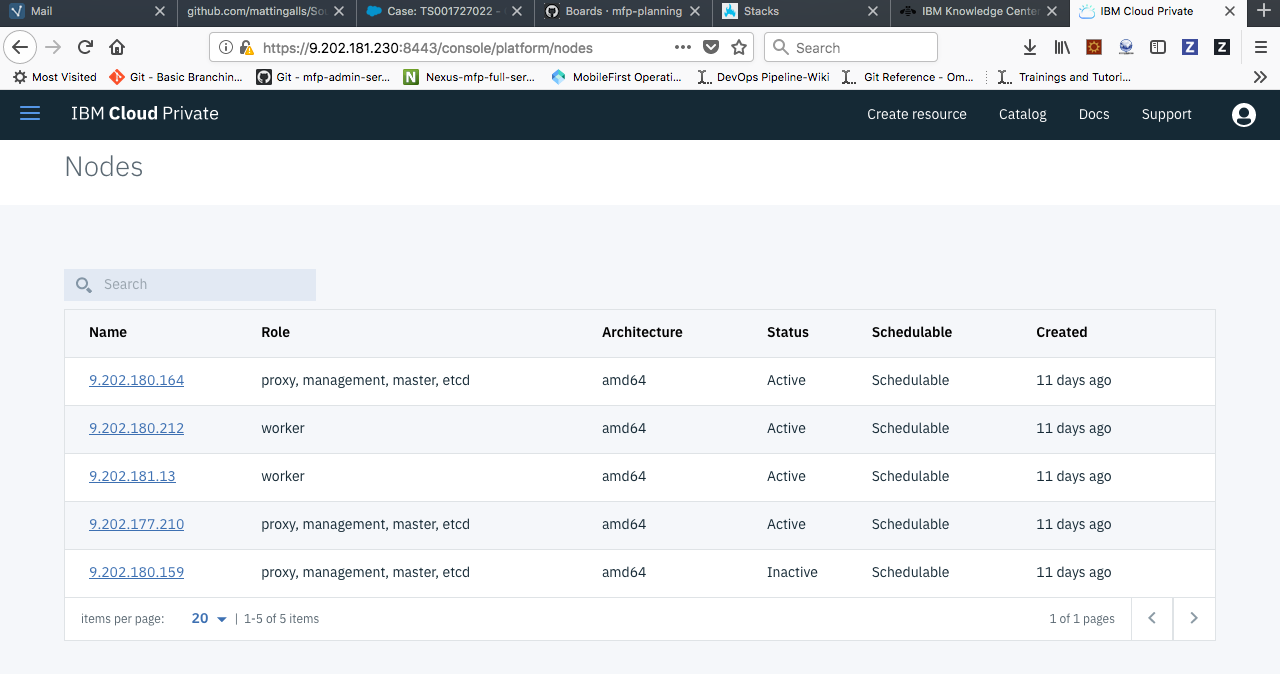
- Now vip_manager(etcd) is responsible for electing one of the active masters as the leader and assign the cluster_vip address.
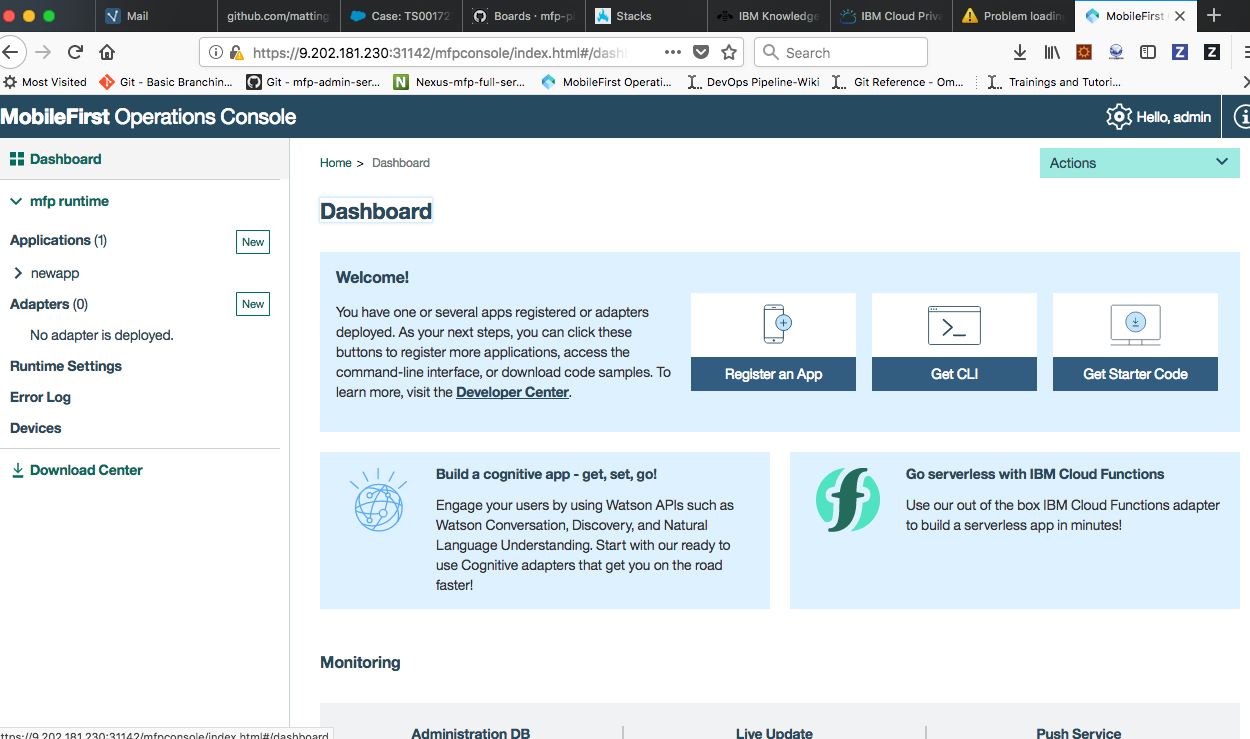
- Even though the active master, which was acting as a leader earlier is down, we can see that the Mobile Foundation Operations admin console is accessible due to the highly availability in our environment setup.
Known Limitation
Using low capacity VMs for the master nodes might experience a downtime close to 3 minutes, during the testing phase as mentioned above, this can be eliminated by using better hardware (or physical machines) as per ICP recommendations.
Inclusive terminology note: The Mobile First Platform team is making changes to support the IBM® initiative to replace racially biased and other discriminatory language in our code and content with more inclusive language. While IBM values the use of inclusive language, terms that are outside of IBM's direct influence are sometimes required for the sake of maintaining user understanding. As other industry leaders join IBM in embracing the use of inclusive language, IBM will continue to update the documentation to reflect those changes.