iOS - Implementing Cordova plug-ins
improve this page | report issueOverview
In some cases, developers of a MobileFirst application might have to use a specific third-party native library or a device function that is not yet available in Apache Cordova.
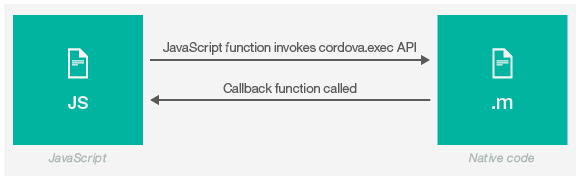
With Apache Cordova, developers can create an Apache Cordova plug-in, which means that they create custom native code blocks, and then call these code blocks in their applications by using JavaScript.
This tutorial demonstrates how to create and integrate a simple Apache Cordova plug-in for iOS, in the following topics:
- Creating a plug-in
- Declaring a plug-in
- Implementing cordova.exec() in JavaScript
- Implementing the Objective-C code of a Cordova plug-in
- Sample application
Note: In Cordova-based applications, developers must check for the deviceready event before they use the Cordova API set. In a MobileFirst application, however, this check is done internally.
Instead of implementing this check, you can place implementation code in the wlCommonInit() function in the common\js\main.js file.
Creating a plug-in
- Declare the plug-in in the
config.xmlfile. - Use the
cordova.exec()API in the JavaScript code. - Create the plug-in class that will run natively in iOS.
The plug-in performs the required action and calls a JavaScript callback method that is specified during the call tocordova.exec()method.
Declaring a plug-in
You must declare the plug-in in the project, so that Cordova can detect it.
To declare the plug-in, add a reference to the config.xml file, located in the native folder of the iOS environment.
<feature name="sayHelloPlugin">
  <param name="ios-package" value="sayHelloPlugin" />
</feature>
Implementing cordova.exec() in JavaScript
From the JavaScript code of the application, use the cordova.exec() method to call the Cordova plug-in:
function sayHello() {
    var name = $("#NameInput").val();
    cordova.exe(sayHelloSuccess, sayHelloFailure, "SayHelloPlugin", "sayHello", [name]);
}
sayHelloSuccess - Success callback
sayHelloFailure - Failure callback
SayHelloPlugin - Plug-in name as declared in the config.xml file
sayHello - Action name
[name] - Parameters array
The plug-in calls the success and failure callbacks.
function sayHelloSuccess(data) {
    WL.SimpleDialog.show(
        "Response from plug-in", data,
        [{text: "OK", handler: function() {WL.Logger.debug("Ok button pressed");}}]
    );
}

function sayHelloFailure(data){
    WL.SimpleDialog.show(
        "Response from plug-in", data,
        [{text: "OK", handler: function() {WL.Logger.debug("Ok button pressed");}}]
    );
}
Implementing the Objective-C code of a Cordova plug-in
After you have declared the plug-in and the JavaScript implementation is ready, you can implement the Cordova plug-in.
Prequisite: Ensure that the project is built in Eclipse and opened in the Xcode IDE.
Step 1
- Add a new Cocoa Touch Class file, make sure that it is a subclass of
UIViewController, and save it in theClassesfolder of the Xcode project. - Import the
Cordova/CDV.hheader file and inherit theCDVPluginclass. - Declare the
SayHelloPluginsignature.#import <Foundation/Foundation.h> #import <Cordova/CDV.h> @interface SayHelloPlugin : CDVPlugin - (void)sayHello:(CDVInvokedUrlCommand*)command; @end
Step 2
- Implement the method. The
commandargument contains references to the parameters that are sent from JavaScript and callbacks:
#import "SayHelloPlugin.h" @implementation SayHelloPlugin - (void)sayHello:(CDVInvokedUrlCommand*)command { - Write this statement to retrieve the parameters that are sent from JavaScript.
NSString *responseString = [NSString stringWithFormat:@"Hello %@", [command.arguments objectAtIndex:0]]; - The
pluginResultobject is created with data retrieved from JavaScript. TheCDVCommandStatusparameter defines whether the plug-in call was successful or not.
CDVPluginResult *pluginResult = [CDVPluginResult resultWithStatus:CDVCommandStatus_OK messageAsString:responseString]; - Use the
sendPluginResultmethod to return a response back to JavaScript (invoke callback).
[self.commandDelegate sendPluginResult:pluginResult callbackId:command.callbackId];

}
@end
Important note:
If you work with existing .m and .h files, reference them while you are working in Xcode.
Placing the .m and .h files only in the iphone\native\Classes folder in Eclipse is not sufficient, because these files are not referenced in the Xcode project unless they were added in Xcode.
Sample application
Click to download the MobileFirst project.

Inclusive terminology note: The Mobile First Platform team is making changes to support the IBM® initiative to replace racially biased and other discriminatory language in our code and content with more inclusive language. While IBM values the use of inclusive language, terms that are outside of IBM's direct influence are sometimes required for the sake of maintaining user understanding. As other industry leaders join IBM in embracing the use of inclusive language, IBM will continue to update the documentation to reflect those changes.