Android - Cloudant NoSQL DB API
improve this page | report issueOverview
This tutorial shows how to apply technology available in IBM MobileFirst Platform Foundation to store data for Android mobile applications. By using Cloudant NoSQL DB APIs, you can complete specific database operations, such as creating, reading, updating, deleting, and synchronizing data between local and remote databases. This tutorial provides a basic overview of these APIs and explains how to configure and run the sample, in the following topics:
- Using the IMFData SDK
- Creating local data stores
- Creating remote data stores
- Setting user permissions for remote stores
- Modeling data for Android applications
- Creating and updating data
- Supporting synchronization and offline storage
- Running the Android sample
- Obtaining and configuring the required SDKs
- Enabling encryption
- BlueList application flow
Using the IMFData SDK
After the IMFData SDK is installed, you can begin to initialize and use the SDK in your native Android application.
// Initialize the IMFDataManager
DataManager manager = DataManager.initialize(context, new URL(CLOUDANT_PROXY_URL));
The value for cloudantProxyUrl is the URL of the MobileFirst Data Proxy which was configured during installation. The URL includes the IP address, host, and context root that you have defined.
For example: http://localhost:10080/imf-data-proxy.
In the native Android sample that comes with this tutorial, the value for the cloudantProxyUrl is set in the bluelist.properties file.
Creating local data stores
You can create a Store object to allow your application to access a local database, which can be used even when the application is offline.
// Using reference to IMFDataManager that you initialized above, create a local store using a bolts task
String name = "todosdb";
// Create local store
Task<Store> storeTask = manager.localStore(name);
storeTask.continueWith(new Continuation<Store, Void>() {
    @Override
    public Void then(Task<Store> task) throws Exception {
        if(task.isFaulted()){
            // Handle error
        }else{
            // Newly created store
            Store localStore = task.getResult();
        }
        return null;
    }
});
Creating remote data stores
You can also create a Store object to allow your application to access a remote database.
// Create remote store
String name = "todosdb";
// Using reference to IMFDataManager that you initialized above, create a remote store using a bolts task
Task<Store> storeTask = manager.remoteStore(name);
storeTask.continueWith(new Continuation<Store, Void>() {
    @Override
    public Void then(Task<Store> task) throws Exception {
        if(task.isFaulted()){
            // Handle error
        }else{
            // Newly created store
            Store remoteStore = task.getResult();
        }
        return null;
    }
});
Setting user permissions for remote stores
You can set specific permissions for users to access remote stores.
// Using reference to IMFDataManager that you initialized above, set the user permissions for the remote store
Task<Boolean> permissionsTask = manager.setCurrentUserPermissions(DataManager.DB_ACCESS_GROUP_MEMBERS, "todosdb");
permissionsTask.continueWith(new Continuation<Boolean, Object>() {
    @Override
    public Object then(Task<Boolean> task) throws Exception {
        if(task.isFaulted()){
            // Handle error
        }else{
           // setting permissions was successful
        }
        return null;
    }
});
Note: In the sample, the user is authenticated via OAuth. OAuth has been configured through adapter-based authentication. You can find further instructions on setting up access with OAuth capabilities and the MobileFirst Data Proxy in the topic about configuring OAuth security, in the user documentation.
Modeling data for Android applications
In Android applications, you can use the DataObjectMapper class to map native objects to JSON document format. When you create a data store with the DataManager API, you can create a new DataObjectMapper to set on the Store object.
localStore.setMapper(new DataObjectMapper());TodoItem class allows you to store custom data as objects in our application. When creating a custom DataObjectMapper class, make sure that it meets the following requirements:
- Conform to the IMFDataObject protocol.
- Have the IMFDataObject protocol metadata property set on the class interface.
- Implements
DataObject.
TodoItem implementation (TodoItem.java)
public class TodoItem implements DataObject {
    private Metadata metadata = null;
    private String name;
    private Integer priority;
    // NOTE: If you use a constructor with arguments, you will need to supply an empty constructor for the mapper to function properly
    public TodoItem(){
        this.name = "";
        this.priority = 0;
    }
    public TodoItem(String name, Integer priority){
        this.name = name;
        this.priority = priority;
    }
    @Override
    public Metadata getMetadata() {
        return metadata;
    }
    @Override
    public void setMetadata(Metadata metadata) {
        this.metadata = metadata;
    }
}
You must then register the class and data type with the DataObjectMapper. In the sample, the DataStoreManager instance does that after the store is created.
//using the existing store with mapper
localStore.getMapper().setDataTypeForClassName("TodoItem", TodoItem.class.getCanonicalName());
Creating and updating data
Using the same operation, you can save new objects and save changes to existing objects in the local data store.
Creating, saving, and updating Todo Items
// You can create a new TodoItem to save here, or you can use an existing object from the localStore that you have made changes to
TodoItem todoItem = new TodoItem("Buy Groceries", 2);
// Use an existing store
Store store = localStore;
// Save automobile to store
Task<Object> saveTask = store.save(automobile);
saveTask.continueWith(new Continuation<Object, Void>() {
    @Override
    public Void then(Task<Object> task) throws Exception {
        if (task.isFaulted()) {
            // save was not successful, task.getError() contains the error
        } else {
            // use the result
            TodoItem savedTodoItem = (TodoItem) task.getResult();
            // Manipulate new item/add to your UI/whatever else you're doing with your data
            .
            .
            .
        }
        return null;
    }
});
Note: When saving an object, it is good practice to use the new object that is returned by the task.getResult() method, to avoid errors caused by stale objects and to maintain a consistent experience.
Deleting data
To delete an object in a data store, pass the object to the LocalStore.delete(objecttodelete) method.
// Use an existing store and TodoItem
Store store = localStore;
// Pass the Item you'd like to delete from the local Data Store as the parameter
TodoItem todoItem = existingTodoItem;
// Delete the TodoItem from the store
Task<String> deleteTask = store.delete(todoItem);
deleteTask.continueWith(new Continuation<String, Void>() {
    @Override
    public Void then(Task<String> task) throws Exception {
        if (task.isFaulted()) {
            // delete was not successful, task.getError() contains the error
        } else {
            // use the result
            String deletedTodoItemId = task.getResult();
        }
        return null;
    }
});
<p>
Querying data
You can query for objects that have an object mapper. To run a query for objects, create a Cloudant query with the query filters on data type. Run the query against a Store object. For more information about query and related operations, see the topics about querying, in the user documentation.
Supporting synchronization and offline storage
By using the data manager API, you can synchronize data between local storage on the device and remote store instances.
Pull replication
When pull replication runs, the local database within the mobile device is updated with what exists in the remote database.
// Use an existing store
Store store = localStore;
// create a pull replication task
// name is the database name of the store being replicated
Task<PullReplication> pullTask = manager.pullReplicationForStore(store.getName());
pullTask.continueWith(new Continuation<PullReplication, Object>() {
    @Override
    public Object then(Task<PullReplication> task) throws Exception {
        if(task.isFaulted()){
            // Handle error
        }else{
            // Start the replication
            PullReplication pull = task.getResult();
            Replicator replicator = ReplicatorFactory.oneway(pull);
            replicator.start();
        }
        return null;
    }
});
Push replication
When push replication runs, the data from the local database within the mobile device is sent to the remote database.
// Use an existing store
Store store = localStore;
// create a push replication task
// name is the database name of the store being replicated
Task<PushReplication> pushTask = manager.pushReplicationForStore(store.getName());
pushTask.continueWith(new Continuation<PushReplication, Object>() {
    @Override<
    public Object then(Task<PushReplication> task) throws Exception {
        if(task.isFaulted()){
            // Handle error
        }else{
            // Start the replication
            PushReplication push = task.getResult();
            Replicator replicator = ReplicatorFactory.oneway(push);
            replicator.start();
        }
        return null;
    }
});
Note: The code snippets above might be different from the code that you can see in the sample. These snippets have been created to give the clearest and most understandable outline of the APIs and how they are used. For the sample to be easier to use, all the implementation for the above operations can be found in DataStoreManager and MainActivity.
Running the Android sample
Make sure that you have properly configured and started the following instances:
- MobileFirst Server with
CloudantAuthenticationAdapterandAndroidBlueListNative API deployed - Cloudant Data Local Layer Edition
- MobileFirst Data Proxy Server configured against MobileFirst Server and the Cloudant Data Layer Local Edition
Obtaining and configuring the required SDKs
Make sure that you have correctly installed and set up Gradle. If you have not done so, complete the following:
- Download the current Gradle distribution from
www.Gradle.org. - When importing the sample, select a
build.gradlefile.
Android Studio then prompts you for aGRADLE_HOMEvariable. - Point to the Gradle distribution that you just downloaded.
- After the project is open, check and update the following items:
- In the
bluelist.propertiesfile, set thecloudantProxyUrlto your MobileFirst Data Proxy Server location. - In the
wlclient.propertiesfile, make sure to check and update the values to match the MobileFirst Server instance that you have deployed.
- In the
Now, you can run the sample on the simulators provided by Android or a supported Android device.
Enabling encryption
It is possible to encrypt the local datastores in order to secure data that is being stored on the device. To begin the process of encrypting the local databases, you must first download the SQLCipher for Android v3.2 .jar and .so binary files and include them in your application as described below:
- Add the downloaded binaries to the appropriate folders within your app structure:
- Add the shared library files and SQLCipher JAR file to the
jniLibsfolder under your Android app directory. - Add the required ICU ZIP file to your app
assetsfolder. - Add
sqlcipher.jaras a file dependency. You can use the Dependencies tab under Open Module Settings, from the context menu of the Android Studio app folder.
- Add the shared library files and SQLCipher JAR file to the
- To use SQLCipher commercially, you must obtain the necessary license.
- Initialize your local store for encryption with a key provider.
// Initalize a key provider KeyProvider keyProvider = new AndroidKeyProvider(getContext(),"passw0rd","user"); // Create local store using reference to IMFDataManager that you initialized above String name = "todosdb"; Task<Store> storeTask = manager.localStore(name, keyProvider); storeTask.continueWith(new Continuation<Store, Void>() { @Override public Void then(Task<Store> task) throws Exception { if (task.isFaulted()) { // Handle error } else { // Do something with Store Store store = task.getResult(); } return null; } }); - When replicating with an encrypted local store, you must pass a
KeyProviderintopullReplicationForStore()orpushReplicationForStore().
// Using reference to IMFDataManager that you initialized above
String name = "todosdb";
// Initalize a key provider
KeyProvider keyProvider = new AndroidKeyProvider(getContext(),"passw0rd","user");
// pull replication
Task<PushReplication> pullTask = manager.pullReplicationForStore(name, keyProvider);
// push replication
Task<PushReplication> pushTask = manager.pushReplicationForStore(name, keyProvider);
BlueList application flow
When the application starts, the DataStoreManager instance initiates the connection to the MobileFirst Server instance and creates and registers the BlueListChallengeHandler instance.
WLClient client = WLClient.createInstance(context);
client.registerChallengeHandler(blueListChallengeHandler);
For simplicity, the sample silently logs in a user by calling CloudantAuthenticationAdapter with correct user name and password parameters. This is completed in the BlueListChallengeHandler.
@Override<br />
public void handleChallenge(WLResponse wlResponse) {
    Object[] parameters = new Object[]{UserName,UserPassword};
    WLProcedureInvocationData invocationData = new  WLProcedureInvocationData(AdapterName, "submitAuthentication");
    invocationData.setParameters(parameters);
    WLRequestOptions options = new WLRequestOptions();
    options.setTimeout(30000);
    submitAdapterAuthentication(invocationData, options);
}
After authentication, the database is configured in the DataStoreManager init method. This database configuration consists of the following steps:
- Initializing the SDK
- Creating the local and remote databases
- Setting permissions for the user that was created
- Setting the
replicatorFactory,pullReplication, andpushReplication - Registering the
TodoItemclass and data type with theDataObjectMapper
Note: For simplicity, the database name that is created is currently set to the variable DBName in the DataStoreManager, but you can change this name in the bluelist.properties file.
The MainActivity class provides functions for creating, updating, deleting, and listing items, and functions for push and pull replication.
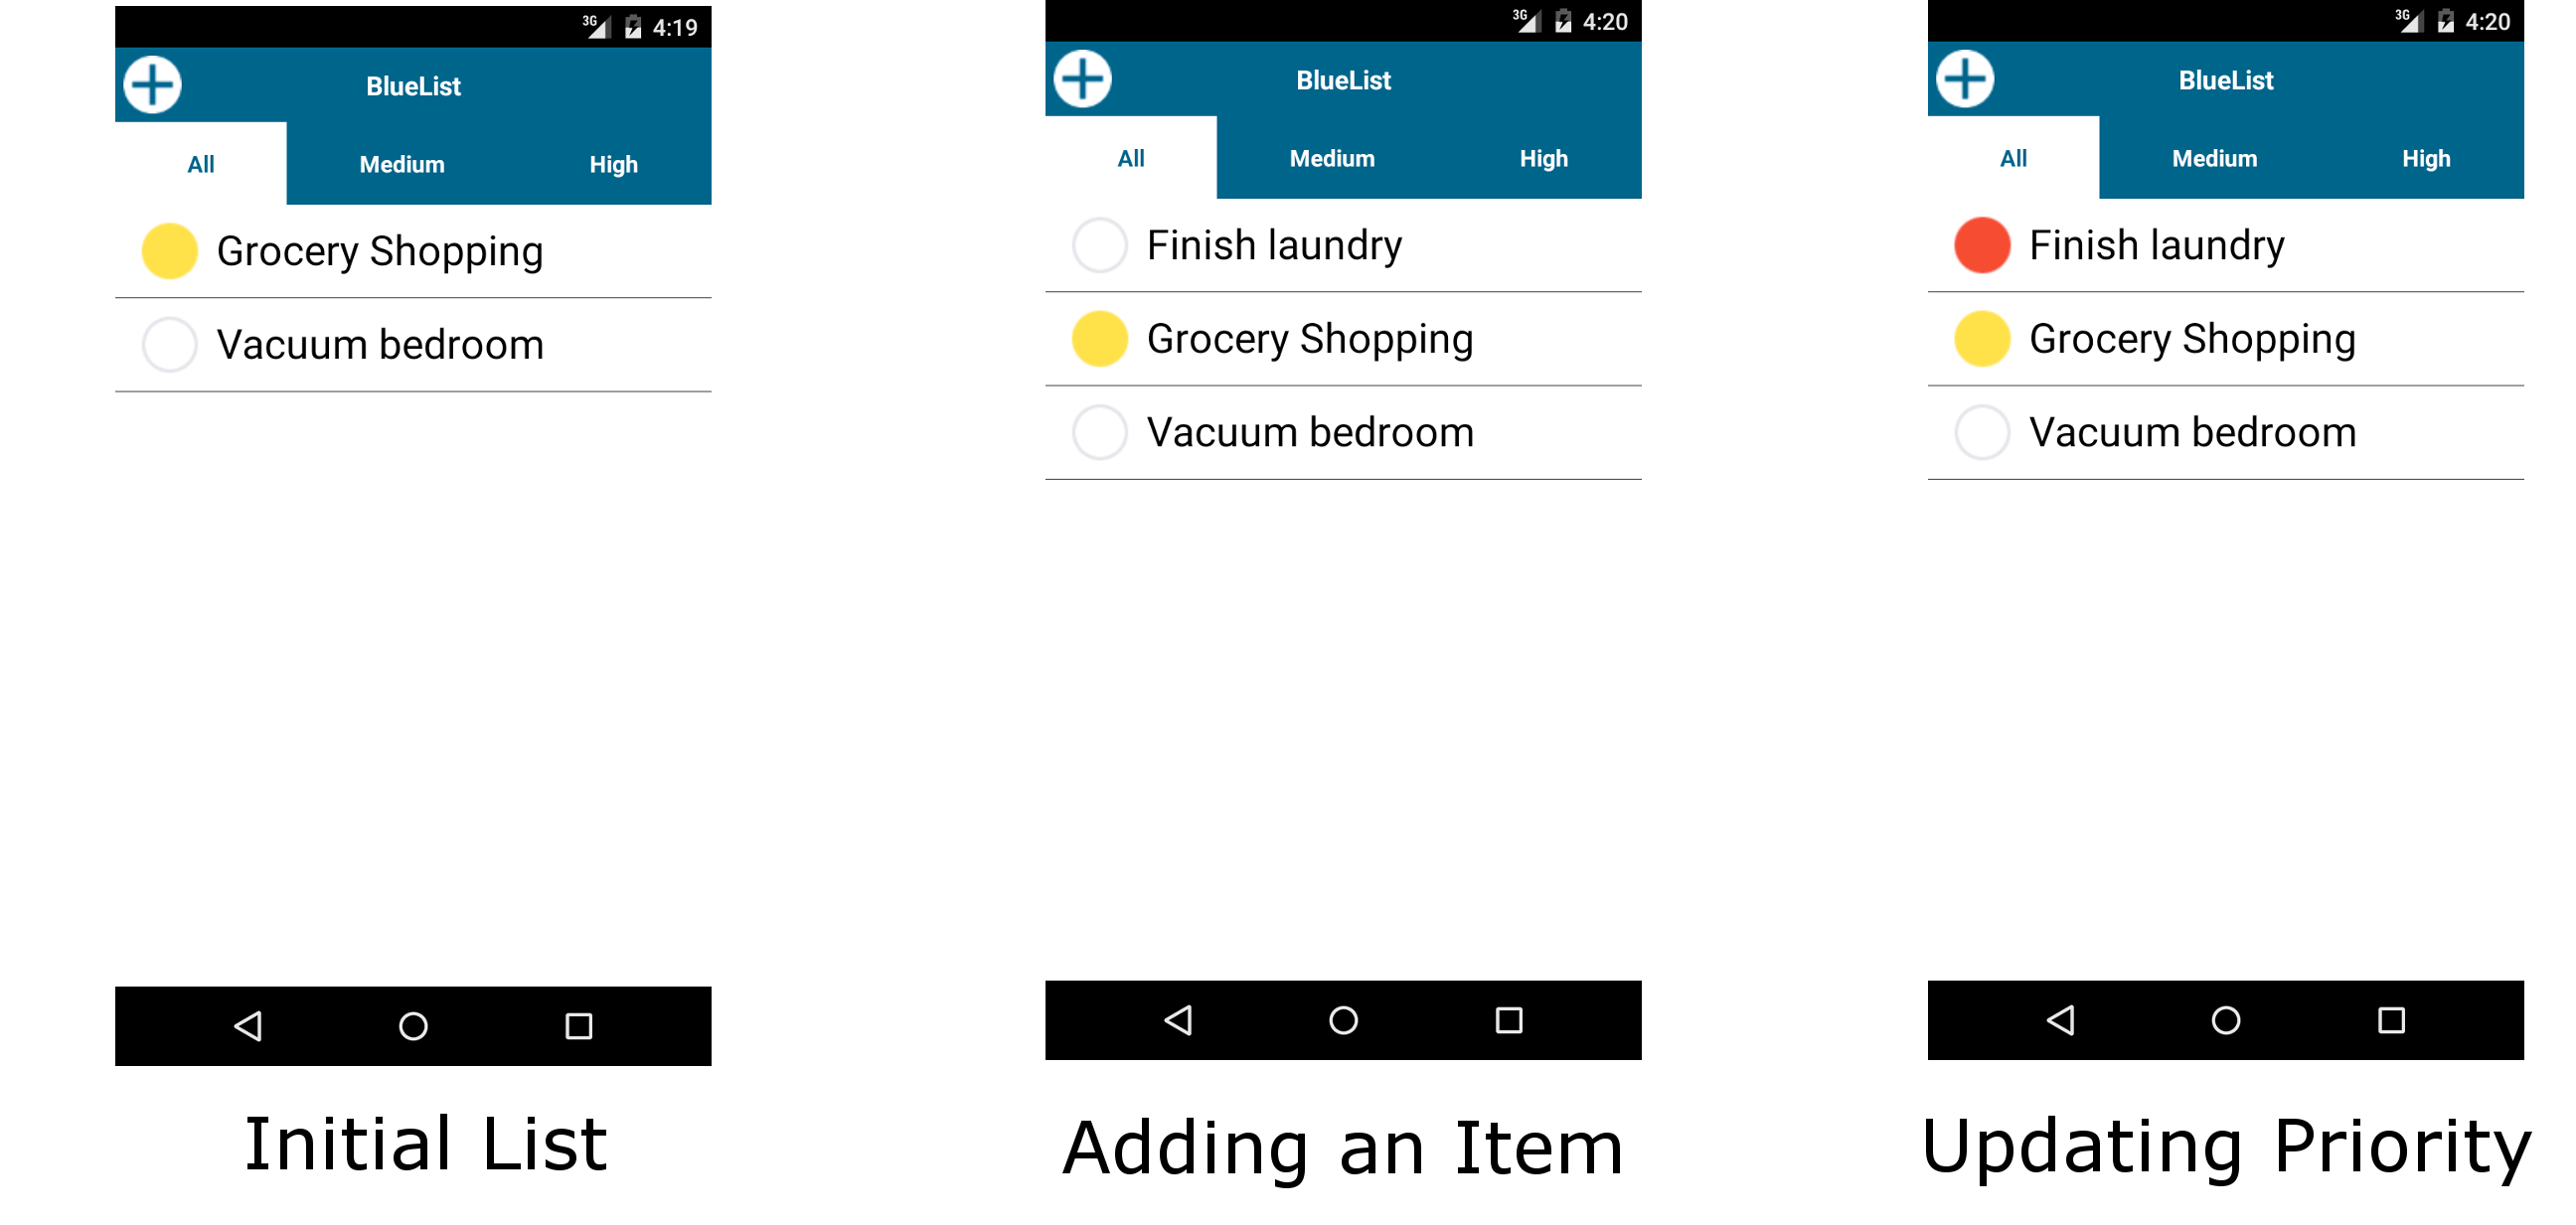
After completing initialization, the application does an initial pull from the remote database. The user can now create, update, and modify list items in the application, and modify the corresponding priority (red = high, yellow = medium, white = low). By design, the application starts synchronization only when the user manually pulls down the list. On pull down, the application first completes a pull replication from the remote database to the local. After this operation has completed, push replication occurs, which sends any updated local data to the remote database. The local and remote databases are then synchronized.

Inclusive terminology note: The Mobile First Platform team is making changes to support the IBM® initiative to replace racially biased and other discriminatory language in our code and content with more inclusive language. While IBM values the use of inclusive language, terms that are outside of IBM's direct influence are sometimes required for the sake of maintaining user understanding. As other industry leaders join IBM in embracing the use of inclusive language, IBM will continue to update the documentation to reflect those changes.