Live Update service
improve this page | report issueOverview
The Live Update feature in Mobile Foundation provides a simple way to define and serve different configurations for users of an application. It includes a component in the MobileFirst Operations Console for defining the structure of the configuration as well as the values of the configuration. A client SDK (available for Android and iOS native and for Cordova applications) is provided for consuming the configuration.
Common Use Cases
Live Update supports defining and consuming configurations, making it easy to make customizations to the application. An example of a common use cases is:
- Release trains and feature flipping
Following usecases will be supported in future releases.
- A/B testing
- Context-based customization of the application (e.g., geographic segmentation)
Jump to:
- Concept
- Live Update Architecture
- Adding Live Update to MobileFirst Server
- Configuring Application Security
- Adding Live Update SDK to Applications
- Using the Live Update SDK
- Advanced Topics
Concept
The Live Update service adds the following functions to every application.
- Features - Using features you can define configurable application features and set their default values.
- Properties - Using properties you can define configurable application properties and set their default values.
The developer or the application management team needs to decide upon the following.
- The set of features and their default state where Live Update can be used.
- The set of configurable string properties and their default values.
Once the parameters are decided upon, add the features and properties to the app through the Live Update section.
- Feature: A feature determines if some part of the application functionality is enabled or disabled. When defining a feature of an application the following elements should be provided:
- id – A unique feature identifier. String, Non-editable.
- name - A descriptive name of the feature. String, Editable.
- description – A short description of the feature. String, Editable.
- defaultValue – The default value of the feature that will be served unless it was overridden inside the segment (see Segment below). Boolean, Editable.
- Property: A property is a key:value entity that can be used to customize applications. When defining a property the following elements should be provided:
- id – A unique property identifier. String, Non-editable.
- name - A descriptive name of a property. String, Editable.
- description – A short description of the property. String, Editable.
- defaultValue - The default value of the property that will be served unless it was overridden inside the segment (see Segment below). String, Editable.
Live Update Architecture
The following system components function together in order to provide the Live Update functionality.
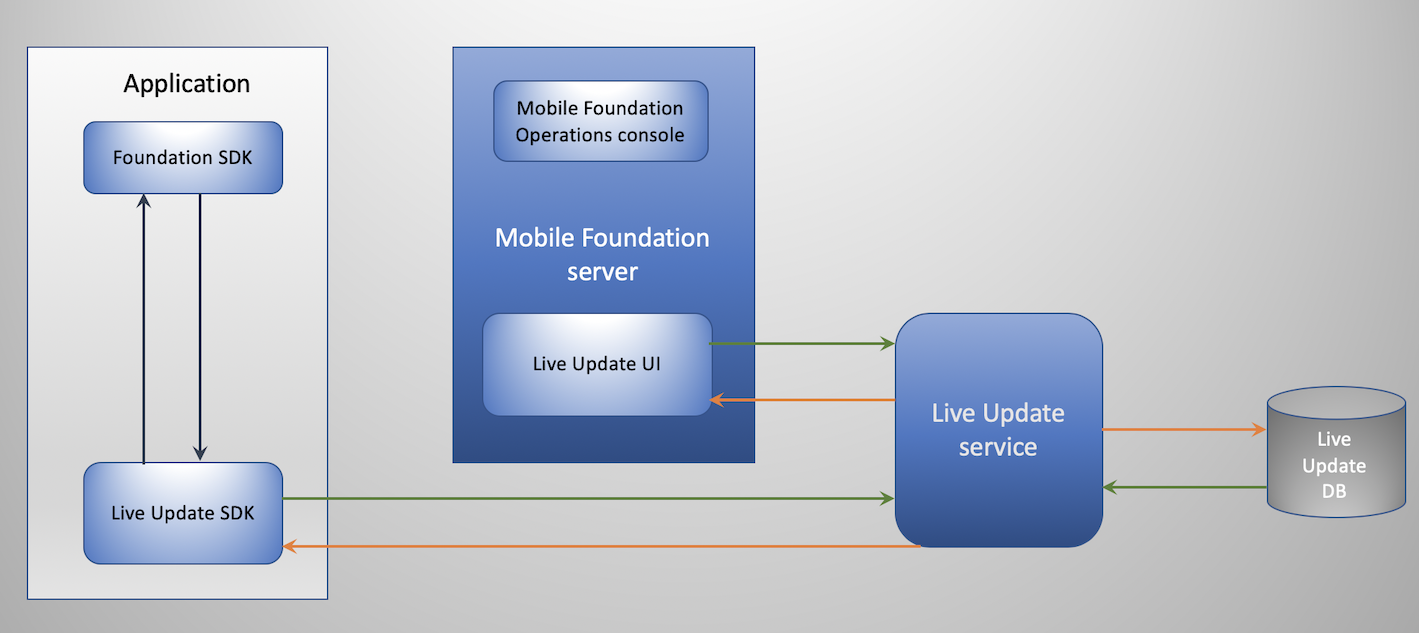
- Live Update service: an independent service which provides:
- Application management
- Serving configurations to applications
- Client-side SDK: the Live Update SDK is used to retrieve and access configuration elements such as features and properties from the MobileFirst Server.
- MobileFirst Operations Console: used for configuring the Live Update adapter and settings.
Installing Live Update service
Live Update service can now be installed and configured on a traditional on-premise MobileFirst Server from the iFix version 8.0.0.0-MFPF-IF202008201003-CDUpdate-07 onwards. The Live Update service war is made available as a part of MobileFirst Server installation. It can be installed on the application server just like any other MobileFirst component using sample ANT tasks or the Server Configuration Tool (SCT).
Installing the Live Update service with Server Configuration Tool (SCT)
-
SCT can be used to set up the Live Update database and install the components to an application server. You will have to create a new profile on SCT to include the Live Update installation.
-
Installing the Live Update service by re-deploying your older configuration (prior to 8.0.0.0-MFPF-IF202008201003-CDUpdate-07) will not install Live Update.
-
However, re-deploying an older configuration on SCT will work as it used to, except that Live Update service will not be installed.
Installing the Live Update Service with Ant tasks
-
Ant tasks can be used to set up the Live Update database and install the components to an application server.
-
If you do not plan to install Live Update, then you can still use your old ANT tasks. The old ANT tasks will work as it used to.
-
If you plan to install Live Update on a new profile, then upgrade your configuration by applying an iFix. After updating your configuration, you can pick up the latest sample configuration files under
mfp_install_dir/MobileFirstServer/configuration-samplesdirectory, modify the ANT tasks accordingly and run the ANT tasks to configure the components on the Application server. -
The installmobilefirstliveupdate, updatemobilefirstliveupdate, and uninstallmobilefirstliveupdate Ant tasks are provided for the installation of the Live Update service.
-
Attributes and elements - The installmobilefirstliveupdate, updatemobilefirstliveupdate, and uninstallmobilefirstliveupdate Ant tasks have the following attributes:
- liveupdateClientID: The ID of this Live Update service instance as a confidential client of the authorization server. The ID and the secret must be registered for the authorization server. It can be registered by installmobilefirstadmin Ant task, or from MobileFirst Operations Console.
- liveupdateClientSecret: The secret key of this Live Update service instance as a confidential client of the authorization server. The ID and the secret must be registered for the authorization server. It can be registered by installmobilefirstadmin Ant task, or from MobileFirst Operations Console.
- authorizationURL: The URL of the authorization server. If the authorization server is the MobileFirst runtime, the URL is the URL of the runtime. For example:
http://myHost:9080/mfp. - auto: If the value is set to true, the URL of the authorization server is computed automatically by using the context root of the runtime on the local application server. The auto mode is not supported if you deploy on WebSphere Application Server Network Deployment on a cluster.
-
Installing Live Update on your existing configuration.
-
If you plan to install Live Update on your existing configuration, then upgrade your configuration by applying an iFix. Use the old ANT task to upgrade the war files. After updating the configuration, pick up the sample configuration files under
mfp_install_dir/MobileFirstServer/configuration-samplesdirectory, enter the required Live Update property values and install Live Update using the Live Update task (For example,ant -f mysampleantfile.xml liveupdateinstall). -
Installing Live Update on your existing configuration requires you to add some JNDI properties manually. Following are the details.
-
Mandatory JNDI properties for Live Update on Liberty: You need to make some specific configurations under the mfpadmin application in the
server.xmlfile. The administration service WAR file is inmfp_install_dir/MobileFirstServer/mfp-admin-service.war. You can define the context root as you want. However, usually it is/mfpadmin. When you define the JNDI properties for Live Update, the JNDI names must be prefixed with the context root of the administration service. The following example illustrates the case to declaremfp.admin.liveupdate.url,mfp.liveupdate.authorization.client.id,mfp.liveupdate.authorization.client.secret, whereby the administration service is installed with/mfpadminas the context root: - Mandatory JNDI properties for Live Update on WebSphere Application Server and WebSphere Application Server Network Deployment: You can set JNDI properties with the WebSphere Application Server administration console. Go to Applications → Application Types → WebSphere enterprise applications → MobileFirst_Administration_Service → Environment entries for Web modules and set the entries. You must configure the following JNDI properties for Live Update:
- mfp.liveupdate.url
- mfp.liveupdate.authorization.client.id
- mfp.liveupdate.authorization.client.secret
Note: The JNDI property values for Live Update under MobileFirst Administration service should be the same as what is mentioned under the Live Update Application (context
/mfpliveupdate). -
Adding Live Update to MobileFirst Server
By default, Live Update service is bundled in the Mobile Foundation DevKit.
For OpenShift Container Platform (OCP) installation follow the documentation here.
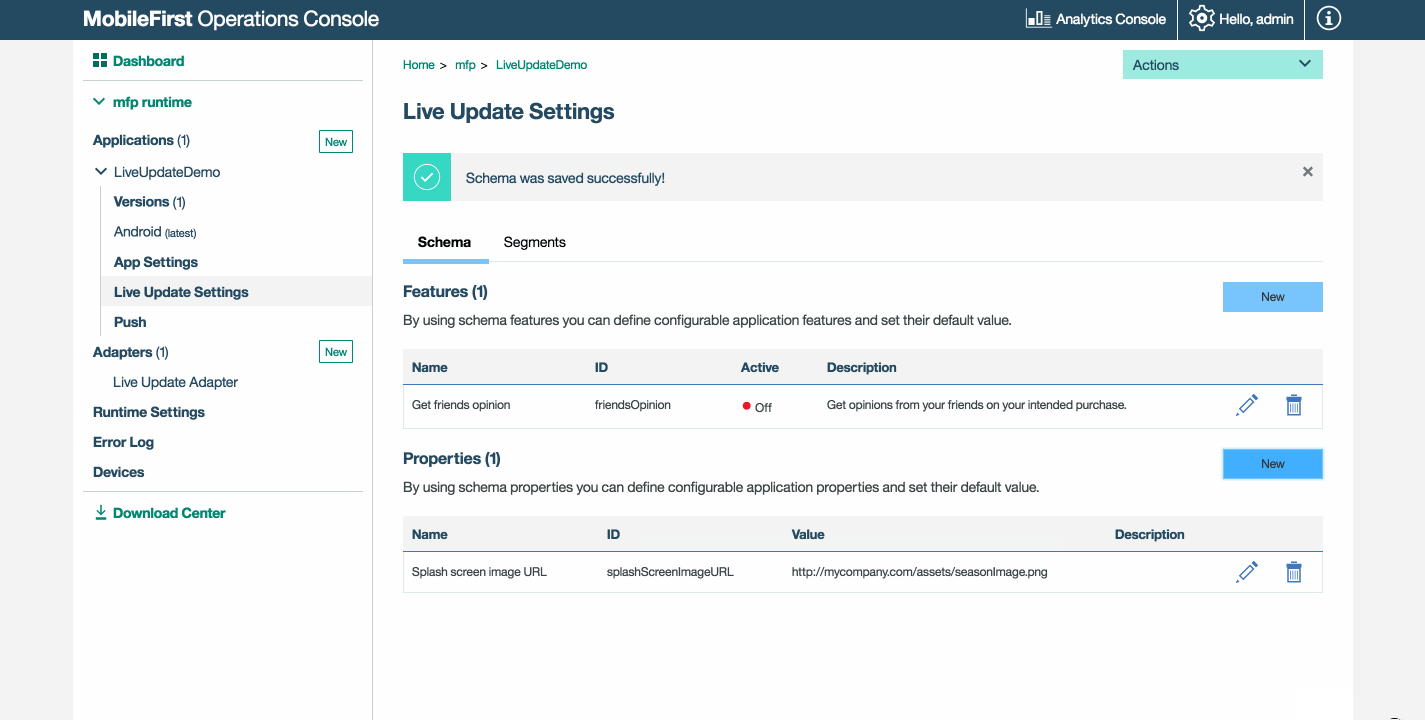
Once the Live Update service is up, the Live Update Settings page is then shown for each registered application.
Configuring Application Security
In order to allow integration with Live Update, a scope element is required. Without the scope element, the service will reject requests from the client applications.
- Load the MobileFirst Operations Console.
- Click [your application] → Security tab → Scope-Elements Mapping.
- Click New and enter the scope element
liveupdate.mobileclient. - Click Add.
You can also map the scope element to a security check in case you’re using one in your application.
Define features and properties with values
See the following demonstration to define features and properties with values.
Adding Live Update SDK to applications
The Live Update SDK provides developers with API to query runtime configuration features and properties that were previously defined in the Live Update Settings screen of the registered application in the MobileFirst Operations Console.
For Cordova, use SDK version 8.0.202003051505 or prior.
For Android, use SDK version 8.0.202003051505.
For iOS, use SDK version 8.0.202003051505 or prior version.
Adding the Cordova plugin
In your Cordova application folder run the following command.
cordova plugin add cordova-plugin-mfp-liveupdate
Adding the iOS SDK
-
Edit your application’s podfile by adding the
IBMMobileFirstPlatformFoundationLiveUpdatepod.
For example:use_frameworks! target 'your-Xcode-project-target' do pod 'IBMMobileFirstPlatformFoundation' pod 'IBMMobileFirstPlatformFoundationLiveUpdate' end -
From a command-line window, navigate to the Xcode project’s root folder and run the following commmand.
pod install
Adding the Android SDK
- In Android Studio, select Android → Gradle Scripts, then select the build.gradle (Module: app) file.
-
Add
ibmmobilefirstplatformfoundationliveupdateinsidedependencies:dependencies { compile group: 'com.ibm.mobile.foundation', name: 'ibmmobilefirstplatformfoundation', version: '8.0.+', ext: 'aar', transitive: true compile group: 'com.ibm.mobile.foundation', name: 'ibmmobilefirstplatformfoundationliveupdate', version: '8.0.0', ext: 'aar', transitive: true }
Using the Live Update SDK
There are several approaches to using the Live Update SDK.
Obtain Configuration
Implement logic to retrieve a configuration.
Replace property-name and feature-name with your own.
Cordova
    var input = { };
    LiveUpdateManager.obtainConfiguration({useClientCache :false },function(configuration) {
        // do something with configration (JSON) object, for example,
        // if you defined in the server a feature named 'feature-name':
        // if (configuration.features.feature-name) {
        //   console.log(configuration.properties.property-name);
	// }
    } ,
    function(err) {
        if (err) {
           alert('liveupdate error:'+err);
        }
  });
iOS
LiveUpdateManager.sharedInstance.obtainConfiguration(completionHandler: { (configuration, error) in
  if error == nil {
    print (configuration?.getProperty("property-name"))
    print (configuration?.isFeatureEnabled("feature-name"))
  } else {
    print (error)
  }
})
Android
LiveUpdateManager.getInstance().obtainConfiguration(new ConfigurationListener() {

    @Override
    public void onSuccess(final Configuration configuration) {
        Log.i("LiveUpdateDemo", configuration.getProperty("property-name"));
        Log.i("LiveUpdateDemo", configuration.isFeatureEnabled("feature-name").toString());
    }

    @Override
    public void onFailure(WLFailResponse wlFailResponse) {
        Log.e("LiveUpdateDemo", wlFailResponse.getErrorMsg());
    }
});
With the Live Update configuration retrieved, the applicative logic and the application flow can be based on the state of features and properties. For example, if today is a national holiday, introduce a new marketing promotion in the application.
Advanced Topics
Caching
Caching is enabled by default in order to avoid network latency. This means that updates may not take place immediately.
Caching can be disabled if more frequent updates are required.
Cordova
Controlling client side cache by using an optional useClientCache boolean flag:
var input = {useClientCache : false };
      LiveUpdateManager.getConfiguration(input,function(configuration) {
              // do something with resulting configuration, for example:
              // console.log(configuration.data.properties.property-name);
              // console.log(configuration.data.features.feature-name);
      } ,
      function(err) {
              if (err) {
                 alert('liveupdate error:'+err);
              }
});
iOS
LiveUpdateManager.sharedInstance.obtainConfiguration(useCache: false, completionHandler: { (configuration, error) in
  if error == nil {
    print (configuration?.getProperty("property-name"))
    print (configuration?.isFeatureEnabled("feature-name"))
  } else {
    print (error)
  }
})
Android
LiveUpdateManager.getInstance().obtainConfiguration(false, new ConfigurationListener() {

    @Override
    public void onSuccess(final Configuration configuration) {
      Log.i("LiveUpdateSample", configuration.getProperty("property-name"));
      Log.i("LiveUpdateSample", configuration.isFeatureEnabled("feature-name").toString());
    }

    @Override
    public void onFailure(WLFailResponse wlFailResponse) {
        Log.e("LiveUpdateSample", wlFailResponse.getErrorMsg());
    }
});
Cache expiration
The expirationPeriod value is 30 minutes, which is the length of time until the caching expires.
Inclusive terminology note: The Mobile First Platform team is making changes to support the IBM® initiative to replace racially biased and other discriminatory language in our code and content with more inclusive language. While IBM values the use of inclusive language, terms that are outside of IBM's direct influence are sometimes required for the sake of maintaining user understanding. As other industry leaders join IBM in embracing the use of inclusive language, IBM will continue to update the documentation to reflect those changes.