Installing MobileFirst Server to an application server
Overview
The installation of the components can be done by using Ant Tasks, the Server Configuration Tool, or manually. Find out the prerequisite and the details about the installation process so that you can install the components on the application server successfully.
Before you proceed with installing the components to the application server, ensure that the databases and the tables for the components are prepared and ready to use. For more information, see Setting up databases.
Depending on your choice of the application server, select one of the following topics to find out the prerequisites that you must fulfill before you install the MobileFirst Server components.
MobileFirst Server has some requirements for the configuration of Apache Tomcat that are detailed in the following topics.
Ensure that you fulfill the following criteria:
The JMX configuration must be enabled to allow the communication between the administration service and the runtime component. The communication uses RMI as described in Configuring JMX connection for Apache Tomcat below.
You must configure a secure JMX connection for Apache Tomcat application server.
The Server Configuration Tool and the Ant tasks can configure a default secure JMX connection, which includes the definition of a JMX remote port, and the definition of authentication properties. They modify tomcat_install_dir/bin/setenv.bat and tomcat_install_dir/bin/setenv.sh to add these options to CATALINA_OPTS:
Note: 8686 is a default value. The value for this port can be changed if the port is not available on the computer.
The setenv.bat file is used if you start Apache Tomcat with tomcat_install_dir/bin/startup.bat, or tomcat_install_dir/bin/catalina.bat.
The setenv.sh file is used if you start Apache Tomcat with tomcatInstallDir/bin/startup.sh, or tomcat_install_dir/bin/catalina.sh.
This file might not be used if you start Apache Tomcat with another command. If you installed the Apache Tomcat Windows Service Installer, the service launcher does not use setenv.bat.
Important: This configuration is not secure by default. To secure the configuration, you must manually complete steps 2 and 3 of the following procedure.
Manually configuring Apache Tomcat:
For a simple configuration, add the following options to CATALINA_OPTS:
If the Tomcat instance is running behind a firewall, the JMX Remote Lifecycle Listener must be configured. See the Apache Tomcat documentation for JMX Remote Lifecycle Listener.
The following environment properties must also be added to the Context section of the administration service application in the server.xml file, such as in the following example:
registryPort must have the same value as the rmiRegistryPortPlatform attribute of the JMX Remote Lifecycle Listener.
serverPort must have the same value as the rmiServerPortPlatform attribute of the JMX Remote Lifecycle Listener.
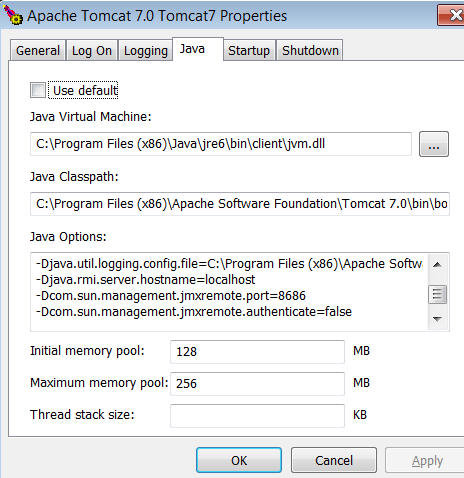
If you installed Apache Tomcat with the Apache Tomcat Windows Service Installer instead of adding the options to CATALINA_OPTS, run tomcat_install_dir/bin/Tomcat7w.exe, and add the options in the Java tab of the Properties window.
WebSphere Application Server Liberty prerequisites
IBM Mobile Foundationhas some requirements for the configuration of the Liberty server that are detailed in the following topics.
Liberty must be run with JRE 7.0 or later. JRE 6.0 is not supported.
Some versions of Liberty support both the features of Java EE 6 and Java EE 7. For example, jdbc-4.0 Liberty feature is part of Java EE 6, whereas jdbc-4.1 Liberty feature is part of Java EE 7. MobileFirst Server V8.0.0 can be installed with Java EE 6 or Java EE 7 features. However, if you want to run an older version of MobileFirst Server on the same Liberty server, you must use the Java EE 6 features. MobileFirst Server V7.1.0 and earlier, does not support the Java EE 7 features.
JMX must be configured as documented in Configuring JMX connection for WebSphere Application Server Liberty profile below.
For an installation in a production environment, you might want to start the Liberty server as a service on Windows, Linux, or UNIX systems so that:
The MobileFirst Server components are started automatically when the computer starts.
The process that runs Liberty server is not stopped when the user, who started the process, logs out.
MobileFirst Server V8.0.0 cannot be deployed in a Liberty server that contains the deployed MobileFirst Server components from the previous versions.
For an installation in a Liberty collective environment, the Liberty collective controller and the Liberty collective cluster members must be configured as documented in Configuring a Liberty collective.
MobileFirst Server requires the secure JMX connection to be configured.
The Server Configuration Tool and the Ant tasks can configure a default secure JMX connection, which includes the generation of a self-signed SSL certificate with a validity period of 365 days. This configuration is not intended for production use.
The rest-connector is available for WebSphere Application Server, Liberty Core, and other editions of Liberty, but it is possible to package a Liberty server with a subset of the available features. To verify that the rest-connector feature is available in your installation of Liberty, enter the following command:
liberty_install_dir/bin/productInfo featureInfo
Note: Verify that the output of this command contains restConnector-1.0.
WebSphere Application Server and WebSphere Application Server Network Deployment prerequisites
MobileFirst Server has some requirements for the configuration of WebSphere Application Server and WebSphere Application Server Network Deployment that are detailed in the following topics.
Ensure that you fulfill the following criteria:
Use a supported version of WebSphere Application Server. See System requirements.
The administrative security must be turned on. MobileFirst Operations Console, the MobileFirst Server administration service, and the MobileFirst Server configuration service are protected by security roles. For more information, see Enabling security.
The JMX configuration must be enabled to allow the communication between the administration service and the runtime component. The communication uses SOAP. For WebSphere Application Server Network Deployment, RMI can be used. For more information, see Configuring JMX connection for WebSphere Application Server and WebSphere Application Server Network Deployment below.
MobileFirst Server requires the secure JMX connection to be configured.
MobileFirst Server requires access to the SOAP port, or the RMI port to perform JMX operations. By default, the SOAP port is active on a WebSphere Application Server. MobileFirst Server uses the SOAP port by default. If both the SOAP and RMI ports are deactivated, MobileFirst Server does not run.
RMI is only supported by WebSphere Application Server Network Deployment. RMI is not supported by a stand-alone profile, or a WebSphere Application Server server farm.
You must activate Administrative and Application Security.
File system prerequisites
To install MobileFirst Server to an application server, the MobileFirst installation tools must be run by a user that has specific file system privileges.
The installation tools include:
IBM Installation Manager
The Server Configuration Tool
The Ant tasks to deploy MobileFirst Server
For WebSphere Application Server Liberty profile, you must have the required permission to perform the following actions:
Read the files in the Liberty installation directory.
Create files in the configuration directory of the Liberty server, which is typically usr/servers/server-name, to create backup copies and modify server.xml and jvm.options.
Create files and directories in the Liberty shared resource directory, which is typically usr/shared.
Create files in the Liberty server apps directory, which is typically usr/servers/server-name/apps.
For WebSphere Application Server full profile and WebSphere Application Server Network Deployment, you must have the required permission to perform the following actions:
Read the files in the WebSphere Application Server installation directory.
Read the configuration file of the selected WebSphere Application Server full profile or of the Deployment Manager profile.
Run the wsadmin command.
Create files in the profiles configuration directory. The installation tools put resources such as shared libraries or JDBC drivers in that directory.
For Apache Tomcat, you must have the required permission to perform the following actions:
Read the configuration directory.
Create backup files and modify files in the configuration directory, such as server.xml, and tomcat-users.xml.
Create backup files and modify files in the bin directory, such as setenv.bat.
Create files in the lib directory.
Create files in the webapps directory.
For all these application servers, the user who runs the application server must be able to read the files that were created by the user who ran the MobileFirst installation tools.
Installing with the Server Configuration Tool
Use the Server Configuration Tool to install the MobileFirst Server components to your application server.
The Server Configuration Tool can set up the database and install the components to an application server. This tool is meant for a single user. The configuration files are store on the disk. The directory where they are stored can be modified with menu File → Preferences. The files must be used only by one instance of the Server Configuration Tool at the time. The tool does not manage concurrent access to the same file. If you have multiple instances of the tool accessing the same file, the data might be lost. For more information about how the tool creates and setup the databases, see Create the database tables with the Server Configuration Tool. If the databases exist, the tool can detect them by testing the presence and the content of some test tables and does not modify these database tables.
You can use the Server Configuration Tool if you are on the following operating systems:
Windows x86 or x86-64
macOS x86-64
Linux x86 or Linux x86-64
The tool is not available on other operating systems. You need to use Ant tasks to install the MobileFirst Server components as described in Installing with Ant Tasks.
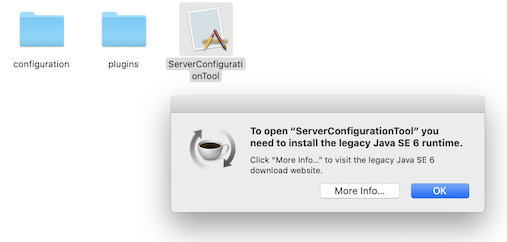
The ServerConfigurationTool (SCT) launcher on Mac OS mandates to install the legacy Java SE 6 runtime. You may see the below message when you launch the SCT launcher on Mac OS.
To workaround this, you can follow one of the following approaches and run SCT using the SCT executable without having to install Java SE 6 runtime.
Approach 1
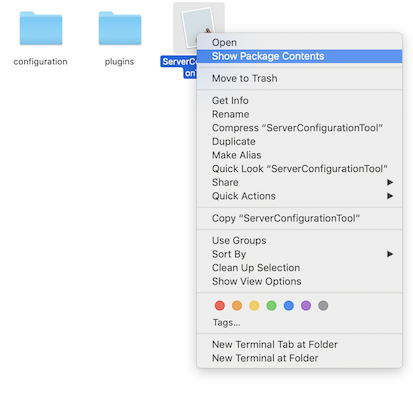
Right Click on the ServerConfigurationTool launcher.
Select Show Package Contents
Click Contents > MacOS.
Click the ServerConfigurationTool executable to launch SCT.
Approach 2
You can have both Java SE 8 and Java SE6 installed on your computer without any issues.
When the pop up window appears while using the SCT launcher, click More Info.
You will be directed to the Apple Support site. Here, you may find further instructions on how to get Java SE 6 runtime.
Follow the instructions, install Java SE 6 Runtime and then launch the SCT launcher.
Supported topologies
The Server Configuration Tool installs the MobileFirst Server components with the following topologies:
All components (MobileFirst Operations Console, the MobileFirst Server administration service, the MobileFirst Server live update service, and the MobileFirst runtime) are in the same application server. However, on WebSphere Application Server Network Deployment when you install on a cluster, you can specify a different cluster for the administration and live update services, and for the runtime. On Liberty collective, MobileFirst Operations Console, the administration service, and the live update service are installed in a collective controller and the runtime in a collective member.
If the MobileFirst Server push service is installed, it is also installed on the same server. However, on WebSphere Application Server Network Deployment when you install on a cluster, you can specify a different cluster for the push service. On Liberty collective, the push service is installed in a Liberty member that can be the same as the one where the runtime is installed.
All the components use the same database system and the user. For DB2 , all the components also use the same schema.
The Server Configuration Tool installs the components for a single server except for Liberty collective and WebSphere Application Server Network Deployment for asymmetric deployment. For an installation on multiple servers, a farm must be configured after the tool is run. The server farm configuration is not required on WebSphere Application Server Network Deployment.
For other topologies or other database settings, you can install the components with Ant Tasks or manually instead.
Running the Server Configuration Tool
Before you run the Server Configuration Tool, make sure that the following requirements are fulfilled:
The databases and the tables for the components are prepared and ready to use. See Setting up databases.
In the Console Settings panel, select whether to install MobileFirst Operations Console or not. If the console is not installed, you need to use command line tools (mfpdev or mfpadm) or the REST API to interact with the MobileFirst Server administration service.
In the Database Selection panel, select the database management system that you plan to use. All the components use the same database type and the same database instance. For more information about the database panes, see Create the database tables with the Server Configuration Tool.
In the Application Server Selection panel, select the type of application server where you want to deploy MobileFirst Server.
In the Application Server Settings panel, choose the application server and do the following steps:
For an installation on WebSphere Application Server Liberty:
Enter the installation directory of Liberty and the name of the server where you want to install MobileFirst Server.
You can create a default user to log in the console. This user is created in the Liberty Basic registry. For a production installation, you might want to clear the Create a default user option and to configure the user access after the installation. For more information, see Configuring user authentication for MobileFirst Server administration.
Select the deployment type: Standalone deployment (default), Server farm deployment, or Liberty collective deployment.
If the Liberty collective deployment option is selected, do the following steps:
Specify the Liberty collective server:
Where the administration service, MobileFirst Operations Console and the live update service are installed. The server must be a Liberty collective controller.
Where the runtime is installed. The server must be a Liberty collective member.
Where the push service is installed. The server must be a Liberty collective member.
Enter the server ID of the member. This identifier must be different for each member in the collective.
Enter the cluster name of the collective members.
Enter the controller host name and HTTPS port number. The values must be the same as the one that is defined in the variable element inside the server.xml file of the Liberty collective controller.
Enter the controller administrator user name and password.
For an installation on WebSphere Application Server or WebSphere Application Server Network Deployment:
Enter the installation directory of WebSphere Application Server.
Select the WebSphere Application Server profile where you want to install MobileFirst Server. If you install on WebSphere Application Server Network Deployment, select the profile of the deployment manager. On the deployment manager profile, you can select a scope (Server or Cluster). If you select Cluster, you must specify the cluster:
Where the runtime is installed.
Where the administration service, MobileFirst Operations Console and the live update service are installed.
Where the push service is installed.
Enter an administrator login ID and password. The administrator user must have an administrator role.
If you select the Declare the WebSphere Administrator as an administrator user in MobileFirst Operations Console option, then the user that is used to install MobileFirst Server is mapped to the administration security role of the console and can log in to the console with administrator privileges. This user is also mapped to the security role of the live update service. The user name and password are set as JNDI properties (mfp.config.service.user and mfp.config.service.password) of the administration service.
If you do not select the Declare the WebSphere Administrator as an administrator user in MobileFirst Operations Console option, then before you can use MobileFirst Server, you must do the following tasks:
Enable the communication between the administration service and the live update service by:
Mapping a user to the security role configadmin of the live update service.
Adding the login ID and password of this user in the JNDI properties (mfp.config.service.user and mfp.config.service.password) of the administration service.
Enter the installation directory of Apache Tomcat.
Enter the port that is used for the JMX communication with RMI. By default, the value is 8686. The Server Configuration Tool modifies the tomcat_install_dir/bin/setenv.bat or tomcat_install_dir/bin/setenv.sh file to open this port. If you want to open the port manually, or have already some code that opens the port in setenv.bat or setenv.sh, do not use the tool. Install with Ant tasks instead. An option to open the RMI port manually is provided for an installation with Ant tasks.
Create a default user to log in the console. This user is also created in the tomcat-users.xml configuration file. For a production installation, you might want to clear the Create a default user option and to configure the user access after the installation. For more information, see Configuring user authentication for MobileFirst Server administration.
In the Push Service Settings panel, select the Install the Push service option if you want the push service to be installed in the application server. The context root is imfpush. To enable the communication between the push service and the administration service, you need to define the following parameters:
Enter the URL of the push service and the URL of the runtime. This URL can be computed automatically if you install on Liberty, Apache Tomcat, or stand-alone WebSphere Application Server. It uses the URL of the component (the runtime or the push service) on the local server. If you install on WebSphere Application Server Network Deployment or the communications go through a web proxy or load balancer, you must enter the URL manually.
Enter the confidential client IDs and secret for the OAuth communication between the services. Otherwise, the tool generates default values and random passwords.
In the Analytics Settings panel, select the Enable the connection to the Analytics server if MobileFirst Analytics is installed. Enter the following connection settings:
The URL of the Analytics console.
The URL of the Analytics server (the Analytics data service).
The user login ID and password that is allowed to publish data to the Analytics server.
The tool configures the runtime and the push service to send data to the Analytics server.
Click Deploy to proceed with the installation.
After the installation is completed successfully, restart the application server in the case of Apache Tomcat or Liberty profile.
If Apache Tomcat is launched as a service, the setenv.bat or setenv.sh file that contains the statement to open the RMI might not be read. As a result, MobileFirst Server might not be able to work correctly. To set the required variables, see Configuring JMX connection for Apache Tomcat.
On WebSphere Application Server Network Deployment, the applications are installed but not started. You need to start them manually. You can do that from the WebSphere Application Server administration console.
Keep the configuration file in the Server Configuration Tool. You might reuse it to install the interim fixes. The menu to apply an interim fix is Configurations > Replace the deployed WAR files.
Applying a fix pack by using the Server Configuration Tool
If MobileFirst Server is installed with the configuration tool and the configuration file is kept, you can apply a fix pack or an interim fix by reusing the configuration file.
Start the Server Configuration Tool.
On Linux, from application shortcuts Applications → IBM MobileFirst Platform Server → Server Configuration Tool.
On Windows, click Start → Programs → IBM MobileFirst Platform Server → Server Configuration Tool.
On macOS, open a shell console. Go to mfp_server_install_dir/shortcuts and type ./configuration-tool.sh.
The mfp_server_install_dir directory is where you installed MobileFirst Server.
Click Configurations → Replace the deployed WAR files and select an existing configuration to apply the fix pack or an interim fix.
Installing with Ant tasks
Use Ant tasks to install the MobileFirst Server components to your application server.
You can find the sample configuration files for installing MobileFirst Server in the mfp_install_dir/MobileFirstServer/configuration-samples directory.
You can also create a configuration with the Server Configuration Tool and export the Ant files by using File → Export Configuration as Ant Files…. The sample Ant files have the same limitations as the Server Configuration Tool:
All components (MobileFirst Operations Console, MobileFirst Server administration service, MobileFirst Server live update service, the MobileFirst Server artifacts, and MobileFirst runtime) are in the same application server. However, on WebSphere Application Server Network Deployment when you install on a cluster, you can specify a different cluster for the administration and live update services, and for the runtime.
If the MobileFirst Server push service is installed, it is also installed on the same server. However, on WebSphere Application Server Network Deployment when you install on a cluster, you can specify a different cluster for the push service.
All the components use the same database system and the user. For DB2 , all the components also use the same schema.
The Server Configuration Tool installs the components for a single server. For an installation on multiple servers, a farm must be configured after the tool is run. The server farm configuration is not supported on WebSphere Application Server Network Deployment.
You can configure the MobileFirst Server services to run in server farm with Ant tasks. To include your server in a farm, you need to specify some specific attributes that configure your application server accordingly. For more information about configuring a server farm with Ant tasks, see Installing a server farm with Ant tasks.
You can run an Ant file with the Ant distribution that is part of the product installation. For example, if you have WebSphere Application Server Network Deployment cluster and your database is IBM DB2, you can use the mfp_install_dir/MobileFirstServer/configuration-samples/configure-wasnd-cluster-db2.xml Ant file. After you edit the file and enter all the required properties, you can run the following commands from mfp_install_dir/MobileFirstServer/configuration-samples directory:
mfp_install_dir/shortcuts/ant -f configure-wasnd-cluster-db2.xml help - This command displays the list of all the possible targets of the Ant file, to install, uninstall, or update some components.
mfp_install_dir/shortcuts/ant -f configure-wasnd-cluster-db2.xml install - This command installs MobileFirst Server on the WebSphere Application Server Network Deployment cluster, with DB2 as a data source by using the parameters that you entered in the properties of the Ant file.
After the installation, make a copy of the Ant file so that you can reuse it to apply a fix pack.
Applying a fix pack by using the Ant files
Updating with the sample Ant file
If you use the sample Ant files that are provided in the mfp_install_dir/MobileFirstServer/configuration-samples directory to install MobileFirst Server, you can reuse a copy of this Ant file to apply a fix pack. For password values, you can enter 12 stars (*) instead of the actual value, to be prompted interactively when the Ant file is run.
Verify the value of the mfp.server.install.dir property in the Ant file. It must point to the directory that contains the product with the fix pack applied. This value is used to take the updated MobileFirst Server WAR files.
Run the command: mfp_install_dir/shortcuts/ant -f your_ant_file update
Updating with own Ant file
If you use your own Ant file, make sure that for each installation task (installmobilefirstadmin, installmobilefirstruntime, and installmobilefirstpush), you have a corresponding update task in your Ant file with the same parameters. The corresponding update tasks are updatemobilefirstadmin, updatemobilefirstruntime, and updatemobilefirstpush.
Verify the class path of the taskdef element for the mfp-ant-deployer.jar file. It must point to the mfp-ant-deployer.jar file in an MobileFirst Server installation that the fix pack is applied. By default, the updated MobileFirst Server WAR files are taken from the location of mfp-ant-deployer.jar.
Run the update tasks (updatemobilefirstadmin, updatemobilefirstruntime, and updatemobilefirstpush) of your Ant file.
Sample Ant files modifications
You can modify the sample Ant files that are provided in the mfp_install_dir/MobileFirstServer/configuration-samples directory to adapt to your installation requirements.
The following sections provide the details on how you can modify the sample Ant files to adapt the installation to your needs:
The installmobilefirstadmin, installmobilefirstruntime, and installmobilefirstpush Ant tasks declare the values for the JNDI properties that are required for the components to function. These JNDI properties are used to define the JMX communication, and also the links to other components (such the live update service, the push service, the analytics service, or the authorization server). However, you can also define values for other JNDI properties. Use the <property> element that exists for these three tasks. For a list of JNDI properties, see:
Also, the user that is created by the sample Ant files is mapped to the security roles of the administration service and the console. With this setting, you can use this user to log on to MobileFirst Server after the installation. To change that behavior, remove the <user> element from the sample Ant files. Alternatively, you can remove the password attribute from the <user> element, and the user is not created in the local registry of the application server.
Specify Liberty Java EE level
Some distributions of WebSphere Application Server Liberty support features from Java EE 6 or from Java EE 7. By default, the Ant tasks automatically detect the features to install. For example, jdbc-4.0 Liberty feature is installed for Java EE 6 and jdbc-4.1 feature is installed in case of Java EE 7. If the Liberty installation supports both features from Java EE 6 and Java EE 7, you might want to force a certain level of features. An example might be that you plan to run both MobileFirst Server V8.0.0 and V7.1.0 on the same Liberty server. MobileFirst Server V7.1.0 or earlier supports only Java EE 6 features.
To force a certain level of Java EE 6 features, use the jeeversion attribute of the <websphereapplicationserver> element. For example:
You can specify the properties for the JDBC connection. Use the <property> element of a <database> element. The element is available in configureDatabase, installmobilefirstadmin, installmobilefirstruntime, and installmobilefirstpush Ant tasks. For example:
Run the Ant files on a computer where MobileFirst Server is not installed
To run the Ant tasks on a computer where MobileFirst Server is not installed, you need the following items:
An Ant installation
A copy of the mfp-ant-deployer.jar file to the remote computer. This library contains the definition of the Ant tasks.
To specify the resources to be installed. By default, the WAR files are taken near the mfp-ant-deployer.jar, but you can specify the location of these WAR files. For example:
For more information, see the Ant tasks to install each MobileFirst Server component at Installation reference.
Specify WebSphere Application Server Network Deployment targets
To install on WebSphere Application Server Network Deployment, the specified WebSphere Application Server profile must be the deployment manager. You can deploy on the following configurations:
A cluster
A single server
A cell (all the servers of a cell)
A node (all the servers of a node)
The sample files such as configure-wasnd-cluster-dbms-name.xml, configure-wasnd-server-dbms-name.xml, and configure-wasnd-node-dbms-name.xml contain the declaration to deploy on each type of target. For more information, see the Ant tasks to install each MobileFirst Server component in the Installation reference.
Note: As of V8.0.0, the sample configuration file for the WebSphere Application Server Network Deployment cell is not provided.
Manual configuration of the RMI port on Apache Tomcat
By default, the Ant tasks modify the setenv.bat file or the setenv.sh file to open the RMI port. If you prefer to open the RMI port manually, add the tomcatSetEnvConfig attribute with the value as false to the <jmx> element of the installmobilefirstadmin, updatemobilefirstadmin, and uninstallmobilefirstadmin tasks.
Installing the MobileFirst Server components manually
You can also install the MobileFirst Server components to your application server manually.
The following topics provide you the complete information to guide you through the installing process of the components on the supported applications in production.
The MobileFirst Server administration service, the MobileFirst Server live update service, and the MobileFirst runtime must be installed on the same application server. The context root of the live update service must be defined as the-adminContextRootconfig. The context root of the push service must be imfpush. For more information about the constraints, see Constraints on the MobileFirst Server components and MobileFirst Analytics.
Application server settings
You must configure the webContainer element to load the servlets immediately. This setting is required for the initialization through JMX. For example: <webContainer deferServletLoad="false"/>.
Optionally, to avoid timeout issues that break the startup sequence of the runtime and the administration service on some Liberty versions, change the default executor element. Set large values to the coreThreads and maxThreads attributes. For example:
You might also configure the tcpOptions element and set the soReuseAddr attribute to true: <tcpOptions soReuseAddr="true"/>.
Liberty features required by the MobileFirst Server applications
You can use the following features for Java EE 6 or Java EE 7.
MobileFirst Server administration service
jdbc-4.0 (jdbc-4.1 for Java EE 7)
appSecurity-2.0
restConnector-1.0
usr:MFPDecoderFeature-1.0
MobileFirst Server push service
jdbc-4.0 (jdbc-4.1 for Java EE 7)
servlet-3.0 (servlet-3.1 for Java EE 7)
ssl-1.0
usr:MFPDecoderFeature-1.0
MobileFirst runtime
jdbc-4.0 (jdbc-4.1 for Java EE 7)
servlet-3.0 (servlet-3.1 for Java EE 7)
ssl-1.0
usr:MFPDecoderFeature-1.0
Global JNDI entries
The following global JNDI entries are required to configure the JMX communication between the runtime and the administration service:
mfp.admin.jmx.host
mfp.admin.jmx.port
mfp.admin.jmx.user
mfp.admin.jmx.pwd
mfp.topology.platform
mfp.topology.clustermode
These global JNDI entries are set with this syntax and are not prefixed by a context root. For example: <jndiEntry jndiName="mfp.admin.jmx.port" value="9443"/>.
Note: To protect against an automatic conversion of the JNDI values, so that 075 is not converted to 61 or 31.500 is not converted to 31.5, use this syntax ‘“075”’ when you define the value.
The administration service is packaged as a WAR application for you to deploy to the application server. You need to make some specific configurations for this application in the server.xml file. The administration service WAR file is in mfp_install_dir/MobileFirstServer/mfp-admin-service.war. You can define the context root as you want. However, usually it is /mfpadmin.
Mandatory JNDI properties
When you define the JNDI properties, the JNDI names must be prefixed with the context root of the administration service. The following example illustrates the case to declare mfp.admin.push.url whereby the administration service is installed with /mfpadmin as the context root:
The JNDI name of the data source for the administration service must be defined as jndiName=the-contextRoot/jdbc/mfpAdminDS. The following example illustrates the case whereby the administration service is installed with the context root /mfpadmin, and that the service is using a relational database:
The live update service is packaged as a WAR application for you to deploy to the application server. You need to make some specific configurations for this application in the server.xml file. Before you proceed, review Manual installation on WebSphere Application Server Liberty for the configuration details that are common to all services.
The live update service WAR file is in mfp_install_dir/MobileFirstServer/mfp-live-update.war. The context root of the live update service must define in this way: /the-adminContextRootconfig. For example, if the context root of the administration service is /mfpadmin, then the context root of the live update service must be /mfpadminconfig.
Data source
The JNDI name of the data source for the live update service must be defined as the-contextRoot/jdbc/ConfigDS. The following example illustrates the case whereby the live update service is installed with the context root /mfpadminconfig, and that the service is using a relational database:
Declare the configadmin role in the application-bnd element of the application. At least one user must be mapped to this role. The user and its password must be provided to the following JNDI properties of the administration service:
The console is packaged as a WAR application for you to deploy to the application server. You need to make some specific configurations for this application in the server.xml file. Before you proceed, review Manual installation on WebSphere Application Server Liberty for the configuration details that are common to all services.
The console WAR file is in mfp_install_dir/MobileFirstServer/mfp-admin-ui.war. You can define the context root as you want. However, usually it is /mfpconsole.
Mandatory JNDI properties
When you define the JNDI properties, the JNDI names must be prefixed with the context root of the console. The following example illustrates the case to declare mfp.admin.endpoint whereby the console is installed with /mfpconsole as the context root:
The runtime is packaged as a WAR application for you to deploy to the application server. You need to make some specific configurations for this application in the server.xml file. Before you proceed, review Manual installation on WebSphere Application Server Liberty for the configuration details that are common to all services.
The runtime WAR file is in mfp_install_dir/MobileFirstServer/mfp-server.war. You can define the context root as you want. However, it is /mfp by default.
Mandatory JNDI properties
When you define the JNDI properties, the JNDI names must be prefixed with the context root of the runtime. The following example illustrates the case to declare mfp.analytics.url whereby the runtime is installed with /mobilefirst as the context root:
The JNDI name of the data source for the runtime must be defined as jndiName=the-contextRoot/jdbc/mfpDS. The following example illustrates the case whereby the runtime is installed with the context root /mobilefirst, and that the runtime is using a relational database:
The push service is packaged as a WAR application for you to deploy to the application server. You need to make some specific configurations for this application in the server.xml file. Before you proceed, review Manual installation on WebSphere Application Server Liberty for the configuration details that are common to all services.
The push service WAR file is in mfp_install_dir/PushService/mfp-push-service.war. You must define the context root as /imfpush. Otherwise, the client devices cannot connect to it as the context root is hardcoded in the SDK.
Mandatory JNDI properties
When you define the JNDI properties, the JNDI names must be prefixed with the context root of the push service. The following example illustrates the case to declare mfp.push.analytics.user whereby the push service is installed with /imfpush as the context root:
The artifacts component is packaged as a WAR application for you to deploy to the application server. You need to make some specific configurations for this application in the server.xml file. Before you proceed, review Manual installation on WebSphere Application Server Liberty for the configuration details that are common to all services.
The WAR file for this component is in mfp_install_dir/MobileFirstServer/mfp-dev-artifacts.war. You must define the context root as /mfp-dev-artifacts.
Manual installation on WebSphere Application Server Liberty collective
The MobileFirst Server administration service, the MobileFirst Server live update service, and MobileFirst Operations Console must be installed in a Liberty collective controller. The MobileFirst runtime and the MobileFirst Server push service must be installed in every member of the Liberty collective cluster.
You must configure the webContainer element to load the servlets immediately. This setting is required for the initialization through JMX. For example: <webContainer deferServletLoad="false"/>.
Optionally, to avoid timeout issues that break the startup sequence of the runtime and the administration service on some Liberty versions, change the default executor element. Set large values to the coreThreads and maxThreads attributes. For example:
You might also configure the tcpOptions element and set the soReuseAddr attribute to true: <tcpOptions soReuseAddr="true"/>.
Liberty features required by the MobileFirst Server applications
You need to add the following features for Java EE 6 or Java EE 7.
MobileFirst Server administration service
jdbc-4.0 (jdbc-4.1 for Java EE 7)
appSecurity-2.0
restConnector-1.0
usr:MFPDecoderFeature-1.0
MobileFirst Server push service
jdbc-4.0 (jdbc-4.1 for Java EE 7)
servlet-3.0 (servlet-3.1 for Java EE 7)
ssl-1.0
usr:MFPDecoderFeature-1.0
MobileFirst runtime
jdbc-4.0 (jdbc-4.1 for Java EE 7)
servlet-3.0 (servlet-3.1 for Java EE 7)
ssl-1.0
usr:MFPDecoderFeature-1.0
Global JNDI entries
The following global JNDI entries are required to configure the JMX communication between the runtime and the administration service:
mfp.admin.jmx.host
mfp.admin.jmx.port
mfp.admin.jmx.user
mfp.admin.jmx.pwd
mfp.topology.platform
mfp.topology.clustermode
mfp.admin.serverid
These global JNDI entries are set with this syntax and are not prefixed by a context root. For example: <jndiEntry jndiName="mfp.admin.jmx.port" value="9443"/>.
Note: To protect against an automatic conversion of the JNDI values, so that 075 is not converted to 61 or 31.500 is not converted to 31.5, use this syntax ‘“075”’ when you define the value.
The administration service is packaged as a WAR application for you to deploy to the Liberty collective controller. You need to make some specific configurations for this application in the server.xml file of the Liberty collective controller.
The administration service WAR file is in mfp_install_dir/MobileFirstServer/mfp-admin-service-collective.war. You can define the context root as you want. However, usually it is /mfpadmin.
Mandatory JNDI properties
When you define the JNDI properties, the JNDI names must be prefixed with the context root of the administration service. The following example illustrates the case to declare mfp.admin.push.url whereby the administration service is installed with /mfpadmin as the context root:
The JNDI name of the data source for the administration service must be defined as jndiName=the-contextRoot/jdbc/mfpAdminDS. The following example illustrates the case whereby the administration service is installed with the context root /mfpadmin, and that the service is using a relational database:
The live update service is packaged as a WAR application for you to deploy to the liberty collective controller. You need to make some specific configurations for this application in the server.xml file of the Liberety collective controller.
The live update service WAR file is in mfp_install_dir/MobileFirstServer/mfp-live-update.war. The context root of the live update service must define in this way: /the-adminContextRootconfig. For example, if the context root of the administration service is /mfpadmin, then the context root of the live update service must be /mfpadminconfig.
Data source
The JNDI name of the data source for the live update service must be defined as the-contextRoot/jdbc/ConfigDS. The following example illustrates the case whereby the live update service is installed with the context root /mfpadminconfig, and that the service is using a relational database:
Declare the configadmin role in the application-bnd element of the application. At least one user must be mapped to this role. The user and its password must be provided to the following JNDI properties of the administration service:
The console is packaged as a WAR application for you to deploy to the Liberty collective controller. You need to make some specific configurations for this application in the server.xml file of the Liberty collective controller.
The console WAR file is in mfp_install_dir/MobileFirstServer/mfp-admin-ui.war. You can define the context root as you want. However, usually it is /mfpconsole.
Mandatory JNDI properties
When you define the JNDI properties, the JNDI names must be prefixed with the context root of the console. The following example illustrates the case to declare mfp.admin.endpoint whereby the console is installed with /mfpconsole as the context root:
The runtime is packaged as a WAR application for you to deploy to the Liberty collective cluster members. You need to make some specific configurations for this application in the server.xml file of every Liberty collective cluster member.
The runtime WAR file is in mfp_install_dir/MobileFirstServer/mfp-server.war. You can define the context root as you want. However, it is /mfp by default.
Mandatory JNDI properties
When you define the JNDI properties, the JNDI names must be prefixed with the context root of the runtime. The following example illustrates the case to declare mfp.analytics.url whereby the runtime is installed with /mobilefirst as the context root:
The JNDI name of the data source for the runtime must be defined as jndiName=the-contextRoot/jdbc/mfpDS. The following example illustrates the case whereby the runtime is installed with the context root /mobilefirst, and that the runtime is using a relational database:
When the MobileFirst Server push service is installed in a Liberty collective, it can be installed in the same cluster than the runtime or in another cluster.
You need to make some specific configurations for this application in the server.xml file of every Liberty collective cluster member. Before you proceed, review Manual installation on WebSphere Application Server Liberty collective for the configuration details that are common to all services.
The push service WAR file is in mfp_install_dir/PushService/mfp-push-service.war. You must define the context root as /imfpush. Otherwise, the client devices cannot connect to it as the context root is hardcoded in the SDK.
Mandatory JNDI properties
When you define the JNDI properties, the JNDI names must be prefixed with the context root of the push service. The following example illustrates the case to declare mfp.push.analytics.user whereby the push service is installed with /imfpush as the context root:
The artifacts component is packaged as a WAR application for you to deploy to the Liberty collective controller. You need to make some specific configurations for this application in the server.xml file of the Liberty collective controller. Before you proceed, review Manual installation on WebSphere Application Server Liberty for the configuration details that are common to all services.
The WAR file for this component is in mfp_install_dir/MobileFirstServer/mfp-dev-artifacts.war. You must define the context root as /mfp-dev-artifacts.
The MobileFirst Server administration service, the MobileFirst Server live update service, and the MobileFirst runtime must be installed on the same application server. The context root of the live update service must be defined as the-adminContextRootconfig. The context root of the push service must be imfpush. For more information about the constraints, see Constraints on the MobileFirst Server components and MobileFirst Analytics.
Application server settings
ou must activate the Single Sign On Valve. For example:
The administration service is packaged as a WAR application for you to deploy to the application server. You need to make some specific configurations for this application in the server.xml file of the application server.
The administration service WAR file is in mfp_install_dir/MobileFirstServer/mfp-admin-service.war. You can define the context root as you want. However, usually it is /mfpadmin.
Mandatory JNDI properties
The JNDI properties are defined within the Environment element in the application context. For example:
The live update service is packaged as a WAR application for you to deploy to the application server. You need to make some specific configurations for this application in the server.xml file.
The live update service WAR file is in mfp_install_dir/MobileFirstServer/mfp-live-update.war. The context root of the live update service must define in this way: /the-adminContextRoot/config. For example, if the context root of the administration service is /mfpadmin, then the context root of the live update service must be /mfpadminconfig.
Data source
The JNDI name of the data source for the live update service must be defined as jdbc/ConfigDS. Declare it as a resource in the Context element.
Security roles
The security role available for the live update service application is configadmin.
At least one user must be mapped to this role. The user and its password must be provided to the following JNDI properties of the administration service:
The console is packaged as a WAR application for you to deploy to the application server. You need to make some specific configurations for this application in the server.xml file of the application server.
The console WAR file is in mfp_install_dir/MobileFirstServer/mfp-admin-ui.war. You can define the context root as you want. However, usually it is /mfpconsole.
Mandatory JNDI properties
You need to define the mfp.admin.endpoint property. The typical value for this property is *://*:*/the-adminContextRoot.
The runtime is packaged as a WAR application for you to deploy to the application server. You need to make some specific configurations for this application in the server.xml file.
The runtime WAR file is in mfp_install_dir/MobileFirstServer/mfp-server.war. You can define the context root as you want. However, it is /mfp by default.
Mandatory JNDI properties
You must define the mfp.authorization.server property. For example:
The push service is packaged as a WAR application for you to deploy to the application server. You need to make some specific configurations for this application. Before you proceed, review Manual installation on Apache Tomcat for the configuration details that are common to all services.
The push service WAR file is in mfp_install_dir/PushService/mfp-push-service.war. You must define the context root as /imfpush. Otherwise, the client devices cannot connect to it as the context root is hardcoded in the SDK.
Mandatory JNDI properties
You need to define the following properties:
mfp.push.authorization.server.url
mfp.push.authorization.client.id
mfp.push.authorization.client.secret
mfp.push.services.ext.security - the value must be com.ibm.mfp.push.server.security.plugin.OAuthSecurityPlugin.
mfp.push.db.type - for a relational database, the value must be DB.
If MobileFirst Analytics is configured, define the following JNDI properties:
mfp.push.analytics.endpoint
mfp.analytics.username
mfp.analytics.password
mfp.push.services.ext.analytics - the value must be com.ibm.mfp.push.server.analytics.plugin.AnalyticsPlugin.
The artifacts component is packaged as a WAR application for you to deploy to the application server. You need to make some specific configurations for this application in the server.xml file of the application server. Before you proceed, review Manual installation on Apache Tomcat for the configuration details that are common to all services.
The WAR file for this component is in mfp_install_dir/MobileFirstServer/mfp-dev-artifacts.war. You must define the context root as /mfp-dev-artifacts.
Manual installation on WebSphere Application Server and WebSphere Application Server Network Deployment
On a stand-alone WebSphere Application Server
The MobileFirst Server administration service, the MobileFirst Server live update service, and the MobileFirst runtime must be installed on the same application server. The context root of the live update service must be defined as the-adminContextRootConfig. The context root of the push service must be imfpush. For more information about the constraints, see Constraints on the MobileFirst Server components and MobileFirst Analytics.
On WebSphere Application Server Network Deployment
The deployment manager must be running while MobileFirst Server is running. The deployment manager is used for the JMX communication between the runtime and the administration service. The administration service and the live update service must be installed on the same application server. The runtime can be installed on different servers than the administration service, but it must be on the same cell.
Application server settings
The administrative security and the application security must be enabled. You can enable the application security in the WebSphere Application Server administration console:
Log in to the WebSphere Application Server administration console.
Click Security → Global Security. Ensure that Enable administrative security is selected.
Also, ensure that Enable application security is selected. The application security can be enabled only if administrative security is enabled.
Click OK.
Save the changes.
For more information, see Enabling security in WebSphere Application Server documentation.
The server class loader policy must support parent last delegation. The MobileFirst Server WAR files must be installed with parent last class loader mode. Review the class-loader policy:
Log in to the WebSphere Application Server administration console.
Click Servers → Server Types → WebSphere application servers, and click on the server that is used for Mobile Foundation.
If the class-loader policy is set to Multiple, do nothing.
If the class-loader policy is set to Single and the class loading mode is set to Classes loaded with local class loader first (parent last), do nothing.
If the class-loader policy is set to Single and the class loading mode is set to Classes loaded with parent class loader first (parent first), change the class-loader policy to Multiple. Also, set the class loader order of all applications other than MobileFirst Server applications to Classes loaded with parent class loader first (parent first).
Class loader
For all MobileFirst Server applications, the class loader must have the parent last delegation.
To set the class loader delegation to parent last after an application is installed, follow these steps:
Click the Manage Applications link, or click Applications → Application Types → WebSphere entreprise applications.
Click the MobileFirst Server application. By default the name of the application is the name of the WAR file.
In the Detail Properties section, click the Class loading and update detection link.
In the Class loader order pane, select the Classes loaded with local class loader first (parent last) option.
Click OK.
In the Modules section, click the Manage Modules link.
Click the module.
For the Class loader order field, select the Classes loaded with local class loader first (parent last) option.
Click OK twice to confirm the selection and back to the Configuration panel of the application.
The administration service is packaged as a WAR application for you to deploy to the application server. You need to make some specific configurations for this application in the server.xml file of the application server.
The administration service WAR file is in mfp_install_dir/MobileFirstServer/mfp-admin-service.war. You can define the context root as you want. However, usually it is /mfpadmin.
Mandatory JNDI properties
You can set JNDI properties with the WebSphere Application Server administration console. Go to Applications → Application Types → WebSphere enterprise applications → application_name → Environment entries for Web modules and set the entries.
To enable the JMX communication with the runtime, define the following JNDI properties:
On WebSphere Application Server Network Deployment
mfp.admin.jmx.dmgr.host
mfp.admin.jmx.dmgr.port - the SOAP port on the deployment manager.
mfp.topology.platform - set the value as WAS.
mfp.topology.clustermode - set the value as Cluster.
mfp.admin.jmx.connector - set the value as SOAP.
On a stand-alone WebSphere Application Server
mfp.topology.platform - set the value as WAS.
mfp.topology.clustermode - set the value as Standalone.
mfp.admin.jmx.connector - set the value as SOAP.
If the push service is installed, you must configure the following JNDI properties:
mfp.admin.push.url
mfp.admin.authorization.server.url
mfp.push.authorization.client.id
mfp.push.authorization.client.secret
mfp.admin.authorization.client.id
mfp.admin.authorization.client.secret
The JNDI properties for the communication with the configuration service are as follows:
Create a data source for the administration service and map it to jdbc/mfpAdminDS.
Start order
The administration service application must start before the runtime application. You can set the order at Startup behavior section. For example, set the Startup Order to 1 for the administration service and 2 to the runtime.
Security roles
The security roles available for the administration service application are:
The live update service is packaged as a WAR application for you to deploy to the application server. You need to make some specific configurations for this application in the server.xml file.
The live update service WAR file is in mfp_install_dir/MobileFirstServer/mfp-live-update.war. The context root of the live update service must define in this way: /the-adminContextRoot/config. For example, if the context root of the administration service is /mfpadmin, then the context root of the live update service must be /mfpadminconfig.
Data source
Create a data source for the live update service and map it to jdbc/ConfigDS.
Security roles
The configadmin role is defined for this application.
At least one user must be mapped to this role. The user and its password must be provided to the following JNDI properties of the administration service:
The console is packaged as a WAR application for you to deploy to the application server. You need to make some specific configurations for this application in the server.xml file of the application server.
The console WAR file is in mfp_install_dir/MobileFirstServer/mfp-admin-ui.war. You can define the context root as you want. However, usually it is /mfpconsole.
Mandatory JNDI properties
You can set JNDI properties with the WebSphere Application Server administration console. Go to Applications → Application Types → WebSphere enterprise applications → application_name → Environment entries for Web modules and set the entries.
You need to define the mfp.admin.endpoint property. The typical value for this property is *://*:*/the-adminContextRoot.
The runtime is packaged as a WAR application for you to deploy to the application server. You need to make some specific configurations for this application in the server.xml file.
The runtime WAR file is in mfp_install_dir/MobileFirstServer/mfp-server.war. You can define the context root as you want. However, it is /mfp by default.
Mandatory JNDI properties
You can set JNDI properties with the WebSphere Application Server administration console. Go to Applications → Application Types → WebSphere enterprise applications → application_name → Environment entries for Web modules and set the entries.
You must define the mfp.authorization.server property with the value as embedded.
Also, define the following JNDI properties to enable the JMX communication with the administration service:
On WebSphere Application Server Network Deployment
mfp.admin.jmx.dmgr.host - the host name of the deployment manager.
mfp.admin.jmx.dmgr.port - the SOAP port of the deployment manager.
mfp.topology.platform - set the value as WAS.
mfp.topology.clustermode - set the value as Cluster.
mfp.admin.jmx.connector - set the value as SOAP.
On a stand-alone WebSphere Application Server
mfp.topology.platform - set the value as WAS.
mfp.topology.clustermode - set the value as Standalone.
mfp.admin.jmx.connector - set the value as SOAP.
If MobileFirst Analytics is installed, you need to define the following JNDI properties:
The runtime application must start after the administration service application. You can set the order at Startup behavior section. For example, set the Startup Order to 1 for the administration service and 2 to the runtime.
Data source
Create a data source for the runtime and map it to jdbc/mfpDS.
The push service WAR file is in mfp_install_dir/PushService/mfp-push-service.war. You must define the context root as /imfpush. Otherwise, the client devices cannot connect to it as the context root is hardcoded in the SDK.
Mandatory JNDI properties
You can set JNDI properties with the WebSphere Application Server administration console. Go to Applications > Application Types → WebSphere enterprise applications → application_name → Environment entries for Web modules and set the entries.
You need to define the following properties:
mfp.push.authorization.server.url
mfp.push.authorization.client.id
mfp.push.authorization.client.secret
mfp.push.services.ext.security - the value must be com.ibm.mfp.push.server.security.plugin.OAuthSecurityPlugin.
mfp.push.db.type - for a relational database, the value must be DB.
If MobileFirst Analytics is configured, define the following JNDI properties:
mfp.push.analytics.endpoint
mfp.analytics.username
mfp.analytics.password
mfp.push.services.ext.analytics - the value must be com.ibm.mfp.push.server.analytics.plugin.AnalyticsPlugin.
The artifacts component is packaged as a WAR application for you to deploy to the application server. You need to make some specific configurations for this application in the server.xml file of the application server. Before you proceed, review Manual installation on WebSphere Application Server and WebSphere Application Server Network Deployment for the configuration details that are common to all services.
The WAR file for this component is in mfp_install_dir/MobileFirstServer/mfp-dev-artifacts.war. You must define the context root as /mfp-dev-artifacts.
Installing a server farm
You can install your server farm by running Ant tasks, with the Server Configuration Tool, or manually.
To plan the configuration of a server farm, choose the application server, configure the MobileFirst databases, and deploy the WAR files of the MobileFirst Server components on each server of the farm. You have the options to use the Server Configuration Tool, Ant tasks, or manual operations to configure a server farm.
In Mobile Foundation, a server farm is composed of multiple stand-alone application servers that are not federated or administered by a managing component of an application server. MobileFirst Server internally provides a farm plug-in as the means to enhance an application server so that it can be part of a server farm.
When to declare a server farm
Declare a server farm in the following cases:
MobileFirst Server is installed on multiple Tomcat application servers.
MobileFirst Server is installed on multiple WebSphere Application Server servers but not on WebSphere Application Server Network Deployment.
MobileFirst Server is installed on multiple WebSphere Application Server Liberty servers.
Do not declare a server farm in the following cases:
Your application server is stand-alone.
Multiple application servers are federated by WebSphere Application Server Network Deployment.
Why it is mandatory to declare a farm
Each time a management operation is performed through MobileFirst Operations Console or through the MobileFirst Server administration service application, the operation needs to be replicated to all instances of a runtime environment. Examples of such management operations are the uploading of a new version of an app or of an adapter. The replication is done via JMX calls performed by the administration service application instance that handles the operation. The administration service needs to contact all runtime instances in the cluster. In environments listed under When to declare a server farm above, the runtime can be contacted through JMX only if a farm is configured. If a server is added to a cluster without proper configuration of the farm, the runtime in that server will be in an inconsistent state after each management operation, and until it is restarted again.
Installing a server farm with the Server Configuration Tool
Use the Server Configuration Tool to configure each server in the farm according to the requirements of the single type of application server that is used for each member of the server farm.
When you plan a server farm with the Server Configuration Tool, first create the stand-alone servers and configure their respective truststores so that they can communicate with one another in a secure way. Then, run the tool that does the following operations:
Configure the database instance that is shared by the MobileFirst Server components.
Deploy the MobileFirst Server components to each server
Modify its configuration to make it a member of a server farm
MobileFirst Server requires the secure JMX connection to be configured.
Prepare the application servers that must be configured as the server farm members.
Choose the type of application server to use to configure the members of the server farm. Mobile Foundation supports the following application servers in server farms:
WebSphere Application Server full profile Note: In a farm topology, you cannot use the RMI JMX connector. In this topology, only the SOAP connector is supported by Mobile Foundation.
WebSphere Application Server Liberty profile
Apache Tomcat
To know which versions of the application servers are supported, see System requirements.
Important: Mobile Foundation supports only homogeneous server farms. A server farm is homogeneous when it connects same type of application servers. Attempting to associate different types of application servers might lead to unpredictable behavior at run time. For example, a farm with a mix of Apache Tomcat servers and WebSphere Application Server full profile servers is an invalid configuration.
Set up as many stand-alone servers as the number of members that you want in the farm.
Each of these stand-alone servers must communicate with the same database. You must make sure that any port used by any of these servers is not also used by another server that is configured on the same host. This constraint applies to the ports used by HTTP, HTTPS, REST, SOAP, and RMI protocols.
Each of these servers must have the MobileFirst Server administration service, the MobileFirst Server live update service, and one or more MobileFirst runtimes deployed on it.
Exchange the signer certificates between all the servers in their respective truststores.
Note: This step is mandatory for the farms that use WebSphere Application Server full profile or Liberty as security must be enabled. In addition, for Liberty farms, the same LTPA configuration must be replicated on each server to ensure single-sign on capability. To do this configuration, follow the guidelines in step 6 of Configuring a server farm manually.
Run the Server Configuration Tool for each server of the farm. All servers must share the same databases. Make sure to select the deployment type: Server farm deployment in the Application Server Settings panel. For more information about the tool, see Running the Server Configuration Tool.
Installing a server farm with Ant tasks
Use Ant tasks to configure each server in the farm according to the requirements of the single type of application server that is used for each member of the server farm.
When you plan a server farm with Ant tasks, first create the stand-alone servers and configure their respective truststores so that they can communicate with one another in a secure way. Then, run Ant tasks to configure the database instance that is shared by the MobileFirst Server components. Finally, run Ant tasks to deploy the MobileFirst Server components to each server and modify its configuration to make it a member of a server farm.
MobileFirst Server requires the secure JMX connection to be configured.
Prepare the application servers that must be configured as the server farm members.
Choose the type of application server to use to configure the members of the server farm. Mobile Foundation supports the following application servers in server farms:
WebSphere Application Server full profile. Note: In a farm topology, you cannot use the RMI JMX connector. In this topology, only the SOAP connector is supported by Mobile Foundation.
WebSphere Application Server Liberty profile
Apache Tomcat
To know which versions of the application servers are supported, see System requirements.
Important: Mobile Foundation supports only homogeneous server farms. A server farm is homogeneous when it connects same type of application servers. Attempting to associate different types of application servers might lead to unpredictable behavior at run time. For example, a farm with a mix of Apache Tomcat servers and WebSphere Application Server full profile servers is an invalid configuration.
Set up as many stand-alone servers as the number of members that you want in the farm.
Each of these stand-alone servers must communicate with the same database. You must make sure that any port used by any of these servers is not also used by another server that is configured on the same host. This constraint applies to the ports used by HTTP, HTTPS, REST, SOAP, and RMI protocols.
Each of these servers must have the MobileFirst Server administration service, the MobileFirst Server live update service, and one or more MobileFirst runtimes deployed on it.
Exchange the signer certificates between all the servers in their respective truststores.
Note: This step is mandatory for the farms that use WebSphere Application Server full profile or Liberty as security must be enabled. In addition, for Liberty farms, the same LTPA configuration must be replicated on each server to ensure single-sign on capability. To do this configuration, follow the guidelines in step 6 of Configuring a server farm manually
.
Configure the database for the administration service, the live update service, and the runtime.
Decide which database that you want to use and choose the Ant file to create and configure the database in the mfp_install_dir/MobileFirstServer/configuration-samples directory:
For DB2 , use create-database-db2.xml.
For MySQL, use create-database-mysql.xml.
For Oracle, use create-database-oracle.xml.
Note: Do not use the Derby database in a farm topology because the Derby database allows only a single connection at a time.
Edit the Ant file and enter all the required properties for the database.
To enable the configuration of the database that is used by the MobileFirst Server components, set the values of the following properties:
Set mfp.process.admin to true. To configure the database for the administration service and the live update service.
Set mfp.process.runtime to true. To configure the database for the runtime.
Run the following commands from the mfp_install_dir/MobileFirstServer/configuration-samples directory where create-database-ant-file.xml must be replaced with the actual Ant file name that you chose: mfp_install_dir/shortcuts/ant -f create-database-ant-file.xml admdatabases and mfp_install_dir/shortcuts/ant -f create-database-ant-file.xml rtmdatabases.
As the MobileFirst Server databases are shared between the application servers in a farm, these two commands must be run only once, whatever the number of servers in the farm.
Optionally, if you want to install another runtime, you must configure another database with another database name or schema. To do so, edit the Ant file, modify the properties, and run the following command once, whatever the number of servers in the farm: mfp_install_dir/shortcuts/ant -f create-database-ant-file.xml rtmdatabases.
Deploy the administration service, the live update service, and the runtime on the servers and configure these servers as the members of a server farm.
Choose the Ant file that corresponds to your application server and your database in the mfp\_install\_dir/MobileFirstServer/configuration-samples directory to deploy the administration service, the live update service, and the runtime on the servers.
For example, choose the configure-liberty-db2.xml file for a deployment on Liberty server with the DB2 database. Make as many copies of this file as the number of members that you want in the farm.
Note: Keep these files after the configuration as they can be reused for upgrading the MobileFirst Server components that are already deployed, or for uninstalling them from each member of the farm.
Edit each copy of the Ant file, enter the same properties for the database that are used at step 2, and also enter the other required properties for the application server.
To configure the server as a server farm member, set the values of the following properties:
Set mfp.farm.configure to true.
mfp.farm.server.id: An identifier that you define for this farm member. Make sure that each server in the farm has its own unique identifier. If two servers in the farm have the same identifier, the farm might behave in an unpredictable way.
mfp.config.service.user: The user name that is used to access the live update service. The user name must be the same for all the members of the farm.
mfp.config.service.password: The password that is used to access the live update service. The password must be the same for all the members of the farm.
To enable the deployment of the WAR files of the MobileFirst Server components on the server, set the values of the following properties:
Set mfp.process.admin to true. To deploy the WAR files of the administration service and the live update service.
Set mfp.process.runtime to true. To deploy the WAR file of the runtime.
Note: If you plan to install more than one runtime on the servers of the farm, specify the attribute id and set a value that must be unique for each runtime on the installmobilefirstruntime, updatemobilefirstruntime, and uninstallmobilefirstruntime Ant tasks.
For example,
For each server, run the following commands where configure-appserver-database-ant-file.xml must be replaced with the actual Ant file name that you chose: mfp_install_dir/shortcuts/ant -f configure-appserver-database-ant-file.xml adminstall and mfp_install_dir/shortcuts/ant -f configure-appserver-database-ant-file.xml rtminstall.
Optionally, if you want to install another runtime, do the following steps:
Make a copy of the Ant file that you configured at step 3.b.
Edit the copy, set a distinct context root, and a value for the attribute id of installmobilefirstruntime, updatemobilefirstruntime, and uninstallmobilefirstruntime that is different from the other runtime configuration.
Run the following command on each server on the farm where configure-appserver-database-ant-file2.xml must be replaced with the actual name of the Ant file that is edited: mfp_install_dir/shortcuts/ant -f configure-appserver-database-ant-file2.xml rtminstall.
Repeat this step for each server of the farm.
Restart all the servers.
Configuring a server farm manually
You must configure each server in the farm according to the requirements of the single type of application server that is used for each member of the server farm.
When you plan a server farm, first create stand-alone servers that communicate with the same database instance. Then, modify the configuration of these servers to make them members of a server farm.
Choose the type of application server to use to configure the members of the server farm. Mobile Foundation supports the following application servers in server farms:
WebSphere Application Server full profile Note: In a farm topology, you cannot use the RMI JMX connector. In this topology, only the SOAP connector is supported by Mobile Foundation.
WebSphere Application Server Liberty profile
Apache Tomcat
To know which versions of the application servers are supported, see System requirements.
Important: Mobile Foundation supports only homogeneous server farms. A server farm is homogeneous when it connects same type of application servers. Attempting to associate different types of application servers might lead to unpredictable behavior at run time. For example, a farm with a mix of Apache Tomcat servers and WebSphere Application Server full profile servers is an invalid configuration.
Decide which database that you want to use. You can choose from:
DB2
MySQL
Oracle
MobileFirst Server databases are shared between the application servers in a farm, which means:
You create the database only once, whatever the number of servers in the farm.
You cannot use the Derby database in a farm topology because the Derby database allows only a single connection at a time.
Set up as many stand-alone servers as the number of members that you want in the farm.
Each of these stand-alone servers must communicate with the same database. You must make sure that any port used by any of these servers is not also used by another server that is configured on the same host. This constraint applies to the ports used by HTTP, HTTPS, REST, SOAP, and RMI protocols.
Each of these servers must have the MobileFirst Server administration service, the MobileFirst Server live update service, and one or more MobileFirst runtimes deployed on it.
When each of these servers is working properly in a stand-alone topology, you can transform them into members of a server farm.
Stop all the servers that are intended to become members of the farm.
Configure each server appropriately for the type of application server. You must set some JNDI properties correctly. In a server farm topology, the mfp.config.service.user and mfp.config.service.password JNDI properties must have the same value for all the members of the farm. For Apache Tomcat, you must also check that the JVM arguments are properly defined.
WebSphere Application Server Liberty profile
In the server.xml file, set the JNDI properties shown in the following sample code.
These properties must be set with appropriate values:
mfp.admin.serverid: The identifier that you defined for this farm member. This identifier must be unique across all farm members.
mfp.admin.jmx.user and mfp.admin.jmx.pwd: These values must match the credentials of a user as declared in the administrator-role element.
mfp.admin.jmx.host: Set this parameter to the IP or the host name that is used by remote members to access this server. Therefore, do not set it to localhost. This host name is used by the other members of the farm and must be accessible to all farm members.
mfp.admin.jmx.port: Set this parameter to the server HTTPS port that is used for the JMX REST connection. You can find the value in the httpEndpoint element of the server.xml file.
Apache Tomcat
Modify the conf/server.xml file to set the following JNDI properties in the administration service context and in every runtime context.
The mfp.admin.serverid property must be set to the identifier that you defined for this farm member. This identifier must be unique across all farm members.
You must make sure that the -Djava.rmi.server.hostname JVM argument is set to the IP or the host name that is used by remote members to access this server. Therefore, do not set it to localhost. In addition, you must make sure that the -Dcom.sun.management.jmxremote.port JVM argument is set with a port that is not already in use to enable JMX RMI connections. Both arguments are set in the CATALINA_OPTS environment variable.
WebSphere Application Server full profile
You must declare the following JNDI properties in the administration service and in every runtime application deployed on the server.
In Web Module Properties, click Environment entries for Web Modules to display the JNDI properties.
Set the values of the following properties.
Set mfp.topology.clustermode to Farm.
Set mfp.admin.serverid to the identifier that you chose for this farm member. This identifier must be unique across all farm members.
Set mfp.admin.jmx.user to a user name that has access to the SOAP connector.
Set mfp.admin.jmx.pwd to the password of the user as declared in mfp.admin.jmx.user.
Set mfp.admin.jmx.port to the value of the SOAP port.
Verify that mfp.admin.jmx.connector is set to SOAP.
Click OK and save the configuration.
Make similar changes for every MobileFirst runtime application deployed on the server.
Exchange the server certificates in their truststores between all members of the farm. Exchanging the server certificates in their truststores is mandatory for farms that use WebSphere Application Server full profile and WebSphere Application Server Liberty profile because in these farms, communications between the servers is secured by SSL.
WebSphere Application Server Liberty profile
You can configure the truststore by using IBM utilities such as Keytool or iKeyman.
For more information about Keytool, see Keytool in the IBM SDK, Java Technology Edition.
For more information about iKeyman, see iKeyman in the IBM SDK, Java Technology Edition.
The locations of keystore and truststore are defined in the server.xml file. See the keyStoreRef and trustStoreRef attributes in SSL configuration attributes. By default, the keystore of Liberty profile is at ${server.config.dir}/resources/security/key.jks. If the truststore reference is missing or not defined in the server.xml file, the keystore that is specified by keyStoreRef is used. The server uses the default keystore and the file is created the first time that the server runs. In that case, a default certificate is created with a validity period of 365 days. For production, you might consider using your own certificate (including the intermediate ones, if needed) or changing the expiration date of the generated certificate.
Note: If you want to confirm the location of the truststore, you can do so by adding the following declaration to the server.xml file:
Restart each instance of WebSphere Application Server Liberty profile to make the security configuration take effect. The following steps are needed for single sign-on (SSO) to work.
Exchange the signer certificates between all the servers in their respective truststores.
Note: This step is mandatory for the farms that use WebSphere Application Server full profile or Liberty as security must be enabled. In addition, for Liberty farms, the same LTPA configuration must be replicated on each server to ensure single-sign on capability. To do this configuration, perform the following steps.
Start one member of the farm. In the default LTPA configuration, after the Liberty server starts successfully, it generates an LTPA keystore as ${wlp.user.dir}/servers/server_name/resources/security/ltpa.keys.
Copy the ltpa.keys file to the ${wlp.user.dir}/servers/server_name/resources/security directory of each farm member to replicate the LTPA keystores across the farm members. For more information about LTPA configuration, see Configuring LTPA on the Liberty profile.
WebSphere Application Server full profile
Configure the truststore in the WebSphere Application Server administration console.
Log in to WebSphere Application Server administration console.
Select Security → SSL certificate and key management.
In Related Items, select Keystores and certificates.
In the Keystore usages field, make sure that SSL keystores is selected. You can now import the certificates from all the other servers in the farm.
Click NodeDefaultTrustStore.
In Additional Properties, select Signer certificates.
Click Retrieve from port. You can now enter communication and security details of each of the other servers in the farm. Follow the next steps for each of the other farm members.
In the Host field, enter the server host name or IP address.
In the Port field, enter the HTTPS transport (SSL) port.
In SSL configuration for outbound connection, select NodeDefaultSSLSettings.
In the Alias field, enter an alias for this signer certificate.
Click Retrieve signer information.
Review the information that is retrieved from the remote server and then click OK.
Click Save.
Restart the server.
Verifying a farm configuration
The purpose of this task is to check the status of the farm members and verify whether a farm is configured properly.
Start all the servers of the farm.
Access MobileFirst Operations Console. For example, http://server_name:port/mfpconsole, or https://hostname:secure_port/mfpconsole in HTTPS.
In the console sidebar, an extra menu that is labeled as Server Farm Nodes appears.
Click Server Farm Nodes to access the list of registered farm members and their status. In the following example, the node that is identified as FarmMember2 is considered to be down, which indicates that this server has probably failed and requires some maintenance.
Lifecycle of a server farm node
You can configure heartbeat rate and timeout values to indicate possible server problems among farm members by triggering a change in status of an affected node.
Registration and monitoring servers as farm nodes
When a server configured as a farm node is started, the administration service on that server automatically registers it as a new farm member.
When a farm member is shut down, it automatically unregisters from the farm.
A heartbeat mechanism exists to keep track of farm members that might become unresponsive, for example, because of a power outage or a server failure. In this heartbeat mechanism, MobileFirst runtimes periodically send a heartbeat to MobileFirst administration services at a specified rate. If the MobileFirst administration service registers that too long a time has elapsed since a farm member sent a heartbeat, the farm member is considered to be down.
Farm members that are considered to be down do not serve any more requests to mobile applications.
Having one or more nodes down does not prevent the other farm members from correctly serving requests to mobile applications nor from accepting new management operations that are triggered through the MobileFirst Operations Console.
Configuring the heartbeat rate and timeout values
You can configure the heartbeat rate and timeout values by defining the following JNDI properties:
Mobile Foundation runtime uses quartz schedulers for performing some of the scheduled activities.
The scheduler in Mobile Foundation runtime performs the following activities:
License Tracking
Creating audit logs
The running of scheduler is controlled by the following two JNDI properties,
mfp.licenseTracking.enabled
mfp.purgedata.enabled (introduced from iFix level 8.0.0.0-MFPF-IF201812191602-CDUpdate-04)
These JNDI properties are enabled by default for all supported application servers.
Note: For Mobile Foundation running on WebSphere Application Server, enable the JNDI properties by setting its value in the Runtime Environment entries in WAS console.
License Tracking
License Tracking tracks metrics relevant to the licensing policy, such as active client devices, addressable devices, and installed apps. This information helps determine if the current usage of Mobile Foundation is within the license entitlement levels and can prevent potential license violations. License tracking helps in decommissioning devices that are no longer accessing the Mobile Foundation Server and also helps in archiving and deleting old records of MFP_PERSISTENT_DATA.
The following table lists the JNDI properties related to license tracking.
JNDI Property
Description
mfp.device.decommissionProcessingInterval
Defines how often (in seconds) the decommissioning task is executed. Default: 86400, which is one day.
mfp.device.decommission.when
The number of days of inactivity after which a client device is decommissioned by the device decommissioning task. Default: 90 days.
mfp.device.archiveDecommissioned.when
The number of days of inactivity, after which a client device that has been decommissioned is archived. This task writes the client devices that were decommissioned to an archive file. The archived client devices are written to a file in the Mobile Foundation Server home\devices_archive directory. The name of the file contains the time stamp when the archive file is created. Default: 90 days.
mfp.licenseTracking.enabled
A value that is used to enable or disable device tracking in IBM Mobile Foundation. For performance reasons, you can disable device tracking when IBM Mobile Foundation runs only Business-to-Consumer (B2C) apps. When device tracking is disabled, the license reports are also disabled and no license metrics are generated. Possible values are true (default) and false.
Please refer the topics below, for more details on license tracking.
License tracking saves the latest run and license data into Mobile Foundation runtime table LICENSE_TERMS. The audit log creates a log based on the latest report entry in this table. The reports are available as .slmtag files in the logs folder under the server install directory.
Disabling Quartz Update
Mobile Foundation runtime bundles the required libraries including a few third-party libraries. Mobile Foundation uses Quartz job schedulers and includes quartz2.2.0.jar.
Quartz contains an update check feature that connects to the server, to check if there is a new version of Quartz available for download. This check runs asynchronously and does not affect the startup/initialization time of Quartz and it fails gracefully if the connection cannot be made. If the check runs, and an update is found, it will be reported as available in Quartz’s logs.
The update check can be disabled by using the flag org.quartz.scheduler.skipUpdateCheck = true. Liberty deployment of Mobile Foundation creates a jvm.options file and during deployment through Server Configuration Tool, the newly created jvm.options file will include this property from iFix level 8.0.0.0-MFPF-IF201909190904 onwards. For prior iFix levels, customer can add this property into the jvm.options file.
In the case of WebSphere Application Server (WAS) deployments, the above JNDI property needs to be added in the environment property of the Mobile Foundation application from the WAS admin console.
Inclusive terminology note: The Mobile First Platform team is making changes to support
the IBM® initiative to replace racially biased and other discriminatory language in our code and content
with more inclusive language. While IBM values the use of inclusive language, terms that are outside of
IBM's direct influence are sometimes required for the sake of maintaining user understanding. As other
industry leaders join IBM in embracing the use of inclusive language, IBM will continue to update the
documentation to reflect those changes.