iOS 애플리케이션의 JSONStore
improve this page | report issue전제조건
- JSONStore 상위 학습서를 읽으십시오.
- MobileFirst 네이티브 SDK가 Xcode 프로젝트에 추가되었는지 확인하십시오. iOS 애플리케이션에 Mobile Foundation SDK 추가 학습서에 따르십시오.
다음으로 이동:
JSONStore 추가
-
Xcode 프로젝트의 루트에 있는 기존
podfile에 다음을 추가하십시오.pod 'IBMMobileFirstPlatformFoundationJSONStore' -
명령행 창에서 Xcode 프로젝트의 루트로 이동하고
pod install명령을 실행하십시오(참고: 이 조치에는 시간이 다소 소요됩니다).
JSONStore를 사용할 때마다 JSONStore 헤더를 가져오십시오.
Objective-C:
#import <IBMMobileFirstPlatformFoundationJSONStore/IBMMobileFirstPlatformFoundationJSONStore.h>
Swift:
import IBMMobileFirstPlatformFoundationJSONStore
기본 사용법
열기
openCollections를 사용하여 하나 이상의 JSONStore 콜렉션을 여십시오.
콜렉션 시작 또는 프로비저닝은 콜렉션 및 문서를 보관하는 지속적 스토리지가 없는 경우 이를 작성하는 것을 의미합니다.
지속적 스토리지가 암호화되어 있고 올바른 비밀번호가 전달되면 데이터에 액세스할 수 있게 하는 필수 보안 프로시저가 실행됩니다.
초기화 시 사용할 수 있는 선택적 기능은 이 학습서의 두 번째 파트에서 보안, 다중 사용자 지원 및 MobileFirst 어댑터 통합을 참조하십시오.
let collection:JSONStoreCollection = JSONStoreCollection(name: "people")

collection.setSearchField("name", withType: JSONStore_String)
collection.setSearchField("age", withType: JSONStore_Integer)

do {
  try JSONStore.sharedInstance().openCollections([collection], withOptions: nil)
} catch let error as NSError {
  // handle error
}
가져오기
getCollectionWithName을 사용하여 콜렉션에 대한 액세서를 작성하십시오. getCollectionWithName을 호출하기 전에 openCollections를 먼저 호출해야 합니다.
let collectionName:String = "people"
let collection:JSONStoreCollection = JSONStore.sharedInstance().getCollectionWithName(collectionName)
이제 변수 collection을 사용하여 people 콜렉션에 대한 조작(예: add, find 및 replace)을 수행할 수 있습니다.
추가
addData를 사용하여 데이터를 콜렉션 내에 문서로 저장하십시오.
let collectionName:String = "people"
let collection:JSONStoreCollection = JSONStore.sharedInstance().getCollectionWithName(collectionName)

let data = ["name" : "yoel", "age" : 23]

do  {
  try collection.addData([data], andMarkDirty: true, withOptions: nil)
} catch let error as NSError {
  // handle error
}
찾기
findWithQueryParts를 사용하여 조회를 통해 콜렉션 내에서 문서를 찾으십시오. findAllWithOptions를 사용하여 콜렉션 내의 모든 문서를 검색하십시오. findWithIds를 사용하여 문서 고유 ID로 검색하십시오.
let collectionName:String = "people"
let collection:JSONStoreCollection = JSONStore.sharedInstance().getCollectionWithName(collectionName)

let options:JSONStoreQueryOptions = JSONStoreQueryOptions()
// returns a maximum of 10 documents, default: returns every document
options.limit = 10

let query:JSONStoreQueryPart = JSONStoreQueryPart()
query.searchField("name", like: "yoel")

do  {
  let results:NSArray = try collection.findWithQueryParts([query], andOptions: options)
} catch let error as NSError {
  // handle error
}
대체
replaceDocuments를 사용하여 콜렉션 내의 문서를 수정하십시오. 대체 수행 시 사용하는 필드는 문서 고유 ID인 _id,입니다.
let collectionName:String = "people"
let collection:JSONStoreCollection = JSONStore.sharedInstance().getCollectionWithName(collectionName)

var document:Dictionary<String,AnyObject> = Dictionary()
document["name"] = "chevy"
document["age"] = 23

var replacement:Dictionary<String, AnyObject> = Dictionary()
replacement["_id"] = 1
replacement["json"] = document

do {
  try collection.replaceDocuments([replacement], andMarkDirty: true)
} catch let error as NSError {
  // handle error
}
이 예제에서는 {_id: 1, json: {name: 'yoel', age: 23} } 문서가 콜렉션에 있다고 가정합니다.
제거
removeWithIds를 사용하여 콜렉션에서 문서를 삭제하십시오.
markDocumentClean을 호출할 때까지 콜렉션에서 문서가 지워지지 않습니다. 자세한 정보는 이 학습서 뒤쪽에 있는 MobileFirst 어댑터 통합 절을 참조하십시오.
let collectionName:String = "people"
let collection:JSONStoreCollection = JSONStore.sharedInstance().getCollectionWithName(collectionName)

do {
  try collection.removeWithIds([1], andMarkDirty: true)
} catch let error as NSError {
  // handle error
}
콜렉션 제거
removeCollection을 사용하여 콜렉션 내에 저장된 모든 문서를 삭제하십시오. 이 조작은 데이터베이스 용어로 된 테이블을 삭제하는 것과 유사합니다.
let collectionName:String = "people"
let collection:JSONStoreCollection = JSONStore.sharedInstance().getCollectionWithName(collectionName)

do {
  try collection.removeCollection()
} catch let error as NSError {
  // handle error
}
영구 삭제
destroyData를 사용하여 다음 데이터를 제거하십시오.
- 모든 문서
- 모든 콜렉션
- 모든 저장소 - 이 학습서 뒤쪽의 다중 사용자 지원 참조
- 모든 JSONStore 메타데이터 및 보안 아티팩트 - 이 학습서 뒤쪽의 보안 참조
do {
  try JSONStore.sharedInstance().destroyData()
} catch let error as NSError {
  // handle error
}
고급 사용법
보안
비밀번호를 사용하여 JSONStoreOpenOptions 오브젝트를 openCollections 함수에 전달함으로써 저장소의 모든 콜렉션을 보호할 수 있습니다. 비밀번호가 전달되지 않으면 저장소에 포함된 모든 콜렉션의 문서가 암호화되지 않습니다.
일부 보안 메타데이터는 키 체인에 저장됩니다(iOS).
저장소는 256비트 AES(Advanced Encryption Standard) 키로 암호화됩니다. 모든 키는 PBKDF2(Password-Based Key Derivation Function 2)로 강화됩니다.
openCollections를 다시 호출할 때까지 closeAllCollections를 사용하여 모든 콜렉션에 대한 액세스를 잠그십시오. openCollections를 로그인 함수로 고려하는 경우 closeAllCollections을 해당 로그아웃 함수로 고려할 수 있습니다.
changeCurrentPassword를 사용하여 비밀번호를 변경하십시오.
let collection:JSONStoreCollection = JSONStoreCollection(name: "people")
collection.setSearchField("name", withType: JSONStore_String)
collection.setSearchField("age", withType: JSONStore_Integer)

let options:JSONStoreOpenOptions = JSONStoreOpenOptions()
options.password = "123"

do {
  try JSONStore.sharedInstance().openCollections([collection], withOptions: options)
} catch let error as NSError {
  // handle error
}
다중 사용자 지원
단일 MobileFirst 애플리케이션에 여러 콜렉션을 포함하는 다중 저장소를 작성할 수 있습니다. openCollections 함수는 사용자 이름을 사용하여 옵션 오브젝트를 가져올 수 있습니다. 사용자 이름이 없는 경우 기본 사용자 이름은 “jsonstore”입니다.
let collection:JSONStoreCollection = JSONStoreCollection(name: "people")
collection.setSearchField("name", withType: JSONStore_String)
collection.setSearchField("age", withType: JSONStore_Integer)

let options:JSONStoreOpenOptions = JSONStoreOpenOptions()
options.username = "yoel"

do {
  try JSONStore.sharedInstance().openCollections([collection], withOptions: options)
} catch let error as NSError {
  // handle error
}
MobileFirst 어댑터 통합
이 절에서는 사용자가 어댑터에 익숙하다고 가정합니다. 어댑터 통합은 선택사항이며 콜렉션의 데이터를 어댑터로 전송하고 어댑터의 데이터를 콜렉션으로 가져오는 방법을 제공합니다.
WLResourceRequest와 같은 함수를 사용하여 해당 목표를 달성할 수 있습니다.
어댑터 구현
어댑터를 작성하고 이름을 “People“로 지정하십시오. 해당 프로시저 addPerson, getPeople, pushPeople, removePerson 및 replacePerson을 정의하십시오.
function getPeople() {
	var data = { peopleList : [{name: 'chevy', age: 23}, {name: 'yoel', age: 23}] };
	WL.Logger.debug('Adapter: people, procedure: getPeople called.');
	WL.Logger.debug('Sending data: ' + JSON.stringify(data));
	return data;
}
function pushPeople(data) {
	WL.Logger.debug('Adapter: people, procedure: pushPeople called.');
	WL.Logger.debug('Got data from JSONStore to ADD: ' + data);
	return;
}
function addPerson(data) {
	WL.Logger.debug('Adapter: people, procedure: addPerson called.');
	WL.Logger.debug('Got data from JSONStore to ADD: ' + data);
	return;
}
function removePerson(data) {
	WL.Logger.debug('Adapter: people, procedure: removePerson called.');
	WL.Logger.debug('Got data from JSONStore to REMOVE: ' + data);
	return;
}
function replacePerson(data) {
	WL.Logger.debug('Adapter: people, procedure: replacePerson called.');
	WL.Logger.debug('Got data from JSONStore to REPLACE: ' + data);
	return;
}
MobileFirst 어댑터의 데이터 로드
MobileFirst 어댑터의 데이터를 로드하려면 WLResourceRequest를 사용하십시오.
// Start - LoadFromAdapter
class LoadFromAdapter: NSObject, WLDelegate {
  func onSuccess(response: WLResponse!) {
    let responsePayload:NSDictionary = response.getResponseJson()
    let people:NSArray = responsePayload.objectForKey("peopleList") as! NSArray
    // handle success
  }

  func onFailure(response: WLFailResponse!) {
    // handle failure
  }
}
// End - LoadFromAdapter

let pull = WLResourceRequest(URL: NSURL(string: "/adapters/People/getPeople"), method: "GET")

let loadDelegate:LoadFromAdapter = LoadFromAdapter()
pull.sendWithDelegate(loadDelegate)
푸시 가져오기 필요(더티 문서)
allDirty를 호출하면 백엔드 시스템에 존재하지 않는 로컬 수정이 포함된 문서인 “더티 문서” 배열이 리턴됩니다.
let collectionName:String = "people"
let collection:JSONStoreCollection = JSONStore.sharedInstance().getCollectionWithName(collectionName)

do {
  let dirtyDocs:NSArray = try collection.allDirty()
} catch let error as NSError {
  // handle error
}
JSONStore에서 문서를 “더티”로 표시하지 않게 하려면 andMarkDirty:false 옵션을 add, replace 및 remove에 전달하십시오.
변경사항 푸시
어댑터에 변경사항을 푸시하려면 allDirty를 호출하여 수정된 문서 목록을 가져온 후 WLResourceRequest를 사용하십시오. 데이터가 전송되고 성공 응답을 수신하면 markDocumentsClean을 호출하십시오.
// Start - PushToAdapter
class PushToAdapter: NSObject, WLDelegate {
  func onSuccess(response: WLResponse!) {
    // handle success
  }

  func onFailure(response: WLFailResponse!) {
    // handle failure
  }
}
// End - PushToAdapter

let collectionName:String = "people"
let collection:JSONStoreCollection = JSONStore.sharedInstance().getCollectionWithName(collectionName)

do {
  let dirtyDocs:NSArray = try collection.allDirty()
  let pushData:NSData = NSKeyedArchiver.archivedDataWithRootObject(dirtyDocs)

  let push = WLResourceRequest(URL: NSURL(string: "/adapters/People/pushPeople"), method: "POST")

  let pushDelegate:PushToAdapter = PushToAdapter()
  push.sendWithData(pushData, delegate: pushDelegate)

} catch let error as NSError {
  // handle error
}
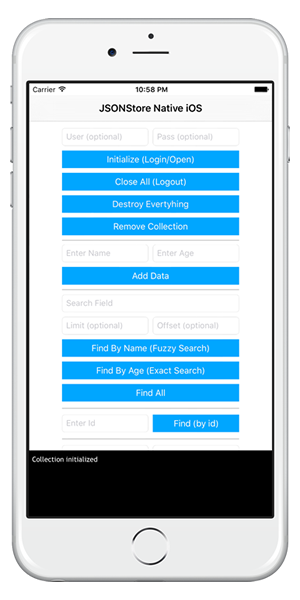
샘플 애플리케이션
JSONStoreSwift 프로젝트에는 JSONStore API 세트를 이용하는 네이티브 iOS Swift 애플리케이션이 있습니다.
JavaScript 어댑터 Maven 프로젝트도 사용 가능합니다.
네이티브 iOS 프로젝트를 다운로드하려면 클릭하십시오.
어댑터 Maven 프로젝트를 다운로드하려면 클릭하십시오.
샘플 사용법
샘플의 README.md 파일에 있는 지시사항을 따르십시오.
▲Inclusive terminology note: The Mobile First Platform team is making changes to support the IBM® initiative to replace racially biased and other discriminatory language in our code and content with more inclusive language. While IBM values the use of inclusive language, terms that are outside of IBM's direct influence are sometimes required for the sake of maintaining user understanding. As other industry leaders join IBM in embracing the use of inclusive language, IBM will continue to update the documentation to reflect those changes.