Java Token Validator
improve this page | report issue개요
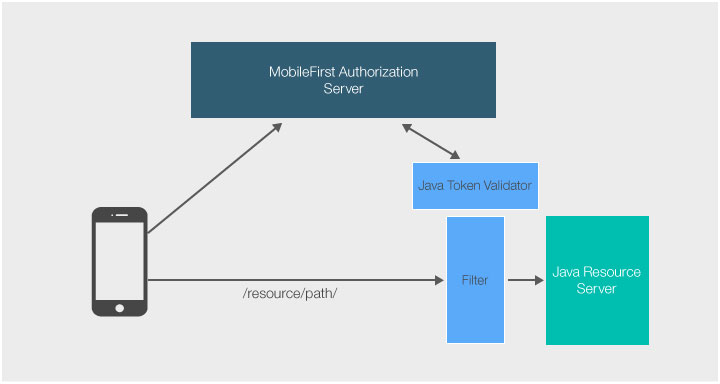
IBM Mobile Foundation은 외부 자원에서 보안 기능을 강제 실행하기 위해 Java 라이브러리를 제공합니다.
Java 라이브러리는 JAR 파일(mfp-java-token-validator-8.0.0.jar)로서 제공됩니다.
이 학습서는 범위(accessRestricted)를 사용하여 단순 Java Servlet, GetBalance를 보호하는 방법을 보여줍니다.
**전제조건: **
- 외부 자원을 인증하기 위해 MobileFirst Server 사용 학습서를 읽으십시오.
- MobileFirst Foundation 보안 프레임워크를 이해하십시오.
.jar 파일 종속성 추가
mfp-java-token-validator-8.0.0.jar 파일은 maven 종속성으로 사용 가능합니다.
<dependency>
  <groupId>com.ibm.mfp</groupId>
  <artifactId>mfp-java-token-validator</artifactId>
  <version>8.0.0</version>
</dependency>
TokenValidationManager 인스턴스화
토큰을 유효성 검증할 수 있으려면 TokenValidationManager를 인스턴스화하십시오.
TokenValidationManager(java.net.URI authorizationURI, java.lang.String clientId, java.lang.String clientSecret);
authorizationURI: 권한 부여 서버, 일반적으로 MobileFirst Server의 URI입니다. 예를 들어 http://localhost:9080/mfp/api입니다.clientId: MobileFirst Operations Console에서 구성한 기밀 클라이언트 ID입니다.clientSecret: MobileFirst Operations Console에서 구성한 기밀 클라이언트 본인확인정보입니다.
라이브러리는 권한 부여 서버의 자체 점검 엔드포인트와 상호작용을 캡슐화하고 단순화하는 API를 표시합니다. 자세한 API 참조는 MobileFirst Java Token Validator API 참조를 참조하십시오.
인증 정보 유효성 검증
validate API 메소드는 권한 부여 서버에 권한 부여 헤더를 유효성 검증하도록 요청합니다.
public TokenValidationResult validate(java.lang.String authorizationHeader, java.lang.String expectedScope);
authorizationHeader: 액세스 토큰인AuthorizationHTTP 헤더의 컨텐츠입니다. 예를 들어HttpServletRequest(“httpServletRequest.getHeader("Authorization))에서 얻을 수 있습니다.expectedScope: 토큰을 유효성 검증할 범위입니다(예:accessRestricted).
오류에 대해 또는 유효한 자체 점검 데이터에 대해 결과로 생기는 TokenValidationResult 오브젝트를 조회할 수 있습니다.
TokenValidationResult tokenValidationRes = validator.validate(authCredentials, expectedScope);
if (tokenValidationRes.getAuthenticationError() != null) {
    // Error
    AuthenticationError error = tokenValidationRes.getAuthenticationError();
    httpServletResponse.setStatus(error.getStatus());
    httpServletResponse.setHeader("WWW-Authenticate", error.getAuthenticateHeader());
} else if (tokenValidationRes.getIntrospectionData() != null) {
    // Success logic here
}
자체 점검 데이터
getIntrospectionData()로 리턴된 TokenIntrospectionData 오브젝트는 클라이언트에 대한 일부 정보(예: 현재 활성 사용자의 사용자 이름)를 제공합니다.
httpServletRequest.setAttribute("introspection-data", tokenValidationRes.getIntrospectionData());
TokenIntrospectionData introspectionData = (TokenIntrospectionData) request.getAttribute("introspection-data");
String username = introspectionData.getUsername();
캐시
TokenValidationManager 클래스는 토큰과 자체 점검 데이터를 캐시하는 내부 캐시와 함께 제공됩니다. 캐시의 목적은 요청이 동일한 헤더로 작성된 경우, 권한 부여 서버에 대해 수행되는 토큰 자체 점검의 양을 줄이는 것입니다.
기본 캐시 크기는 50000개 항목입니다. 이 용량에 도달한 후 가장 오래된 토큰이 제거됩니다.
TokenValidationManager의 생성자는 또한 저장할 cacheSize(자체 점검 데이터 항목의 수)를 승인할 수 있습니다.
public TokenValidationManager(java.net.URI authorizationURI, java.lang.String clientId, java.lang.String clientSecret, long cacheSize);
단순 Java 서블릿 보호
-
하드코딩된 값을 리턴하는
GetBalance라는 단순 Java 서블릿을 작성하십시오.@WebServlet("/GetBalance") public class GetBalance extends HttpServlet { private static final long serialVersionUID = 1L; protected void doGet(HttpServletRequest request, HttpServletResponse response) throws ServletException, IOException { //Return hardcoded value response.getWriter().append("17364.9"); } } -
지정된 범위에 대한 권한 부여 헤더를 유효성 검증할
javax.servlet.Filter라는JTVFilter구현을 작성하십시오.public class JTVFilter implements Filter { public static final String AUTH_HEADER = "Authorization"; private static final String AUTHSERVER_URI = "http://localhost:9080/mfp/api"; //Set here your authorization server URI private static final String CLIENT_ID = "jtv"; //Set here your confidential client ID private static final String CLIENT_SECRET = "jtv"; //Set here your confidential client SECRET private TokenValidationManager validator; private FilterConfig filterConfig = null; @Override public void init(FilterConfig filterConfig) throws ServletException { URI uri = null; try { uri = new URI(AUTHSERVER_URI); validator = new TokenValidationManager(uri, CLIENT_ID, CLIENT_SECRET); this.filterConfig = filterConfig; } catch (Exception e1) { System.out.println("Error reading introspection URI"); } } @Override public void doFilter(ServletRequest req, ServletResponse res, FilterChain filterChain) throws IOException, ServletException { String expectedScope = filterConfig.getInitParameter("scope"); HttpServletRequest httpServletRequest = (HttpServletRequest) req; HttpServletResponse httpServletResponse = (HttpServletResponse) res; String authCredentials = httpServletRequest.getHeader(AUTH_HEADER); try { TokenValidationResult tokenValidationRes = validator.validate(authCredentials, expectedScope); if (tokenValidationRes.getAuthenticationError() != null) { // Error AuthenticationError error = tokenValidationRes.getAuthenticationError(); httpServletResponse.setStatus(error.getStatus()); httpServletResponse.setHeader("WWW-Authenticate", error.getAuthenticateHeader()); } else if (tokenValidationRes.getIntrospectionData() != null) { // Success httpServletRequest.setAttribute("introspection-data", tokenValidationRes.getIntrospectionData()); filterChain.doFilter(req, res); } } catch (TokenValidationException e) { httpServletResponse.setStatus(500); } } } -
서블릿의 web.xml 파일에서
JTVFilter의 인스턴스를 선언하고 매개변수로서 scopeaccessRestricted를 전달하십시오.<filter> <filter-name>accessRestricted</filter-name> <filter-class>com.sample.JTVFilter</filter-class> <init-param> <param-name>scope</param-name> <param-value>accessRestricted</param-value> </init-param> </filter>그런 다음 사용자의 서블릿을 필터로 보호하십시오.
<filter-mapping>
   <filter-name>accessRestricted</filter-name>
   <url-pattern>/GetBalance</url-pattern>
</filter-mapping>
샘플 애플리케이션
지원되는 애플리케이션 서버(Tomcat, WebSphere Application
Server 전체 프로파일 및 WebSphere Application Server Liberty 프로파일)에서 프로젝트를 배치할 수 있습니다.
단순 Java 서블릿을 다운로드하십시오.
샘플 사용법
- 기밀 클라이언트 및 본인확인정보 값을 MobileFirst Operations Console에서 업데이트하십시오.
- UserLogin 또는 PinCodeAttempts 보안 검사 중 하나를 배치하십시오.
- 일치하는 애플리케이션을 등록하십시오.
accessRestricted범위를 보안 검사에 맵핑하십시오.- 서블릿 URL에 대한
WLResourceRequest를 작성하기 위해 클라이언트 애플리케이션을 업데이트하십시오.
Inclusive terminology note: The Mobile First Platform team is making changes to support the IBM® initiative to replace racially biased and other discriminatory language in our code and content with more inclusive language. While IBM values the use of inclusive language, terms that are outside of IBM's direct influence are sometimes required for the sake of maintaining user understanding. As other industry leaders join IBM in embracing the use of inclusive language, IBM will continue to update the documentation to reflect those changes.