IMFData 또는 Cloudant SDK로 Cloudant에 모바일 데이터를 저장하는 앱 마이그레이션
improve this page | report issue개요
모바일 애플리케이션의 데이터를 Cloudant 데이터베이스에 저장할 수 있습니다. Cloudant는 JSON, 전체 텍스트 및 지리공간 데이터와 같은 다양한 유형의 데이터를 처리할 수 있는 고급 NoSQL 데이터베이스입니다. SDK는 Java™, Objective-C 및 Swift에 사용 가능합니다.
CloudantToolkit 및 IMFData 프레임워크는 IBM Mobile Foundation v8.0에서 사용되지 않습니다.
- iOS의 경우, CloudantToolkit 및 IMFData 프레임워크 대신 CDTDatastore SDK를 사용하십시오.
- Android의 경우, CloudantToolkit 및 IMFData 프레임워크 대신 Cloudant Sync Android SDK를 사용하십시오. Cloudant Sync를 사용하여 원격 데이터 저장소에서 데이터를 논리적으로 지속하고 복제할 수 있습니다.
원격 저장소에 직접 액세스하려면 애플리케이션에서 REST 호출을 사용하고 Cloudant API 참조를 참조하십시오.
Cloudant 대 JSONStore
다음 시나리오에서는 Cloudant 대신 JSONStore를 사용할 것을 고려할 수 있습니다.
- FIPS 140-2 준수 방식으로 저장되어야 하는 모바일 디바이스에 데이터를 저장하는 경우
- 디바이스와 엔터프라이즈 간에 데이터를 동기화해야 하는 경우
- 하이브리드 애플리케이션을 개발 중인 경우
JSONStore에 대한 자세한 정보는 JSONStore를 참조하십시오.
다음으로 이동
- MobileFirst와 Cloudant 보안 통합
- 데이터베이스 작성
- 디바이스의 데이터 암호화
- 사용자 권한 설정
- 데이터 모델링
- CRUD 조작 수행
- 색인 작성
- 데이터 조회
- 오프라인 스토리지 및 동기화 지원
MobileFirst와 Cloudant 보안 통합
어댑터 샘플
샘플을 다운로드하려면 샘플: mfp-bluelist-on-premises를 참조하십시오.
Bluelist 샘플과 함께 포함된 어댑터를 이해하려면 Cloudant 보안과 MobileFirst 보안 프레임워크를 둘 다 이해해야 합니다.
Bluelist 어댑터 샘플의 두 가지 기본 기능은 다음과 같습니다.
- Cloudant 세션 쿠키에 대해 MobileFirst OAuth 토큰 교환
- Bluelist 샘플에서 Cloudant에 대해 필요한 관리 요청 수행
샘플은 보안 서버에서 관리 액세스가 필요한 API 요청을 수행하는 방법을 설명합니다. 관리자 인증 정보를 모바일 디바이스에 배치할 수도 있지만 모바일 디바이스로부터의 액세스를 제한하는 것이 더 좋습니다.
Bluelist 샘플은 MobileFirst 보안을 Cloudant 보안과 통합합니다. 어댑터 샘플은 MobileFirst ID를 Cloudant ID에 맵핑합니다. 모바일 디바이스는 비관리 API 요청을 수행하기 위해 Cloudant 세션 쿠키를 수신합니다. 샘플은 Couch 보안 모델을 사용합니다.
등록 REST 엔드포인트
다음 다이어그램은 Bluelist 어댑터 샘플 /enroll 엔드포인트에 의해 수행된 통합을 설명합니다.
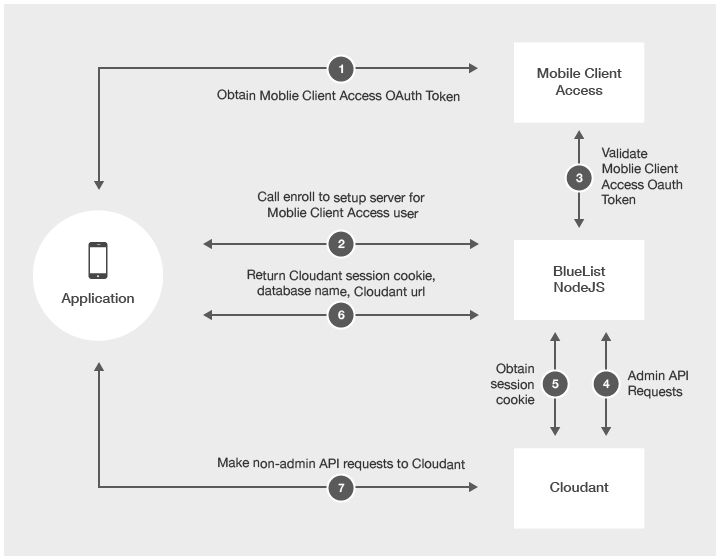
- 모바일 디바이스가 MobileFirst Server에서 MobileFirst OAuth 토큰을 얻습니다.
- 모바일 디바이스가 어댑터에서 /enroll 엔드포인트를 호출합니다.
- 어댑터 샘플이 MobileFirst Server에 대해 MobileFirst OAuth 토큰을 유효성 검증합니다.
- 유효한 경우 Cloudant에 대해 관리 API 요청을 수행합니다. 샘플은 _users 데이터베이스에서 기존 Cloudant 사용자를 확인합니다.
- 해당 사용자가 존재하는 경우 _users 데이터베이스에서 Cloudant 사용자 인증 정보를 검색하십시오.
- 새 사용자가 전달된 경우, Coudant 관리자 인증 정보를 사용하여 새 Cloudant 사용자를 작성하고 _users 데이터베이스에 저장하십시오.
- 사용자를 위한 고유 데이터베이스 이름을 작성하고 그 이름으로 Cloudant에 원격 데이터베이스를 작성하십시오.
- 새로 작성한 데이터베이스를 읽고 쓰기 위한 Cloudant 사용자 권한을 부여하십시오.
- Bluelist 애플리케이션의 필수 색인을 작성하십시오.
- 새 Cloudant 세션 쿠키를 요청하십시오.
- 어댑터 샘플은 Cloudant 세션 쿠키, 원격 데이터베이스 이름 및 Cloudant URL을 모바일 디바이스로 리턴합니다.
- 모바일 디바이스는 세션 쿠키가 만료될 때까지 Cloudant에 대해 직접 요청을 작성합니다.
sessioncookie REST 엔드포인트
만료된 세션 쿠키의 경우, 모바일 디바이스는 Cloudant 세션 쿠키에 대해 유효한 MobileFirst OAuth 토큰을 /sessioncookie 엔드포인트와 교환할 수 있습니다.
데이터베이스 작성
로컬 데이터 저장소 액세스
로컬 데이터 저장소를 사용하여 오프라인에서도 빠르게 액세스할 수 있도록 클라이언트 디바이스에 데이터를 저장할 수 있습니다.
로컬 데이터베이스에 액세스하기 위해 저장소 오브젝트를 작성하려면 데이터 저장소의 이름을 제공하십시오.
중요: 데이터베이스 이름은 소문자여야 합니다.
iOS
이전(IMFData/CloudantToolkit 사용):
Objective-C
//Get reference to data manager
IMFDataManager *manager = [IMFDataManager sharedInstance];
NSString *name = @"automobiledb";
NSError *error = nil;
Swift
//Create local store
CDTStore *store = [manager localStore:name error:&error];
let manager = IMFDataManager.sharedInstance()
let name = "automobiledb"

var store:CDTStore?
do {
    store = try manager.localStore(name)
} catch let error as NSError {
    // Handle error
}
이후(Cloundant Sync 사용):
Objective-C
// Get reference to datastore manager
CDTDatastoreManager *datastoreManager = existingDatastoreManager;
NSString *name = @"automobiledb";
NSError *error = nil;

//Create datastore
CDTDatastore *datastore = [datastoreManager datastoreNamed:name error:&error];
Swift
// Get reference to datastore manager
let datastoreManager:CDTDatastoreManager = existingDatastoreManager
let name:String  = "automobiledb"

//Create local store
var datastore:CDTDatastore?
do{
    datastore = try datastoreManager.datastoreNamed(name)
}catch let error as NSError{
    // Handle error
}
Android
이전(IMFData/CloudantToolkit 사용):
// Get reference to DataManager
DataManager manager = DataManager.getInstance();

// Create local store
String name = "automobiledb";

Task<Store> storeTask = manager.localStore(name);
storeTask.continueWith(new Continuation<Store, Void>() {
    @Override
    public Void then(Task<Store> task) throws Exception {
        if(task.isFaulted()){
            // Handle error
        }else{
            // Do something with Store
            Store store = task.getResult();
        }
        return null;
    }
});
이후(Cloundant Sync 사용): Android:
// Create DatastoreManager
   File path = context.getDir("databasedir", Context.MODE_PRIVATE);
   DatastoreManager manager = new DatastoreManager(path.getAbsolutePath());

       // Create a Datastore
       String name = "automobiledb";
       Datastore datastore = manager.openDatastore(name);
원격 데이터 저장소 작성
원격 저장소에 데이터를 저장하려면 데이터 저장소 이름을 제공하십시오.
iOS의 경우
이전(IMFData/CloudantToolkit 사용): iOS용:
Objective-c
// Get reference to data manager
IMFDataManager *manager = [IMFDataManager sharedInstance];
NSString *name = @"automobiledb";

// Create remote store
[manager remoteStore:name completionHandler:^(CDTStore *createdStore, NSError *error) {
    if(error){
        // Handle error
    }else{
        CDTStore *store = createdStore;
        NSLog(@"Successfully created store: %@", store.name);
    }
}];
Swift
let manager = IMFDataManager.sharedInstance()
let name = "automobiledb"

manager.remoteStore(name, completionHandler: { (createdStore:CDTStore!, error:NSError!) -> Void in
    if nil != error {
        //Handle error
    } else {
        let store:CDTStore = createdStore
        print("Successfully created store: \(store.name)")
    }
})
이후(Cloundant Sync 사용): iOS용:
Objective-c
Swift
Android의 경우
이전(IMFData/CloudantToolkit 사용): Android용:
이후(Cloundant Sync 사용): Android용:
디바이스의 데이터 암호화
모바일 디바이스에서 로컬 데이터 저장소의 암호화를 사용하려면 암호화 기능을 포함하도록 애플리케이션을 업데이트하고 암호화된 데이터 저장소를 작성해야 합니다.
iOS 디바이스의 데이터 암호화
- CocoaPods를 사용하여 암호화 기능을 얻으십시오.
- Podfile을 열고 다음 행을 추가하십시오.
이전(IMFData/CloudantToolkit 사용):
pod 'IMFDataLocal/SQLCipher'이후(Cloudant Sync 사용): iOS 디바이스의 데이터 암호화:
pod 'CDTDatastore/SQLCipher'자세한 정보는 CDTDatastore 암호화 문서를 참조하십시오.
-
다음 명령을 실행하여 애플리케이션에 종속 항목을 추가하십시오.
pod install
-
Swift 애플리케이션 내에서 암호화 기능을 사용하려면 애플리케이션의 연관된 브릿지 헤더에 다음 가져오기를 추가하십시오.
이전(IMFData/CloudantToolkit 사용): iOS 디바이스의 데이터 암호화:
#import <CloudantSync.h>
#import <CloudantSyncEncryption.h>
#import <CloudantToolkit/CloudantToolkit.h>
#import <IMFData/IMFData.h>
이후(Cloudant Sync 사용): iOS 디바이스의 데이터 암호화(Swift):
#import <CloudantSync.h> #import <CloudantSyncEncryption.h> -
키 제공자로 암호화에 필요한 로컬 저장소를 초기화하십시오.
경고: 데이터베이스를 작성한 후 비밀번호를 변경하면 기존 데이터베이스가 복호화될 수 없으므로 오류가 발생합니다. 데이터베이스가 암호화된 후에는 비밀번호를 변경할 수 없습니다. 비밀번호를 변경하려면 데이터베이스를 삭제해야 합니다.
이전(IMFData/CloudantToolkit 사용): 암호화를 위한 로컬 저장소 초기화:
Objective-C
//Get reference to data manager
IMFDataManager *manager = [IMFDataManager sharedInstance];
NSString *name = @"automobiledb";
NSError *error = nil;

// Initalize a key provider
id<CDTEncryptionKeyProvider> keyProvider = [CDTEncryptionKeychainProvider providerWithPassword: @"passw0rd" forIdentifier: @"identifier"];

//Initialize local store
CDTStore *localStore = [manager localStore: name withEncryptionKeyProvider: keyProvider error: &error];
Swift
let manager = IMFDataManager.sharedInstance()
let name = "automobiledb"

let keyProvider = CDTEncryptionKeychainProvider(password: "passw0rd", forIdentifier: "identifier")
var store:CDTStore?
do {
     store = try manager.localStore(name, withEncryptionKeyProvider: keyProvider)
} catch let error as NSError {
     // Handle error
}
이후(Cloudant Sync 사용): 암호화를 위한 로컬 저장소 초기화:
Objective-C
// Get reference to datastore manager
CDTDatastoreManager *datastoreManager = existingDatastoreManager;
NSString *name = @"automobiledb";
NSError *error = nil;

// Create KeyProvider
id<CDTEncryptionKeyProvider> keyProvider = [CDTEncryptionKeychainProvider providerWithPassword: @"passw0rd" forIdentifier: @"identifier"];

//Create local store
CDTDatastore *datastore = [datastoreManager datastoreNamed:name withEncryptionKeyProvider:keyProvider error:&error];
Swift
// Get reference to datastore manager let datastoreManager:CDTDatastoreManager = existingDatastoreManager let name:String = "automobiledb" //Create local store var datastore:CDTDatastore? let keyProvider = CDTEncryptionKeychainProvider(password: "passw0rd", forIdentifier: "identifier") do{ datastore = try datastoreManager.datastoreNamed(name, withEncryptionKeyProvider: keyProvider) }catch let error as NSError{ // Handle error } -
암호화된 로컬 저장소에서 데이터를 복제하는 경우, 키 제공자로 CDTPullReplication 및 CDTPushReplication 메소드를 초기화해야 합니다.
이전(IMFData/CloudantToolkit 사용): 키 제공자로 초기화:
Objective-C
//Get reference to data manager
IMFDataManager *manager = [IMFDataManager sharedInstance];
NSString *databaseName = @"automobiledb";

// Initalize a key provider
id<CDTEncryptionKeyProvider> keyProvider = [CDTEncryptionKeychainProvider providerWithPassword:@"password" forIdentifier:@"identifier"];

// pull replication
CDTPullReplication *pull = [manager pullReplicationForStore: databaseName withEncryptionKeyProvider: keyProvider];

// push replication
CDTPushReplication *push = [manager pushReplicationForStore: databaseName withEncryptionKeyProvider: keyProvider];
Swift
//Get reference to data manager
let manager = IMFDataManager.sharedInstance()
let databaseName = "automobiledb"

// Initalize a key provider
let keyProvider = CDTEncryptionKeychainProvider(password: "password", forIdentifier: "identifier")

// pull replication
let pull:CDTPullReplication = manager.pullReplicationForStore(databaseName, withEncryptionKeyProvider: keyProvider)

// push replication
let push:CDTPushReplication = manager.pushReplicationForStore(databaseName, withEncryptionKeyProvider: keyProvider)
이후(Cloundant Sync 사용): 키 제공자로 초기화:
암호화된 데이터베이스에서 복제하는 경우에는 암호화되지 않은 데이터베이스의 복제를 변경할 필요가 없습니다.
Android 디바이스의 데이터 암호화
Android 디바이스에서 데이터를 암호화하려면 애플리케이션에 정확한 라이브러리를 포함시켜서 암호화 기능을 얻으십시오. 그런 다음 암호화를 위한 로컬 저장소를 초기화하고 데이터를 복제할 수 있습니다.
-
build.gradle 파일에 종속 항목으로 Cloudant Toolkit 라이브러리를 추가하십시오.
이전(IMFData/CloudantToolkit 사용): Android 디바이스의 데이터 암호화:
repositories {
mavenCentral()
}

dependencies {
    compile 'com.ibm.mobile.services:cloudant-toolkit-local:1.0.0'
}
이후(Cloudant Sync 사용): Android 디바이스의 데이터 암호화:
repositories { mavenLocal() maven { url "http://cloudant.github.io/cloudant-sync-eap/repository/" } mavenCentral() } dependencies { compile group: 'com.cloudant', name: 'cloudant-sync-datastore-core', version:'0.13.2' compile group: 'com.cloudant', name: 'cloudant-sync-datastore-android', version:'0.13.2' compile group: 'com.cloudant', name: 'cloudant-sync-datastore-android-encryption', version:'0.13.2' } - SQLCipher for Android v3.2 .jar 및 .so 2진 파일을 다운로드하여 애플리케이션의 앱 구조 내에 있는 적절한 폴더에 포함시키십시오.
- 라이브러리를 추가하십시오. 공유 라이브러리 파일과 SQLCipher 아카이브를 Android 앱 디렉토리 아래의 jniLibs 폴더에 추가하십시오.
- 필수 ICU 압축 파일을 앱의 assets 폴더에 추가하십시오.
- sqlcipher.jar를 파일 종속 항목으로 추가하십시오. Android Studio의 앱 폴더 메뉴에서 공개 모듈 설정 아래의 종속 항목 탭을 선택하십시오.
-
키 제공자로 암호화에 필요한 로컬 저장소를 초기화하십시오.
경고: 데이터베이스를 작성한 후 비밀번호를 변경하면 기존 데이터베이스가 복호화될 수 없으므로 오류가 발생합니다. 데이터베이스가 암호화된 후에는 비밀번호를 변경할 수 없습니다. 비밀번호를 변경하려면 데이터베이스를 삭제해야 합니다.
이전(IMFData/CloudantToolkit 사용): 로컬 저장소 초기화(Android):
// Get reference to DataManager
DataManager manager = DataManager.getInstance();

// Initalize a key provider
KeyProvider keyProvider = new AndroidKeyProvider(getContext(),"password","identifier");

// Create local store
String databaseName = "automobiledb";
Task<Store> storeTask = manager.localStore(databaseName, keyProvider);
storeTask.continueWith(new Continuation<Store, Void >() {
     @Override
     public Void then(Task<Store> task) throws Exception {
         if (task.isFaulted()) {
             // Handle error
 } else {
             // Do something with Store
             Store store = task.getResult();
         }
         return null;
      }
});
이후(Cloudant Sync 사용): 로컬 저장소 초기화(Android):
// Load SQLCipher libs SQLiteDatabase.loadLibs(context); // Create DatastoreManager File path = context.getDir("databasedir", Context.MODE_PRIVATE); DatastoreManager manager = new DatastoreManager(path.getAbsolutePath()); // Create encrypted local store String name = "automobiledb"; KeyProvider keyProvider = new AndroidKeyProvider(context,"passw0rd","identifier"); Datastore datastore = manager.openDatastore(name, keyProvider); -
암호화된 데이터 저장소에서 데이터를 복제하는 경우에는 KeyProvider 오브젝트를
pullReplicationForStore()또는pushReplicationForStore()메소드로 전달해야 합니다.이전(IMFData/CloudantToolkit 사용): 키 제공자로 초기화(Android):
//Get reference to data manager
DataManager manager = DataManager.getInstance();
String databaseName = "automobiledb";

// Initalize a key provider
KeyProvider keyProvider = new AndroidKeyProvider(getContext(),"password","identifier");

// pull replication
Task<PushReplication> pullTask = manager.pullReplicationForStore(databaseName, keyProvider);

// push replication
Task<PushReplication> pushTask = manager.pushReplicationForStore(databaseName, keyProvider);
이후(Cloudant 사용): 키 제공자로 초기화(Android)
암호화된 데이터베이스에서 복제하는 경우에는 암호화되지 않은 데이터베이스의 복제를 변경할 필요가 없습니다.
사용자 권한 설정
원격 데이터베이스에서 사용자 권한을 설정할 수 있습니다.
이전(IMFData/CloudantToolkit 사용): 사용자 권한 설정:
Objective-C
// Get reference to data manager
IMFDataManager *manager = [IMFDataManager sharedInstance];

// Set permissions for current user on a store
[manager setCurrentUserPermissions: DB_ACCESS_GROUP_MEMBERS forStoreName: @"automobiledb" completionHander:^(BOOL success, NSError *error) {
    if(error){
        // Handle error
    }else{
        // setting permissions was successful
    }
}];
Swift
// Get reference to data manager
let manager = IMFDataManager.sharedInstance()

// Set permissions for current user on a store
manager.setCurrentUserPermissions(DB_ACCESS_GROUP_MEMBERS, forStoreName: "automobiledb") { (success:Bool, error:NSError!) -> Void in
    if nil != error {
        // Handle error
    } else {
        // setting permissions was successful
    }
}
Java
Task<Boolean> permissionsTask = manager.setCurrentUserPermissions(DataManager.DB_ACCESS_GROUP_MEMBERS, "automobiledb");

permissionsTask.continueWith(new Continuation<Boolean, Object>() {
    @Override
    public Object then(Task<Boolean> task) throws Exception {
        if(task.isFaulted()){
            // Handle error
        }else{
           // setting permissions was successful
        }
        return null;
    }
});
이후(Cloudant Sync 사용): 사용자 권한 설정:
모바일 디바이스에서는 사용자 권한을 설정할 수 없습니다. Cloudant 대시보드 또는 서버 측 코드를 사용하여 권한을 설정해야 합니다. MobileFirst OAuth 토큰을 Cloudant 보안과 통합하는 방법에 대한 샘플은 Bluelist 샘플을 참조하십시오.
데이터 모델링
Cloudant는 데이터를 JSON 문서로 저장합니다. 데이터를 애플리케이션에 오브젝트로 저장하려면 고유 오브젝트를 기본 JSON 문서 형식으로 맵핑하는 포함된 데이터 오브젝트 맵퍼 클래스를 사용하십시오.
- iOS: Cloudant는 데이터를 JSON 문서로 저장합니다. CloudantToolkit 프레임워크는 고유 오브젝트와 JSON 문서 사이를 맵핑하는 오브젝트 맵퍼를 제공했습니다. CDTDatastore API는 이 기능을 제공하지 않습니다. 다음 절의 스니펫은 CDTDatastore 오브젝트를 사용하여 동일한 조작을 달성하는 방법을 설명합니다.
- Android: AndroidCloudant는 데이터를 JSON 문서로 저장합니다. CloudantToolkit API는 고유 오브젝트와 JSON 문서 사이를 맵핑하는 오브젝트 맵퍼를 제공했습니다. Cloundant Sync는 이 기능을 제공하지 않습니다. 다음 절의 스니펫은 DocumentRevision 오브젝트를 사용하여 동일한 조작을 달성하는 방법을 설명합니다.
CRUD 조작 수행
데이터 저장소의 컨텐츠를 수정할 수 있습니다.
create,retrieve,update및delete(CRUD) 조작에 대한 세부사항은 CDTDatastore CRUD 문서를 참조하십시오.- 원격 저장소에서
create,retrieve,update및delete(CRUD) 조작에 대해서는 Cloudant 문서 API를 참조하십시오.
데이터 작성
이전
Objective-C
// Use an existing store
CDTStore *store = existingStore;

// Create your Automobile to save
Automobile *automobile = [[Automobile alloc] initWithMake:@"Toyota" model:@"Corolla" year: 2006];

[store save:automobile completionHandler:^(id savedObject, NSError *error) {
    if (error) {
        // save was not successful, handler received an error
    } else {
        // use the result
        Automobile *savedAutomobile = savedObject;
        NSLog(@"saved revision: %@", savedAutomobile);
    }
}];
Swift
// Use an existing store
let store:CDTStore = existingStore

// Create your object to save
let automobile = Automobile(make: "Toyota", model: "Corolla", year: 2006)

store.save(automobile, completionHandler: { (savedObject:AnyObject!, error:NSError!) -> Void in
   if nil != error {
       //Save was not successful, handler received an error
   } else {
       // Use the result
       print("Saved revision: \(savedObject)")
   }
})
Java
// Use an existing store
Store store = existingStore;

// Create your object to save
Automobile automobile = new Automobile("Toyota", "Corolla", 2006);

// Save automobile to store
Task<Object> saveTask = store.save(automobile);
saveTask.continueWith(new Continuation<Object, Void>() {
    @Override
    public Void then(Task<Object> task) throws Exception {
        if (task.isFaulted()) {
            // save was not successful, task.getError() contains the error
        } else {
            // use the result
            Automobile savedAutomobile = (Automobile) task.getResult();
        }
        return null;
    }
});
이후
// Use an existing store
CDTDatastore *datastore = existingDatastore;

// Create document body
CDTMutableDocumentRevision * revision = [CDTMutableDocumentRevision revision];
revision.body = @{@"@datatype" : @"Automobile", @"make" :@"Toyota", @"model": @"Corolla", @"year" : @2006};

NSError *error = nil;
CDTDocumentRevision *createdRevision = [datastore createDocumentFromRevision:revision error:&error];

if (error) {
    // save was not successful, handler received an error
} else {
    // use the result
    NSLog(@"Revision: %@", createdRevision);
}
Swift
// Use an existing store
let datastore:CDTDatastore = existingDatastore

// Create document body
let revision = CDTMutableDocumentRevision()
revision.setBody(["make":"Toyota","model":"Corolla","year":2006])

var createdRevision:CDTDocumentRevision?
do{
    createdRevision = try datastore.createDocumentFromRevision(revision)
    NSLog("Revision: \(createdRevision)");
}catch let error as NSError{
    // Handle error
}
Java
// Use an existing store
Datastore datastore = existingStore;

// Create document body
Map<String, Object> body = new HashMap<String, Object>();
body.put("@datatype", "Automobile");
body.put("make", "Toyota");
body.put("model", "Corolla");
body.put("year", 2006);

// Create revision and set body
MutableDocumentRevision revision  = new MutableDocumentRevision();
revision.body = DocumentBodyFactory.create(body);

// Save revision to store
DocumentRevision savedRevision = datastore.createDocumentFromRevision(revision);
데이터 읽기
이전
Objective-C
CDTStore *store = existingStore;
NSString *automobileId = existingAutomobileId;

// Fetch Autombile from Store
[store fetchById:automobileId completionHandler:^(id object, NSError *error) {
    if (error) {
        // fetch was not successful, handler received an error
    } else {
        // use the result
        Automobile *savedAutomobile = object;
        NSLog(@"fetched automobile: %@", savedAutomobile);
    }
}];
Swift
// Using an existing store and Automobile
let store:CDTStore = existingStore
let automobileId:String = existingAutomobileId

// Fetch Autombile from Store
store.fetchById(automobileId, completionHandler: { (object:AnyObject!, error:NSError!) -> Void in
    if nil != error {
        // Fetch was not successful, handler received an error
    } else {
        // Use the result
        let savedAutomobile:Automobile = object as! Automobile
        print("Fetched automobile: \(savedAutomobile)")
    }
})
Java
// Use an existing store and documentId
Store store = existingStore;
String automobileId = existingAutomobileId;

// Fetch the automobile from the store
Task<Object> fetchTask = store.fetchById(automobileId);
fetchTask.continueWith(new Continuation<Object, Void>() {
    @Override
    public Void then(Task<Object> task) throws Exception {
        if (task.isFaulted()) {
            // fetch was not successful, task.getError() contains the error
        } else {
            // use the result
            Automobile fetchedAutomobile = (Automobile) task.getResult();
        }
        return null;
    }
});
이후
Objective-C
// Use an existing store and documentId
CDTDatastore *datastore = existingDatastore;
NSString *documentId = existingDocumentId;

// Fetch the CDTDocumentRevision from the store
NSError *error = nil;
CDTDocumentRevision *fetchedRevision = [datastore getDocumentWithId:documentId error:&error];

if (error) {
    // fetch was not successful, handler received an error
} else {
    // use the result
    NSLog(@"Revision: %@", fetchedRevision);
}
Swift
// Use an existing store and documentId
let datastore:CDTDatastore = existingDatastore
let documentId:String = existingDocumentId

var fetchedRevision:CDTDocumentRevision?
do{
    fetchedRevision = try datastore.getDocumentWithId(documentId)
    NSLog("Revision: \(fetchedRevision)");
}catch let error as NSError{
    // Handle error
}
Java
// Use an existing store and documentId
Datastore datastore = existingStore;
String documentId = existingDocumentId;

// Fetch the revision from the store
DocumentRevision fetchedRevision = datastore.getDocument(documentId);
데이터 업데이트
이전
Objective-C
// Use an existing store and Automobile
CDTStore *store = existingStore;
Automobile *automobile = existingAutomobile;

// Update some of the values in the Automobile
automobile.year = 2015;

// Save Autombile to the store
[store save:automobile completionHandler:^(id savedObject, NSError *error) {
    if (error) {
        // sasve was not successful, handler received an error
    } else {
        // use the result
        Automobile *savedAutomobile = savedObject;
        NSLog(@"saved automobile: %@", savedAutomobile);
    }
}];
Swift
// Use an existing store and Automobile
let store:CDTStore = existingStore
let automobile:Automobile = existingAutomobile

// Update some of the values in the Automobile
automobile.year = 2015

// Save Autombile to the store
store.save(automobile, completionHandler: { (savedObject:AnyObject!, error:NSError!) -> Void in
    if nil != error {
        // Update was not successful, handler received an error
    } else {
        // Use the result
        let savedAutomobile:Automobile = savedObject as! Automobile
        print("Updated automobile: \(savedAutomobile)")
    }
})
Java
// Use an existing store and Automobile
Store store = existingStore;
Automobile automobile = existingAutomobile;

// Update some of the values in the Automobile
automobile.setYear(2015);

// Save automobile to store
Task<Object> saveTask = store.save(automobile);
saveTask.continueWith(new Continuation<Object, Void>() {
    @Override
    public Void then(Task<Object> task) throws Exception {
        if (task.isFaulted()) {
            // save was not successful, task.getError() contains the error
        } else {
            // use the result
            Automobile savedAutomobile = (Automobile) task.getResult();
        }
        return null;
    }
});
이후
Objective-C
// Use an existing store and document
CDTDatastore *datastore = existingDatastore;
CDTMutableDocumentRevision *documentRevision = [existingDocumentRevision mutableCopy];

// Update some of the values in the revision
[documentRevision.body setValue:@2015 forKey:@"year"];

NSError *error = nil;
CDTDocumentRevision *updatedRevision = [datastore updateDocumentFromRevision:documentRevision error:&error];
if (error) {
    // save was not successful, handler received an error
} else {
    // use the result
    NSLog(@"Revision: %@", updatedRevision);
}
Swift
// Use an existing store and document
let datastore:CDTDatastore = existingDatastore
let documentRevision:CDTMutableDocumentRevision = existingDocumentRevision.mutableCopy()

// Update some of the values in the revision
documentRevision.body()["year"] = 2015

var updatedRevision:CDTDocumentRevision?
do{
    updatedRevision = try datastore.updateDocumentFromRevision(documentRevision)
    NSLog("Revision: \(updatedRevision)");
}catch let error as NSError{
    // Handle error
}
Java
// Use an existing store and documentId
// Use an existing store
Datastore datastore = existingStore;

// Make a MutableDocumentRevision from the existing revision
MutableDocumentRevision revision = existingRevision.mutableCopy();

// Update some of the values in the revision
Map<String, Object> body = revision.getBody().asMap();
body.put("year", 2015);
revision.body = DocumentBodyFactory.create(body);

// Save revision to store
DocumentRevision savedRevision = datastore.updateDocumentFromRevision(revision);
데이터 삭제
오브젝트를 삭제하려면 삭제할 오브젝트를 저장소로 전달하십시오.
이전
Objective-C
// Using an existing store and Automobile
CDTStore *store = existingStore;
Automobile *automobile = existingAutomobile;

// Delete the Automobile object from the store
[store delete:automobile completionHandler:^(NSString *deletedObjectId, NSString *deletedRevisionId, NSError *error) {
    if (error) {
        // delete was not successful, handler received an error
    } else {
        // use the result
        NSLog(@"deleted Automobile doc-%@-rev-%@", deletedObjectId, deletedRevisionId);
    }
}];
Swift
// Using an existing store and Automobile
let store:CDTStore = existingStore
let automobile:Automobile = existingAutomobile

// Delete the Automobile object
store.delete(automobile, completionHandler: { (deletedObjectId:String!, deletedRevisionId:String!, error:NSError!) -> Void in
    if nil != error {
        // delete was not successful, handler received an error
    } else {
        // use the result
        print("deleted document doc-\(deletedObjectId)-rev-\(deletedRevisionId)")
    }
})
Java
// Use an existing store and automobile
Store store = existingStore;
Automobile automobile = existingAutomobile;

// Delete the automobile from the store
Task<String> deleteTask = store.delete(automobile);
deleteTask.continueWith(new Continuation<String, Void>() {
    @Override
    public Void then(Task<String> task) throws Exception {
        if (task.isFaulted()) {
            // delete was not successful, task.getError() contains the error
        } else {
            // use the result
            String deletedAutomobileId = task.getResult();
        }
        return null;
    }
});
이후
Objective-C
// Use an existing store and revision
CDTDatastore *datastore = existingDatastore;
CDTDocumentRevision *documentRevision = existingDocumentRevision;

// Delete the CDTDocumentRevision from the store
NSError *error = nil;
CDTDocumentRevision *deletedRevision = [datastore deleteDocumentFromRevision:documentRevision error:&error];
if (error) {
    // delete was not successful, handler received an error
} else {
    // use the result
    NSLog(@"deleted document: %@", deletedRevision);
}
Swift
// Use an existing store and revision
let datastore:CDTDatastore = existingDatastore
let documentRevision:CDTDocumentRevision = existingDocumentRevision

var deletedRevision:CDTDocumentRevision?
do{
    deletedRevision = try datastore.deleteDocumentFromRevision(documentRevision)
    NSLog("Revision: \(deletedRevision)");
}catch let error as NSError{
    // Handle error
}
Java
// Use an existing store and revision
Datastore datastore = existingStore;
BasicDocumentRevision documentRevision = (BasicDocumentRevision) existingDocumentRevision;

// Delete revision from store
DocumentRevision deletedRevision = datastore.deleteDocumentFromRevision(documentRevision);
색인 작성
조회를 수행하려면 색인을 작성해야 합니다.
- iOS: 세부사항은 CDTDatastore 조회 문서를 참조하십시오. 원격 저장소의 조회 조작에 대해서는 Cloudant 조회 API를 참조하십시오.
- Android: 세부사항은 Cloundant Sync 조회 문서를 참조하십시오. 원격 저장소의 CRUD 조작에 대해서는 Cloudant의 조회 API를 참조하십시오.
-
데이터 유형을 포함하는 색인을 작성하십시오. 데이터 유형이 있는 색인은 데이터 저장소에서 오브젝트 맵퍼가 설정된 경우에 유용합니다.
이전
Objective-C
// Use an existing data store
CDTStore *store = existingStore;

// The data type to use for the Automobile class
NSString *dataType = [store.mapper dataTypeForClassName:NSStringFromClass([Automobile class])];

// Create the index
[store createIndexWithDataType:dataType fields:@[@"year", @"make"] completionHandler:^(NSError *error) {
    if(error){
         // Handle error
     }else{
         // Continue application flow
     }
}];
Swift
// A store that has been previously created.
let store:CDTStore = existingStore

// The data type to use for the Automobile class
let dataType:String = store.mapper.dataTypeForClassName(NSStringFromClass(Automobile.classForCoder()))

// Create the index
store.createIndexWithDataType(dataType, fields: ["year","make"]) { (error:NSError!) -> Void in
     if nil != error {
         // Handle error
 } else {
         // Continue application flow
     }
}
Java
// Use an existing data store
Store store = existingStore;

// The data type to use for the Automobile class
String dataType = store.getMapper().getDataTypeForClassName(Automobile.class.getCanonicalName());

// The fields to index.
List<IndexField> indexFields = new ArrayList<IndexField>();
indexFields.add(new IndexField("year"));
indexFields.add(new IndexField("make"));

// Create the index
Task<Void> indexTask = store.createIndexWithDataType(dataType, indexFields);
indexTask.continueWith(new Continuation<Void, Void>() {
     @Override
     public Void then(Task<Void> task) throws Exception {
         if(task.isFaulted()){
             // Handle error
         }else{
             // Continue application flow
         }
         return null;
     }
});
이후
Objective-C
// A store that has been previously created.
CDTDatastore *datastore = existingDatastore;

NSString *indexName = [datastore ensureIndexed:@[@"@datatype", @"year", @"make"] withName:@"automobileindex"];
if(!indexName){
     // Handle error
}
Swift
// A store that has been previously created.
let datastore:CDTDatastore = existingDatastore

// Create the index
let indexName:String? = datastore.ensureIndexed(["@datatype","year","make"], withName: "automobileindex")
if(indexName == nil){
     // Handle error
}
Java
// Use an existing store Datastore datastore = existingStore; // Create an IndexManager IndexManager indexManager = new IndexManager(datastore); // The fields to index. List<Object> indexFields = new ArrayList<Object>(); indexFields.add("@datatype"); indexFields.add("year"); indexFields.add("make"); // Create the index indexManager.ensureIndexed(indexFields, "automobile_index"); -
색인을 삭제하십시오.
이전
Objective-C
// Use an existing data store
CDTStore *store = existingStore;
NSString *indexName = existingIndexName;

// Delete the index
[store deleteIndexWithName:indexName completionHandler:^(NSError *error) {
     if(error){
         // Handle error
     }else{
         // Continue application flow
     }
}];
Swift
// Use an existing store
let store:CDTStore = existingStore

// The data type to use for the Automobile class
let dataType:String = store.mapper.dataTypeForClassName(NSStringFromClass(Automobile.classForCoder()))

// Delete the index
store.deleteIndexWithDataType(dataType, completionHandler: { (error:NSError!) -> Void in
     if nil != error {
         // Handle error
 } else {
         // Continue application flow
     }
})
Java
// Use an existing data store
Store store = existingStore;
String indexName = existingIndexName;

// Delete the index
Task<Void> indexTask = store.deleteIndex(indexName);
indexTask.continueWith(new Continuation<Void, Void>() {
     @Override
     public Void then(Task<Void> task) throws Exception {
         if(task.isFaulted()){
             // Handle error
         }else{
             // Continue application flow
         }
         return null;
     }
});
이후
Objective-C
// Use an existing store
CDTDatastore *datastore = existingDatastore;
NSString *indexName = existingIndexName;

// Delete the index
BOOL success = [datastore deleteIndexNamed:indexName];
if(!success){
     // Handle error
}
Swift
// A store that has been previously created.
let datastore:CDTDatastore = existingDatastore
let indexName:String = existingIndexName

// Delete the index
let success:Bool = datastore.deleteIndexNamed(indexName)
if(!success){
     // Handle error
}
Java
// Use an existing store
Datastore datastore = existingStore;
String indexName = existingIndexName;
IndexManager indexManager = existingIndexManager;

// Delete the index
indexManager.deleteIndexNamed(indexName);
데이터 조회
색인을 작성한 후 데이터베이스에서 데이터를 조회할 수 있습니다.
- iOS: 세부사항은 CDTDatastore 조회 문서를 참조하십시오.
- Android: 세부사항은 Cloundant Sync 조회 문서를 참조하십시오.
- 원격 저장소의 조회 조작에 대해서는 Cloudant 조회 API를 참조하십시오.
iOS(데이터 조회)
이전(IMFData/CloudantToolkit 사용): iOS(데이터 조회)
Objective-C
// Use an existing store
CDTStore *store = existingStore;

NSPredicate *queryPredicate = [NSPredicate predicateWithFormat:@"(year = 2006)"];
CDTCloudantQuery *query = [[CDTCloudantQuery alloc] initDataType:[store.mapper dataTypeForClassName:NSStringFromClass([Automobile class])] withPredicate:queryPredicate];

[store performQuery:query completionHandler:^(NSArray *results, NSError *error) {
    if(error){
        // Handle error
    }else{
        // Use result of query.  Result will be Automobile objects.
    }
}];
Swift
// Use an existing store
let store:CDTStore = existingStore

let queryPredicate:NSPredicate = NSPredicate(format:"(year = 2006)")
let query:CDTCloudantQuery = CDTCloudantQuery(dataType: "Automobile", withPredicate: queryPredicate)

store.performQuery(query, completionHandler: { (results:[AnyObject]!, error:NSError!) -> Void in
    if nil != error {
        // Handle error
    } else {
        // Use result of query.  Result will be Automobile objects.
    }
})
이후(Cloudant Sync 사용)(데이터 조회):
Objective-C
// Use an existing store
CDTDatastore *datastore = existingDatastore;

CDTQResultSet *results = [datastore find:@{@"@datatype" : @"Automobile", @"year" : @2006}];
if(results){
    // Use results
}
// Use an existing store
let datastore:CDTDatastore = existingDatastore

let results:CDTQResultSet? = datastore.find(["@datatype" : "Automobile", "year" : 2006])
if(results == nil){
    // Handle error
}
Android(데이터 조회)
오브젝트에 대한 조회를 실행하려면 데이터 유형에 대해 조회 필터로 Cloudant 조회를 작성하십시오. 저장소 오브젝트에 대해 조회를 실행하십시오.
이전(IMFData/CloudantToolkit 사용): Android(데이터 조회)
// Use an existing store
Store store = existingStore;

// Create data type predicate
Map<String, Object> dataTypeEqualityOpMap = new HashMap<String, Object>();
dataTypeEqualityOpMap.put("$eq", "Automobile");

Map<String, Object> dataTypeSelectorMap = new HashMap<String, Object>();
dataTypeSelectorMap.put("@datatype", dataTypeEqualityOpMap);

// Create year predicate
Map<String, Object> yearEqualityOpMap = new HashMap<String, Object>();
yearEqualityOpMap.put("$eq", 2006);

Map<String, Object> yearSelectorMap = new HashMap<String, Object>();
yearSelectorMap.put("year", yearEqualityOpMap);

// Add predicates to AND compound predicate
List<Map<String, Object>> andPredicates = new ArrayList<Map<String, Object>>();
andPredicates.add(dataTypeSelectorMap);
andPredicates.add(yearSelectorMap);

Map<String, Object> andOpMap = new HashMap<String, Object>();
andOpMap.put("$and", andPredicates);

Map<String, Object> cloudantQueryMap = new HashMap<String, Object>();
cloudantQueryMap.put("selector", andOpMap);

// Create a Cloudant Query Object
CloudantQuery query = new CloudantQuery(cloudantQueryMap);

// Run the Cloudant Query against a Store
Task<List> queryTask = store.performQuery(query);
queryTask.continueWith(new Continuation<List, Object>() {
    @Override
    public Object then(Task<List> task) throws Exception {
        if(task.isFaulted()){
            // Handle Error
        }else{
            List queryResult = task.getResult();
            // Use queryResult to do something
        }
        return null;
    }
});
이후(Cloudant Sync 사용): Android(데이터 조회):
// Use an existing store
Datastore datastore = existingStore;
IndexManager indexManager = existingIndexManager;

// Create data type predicate
Map<String, Object> dataTypeEqualityOpMap = new HashMap<String, Object>();
dataTypeEqualityOpMap.put("$eq", "Automobile");

Map<String, Object> dataTypeSelectorMap = new HashMap<String, Object>();
dataTypeSelectorMap.put("@datatype", dataTypeEqualityOpMap);

// Create year predicate
Map<String, Object> yearEqualityOpMap = new HashMap<String, Object>();
yearEqualityOpMap.put("$eq", 2006);

Map<String, Object> yearSelectorMap = new HashMap<String, Object>();
yearSelectorMap.put("year", yearEqualityOpMap);

// Add predicates to AND compound predicate
List<Map<String, Object>> andPredicates = new ArrayList<Map<String, Object>>();
andPredicates.add(dataTypeSelectorMap);
andPredicates.add(yearSelectorMap);

Map<String, Object> selectorMap = new HashMap<String, Object>();
selectorMap.put("$and", andPredicates);

// Run the query against a Store
QueryResult result = indexManager.find(selectorMap);
오프라인 스토리지 및 동기화 지원
모바일 디바이스의 데이터를 원격 데이터베이스 인스턴스와 동기화할 수 있습니다. 원격 데이터베이스에서 모바일 디바이스의 로컬 데이터베이스로 업데이트를 풀하거나 로컬 데이터베이스 업데이트를 원격 데이터베이스에 푸시할 수 있습니다.
- iOS: 세부사항은 CDTDatastore 복제 문서를 참조하십시오.
- Android: 세부사항은 Cloundant Sync 복제 문서를 참조하십시오. 원격 저장소의 CRUD 조작에 대해서는 Cloudant 복제 API를 참조하십시오.
풀 복제 실행
이전
Objective-C
// store is an existing CDTStore object created using IMFDataManager remoteStore
__block NSError *replicationError;
CDTPullReplication *pull = [manager pullReplicationForStore: store.name];
CDTReplicator *replicator = [manager.replicatorFactory oneWay:pull error:&replicationError];
if(replicationError){
    // Handle error
}else{
    // replicator creation was successful
}

[replicator startWithError:&replicationError];
if(replicationError){
    // Handle error
}else{
    // replicator start was successful
}

// (optionally) monitor replication via polling
while (replicator.isActive) {
    [NSThread sleepForTimeInterval:1.0f];
    NSLog(@"replicator state : %@", [CDTReplicator stringForReplicatorState:replicator.state]);
}
Swift
// Use an existing store
let store:CDTStore = existingStore

do {
    // store is an existing CDTStore object created using IMFDataManager remoteStore
    let pull:CDTPullReplication = manager.pullReplicationForStore(store.name)
    let replicator:CDTReplicator = try manager.replicatorFactory.oneWay(pull)

    // start replication
    try replicator.start()

    // (optionally) monitor replication via polling
    while replicator.isActive() {
        NSThread.sleepForTimeInterval(1.0)
        print("replicator state : \(CDTReplicator.stringForReplicatorState(replicator.state))")
    }

} catch let error as NSError {
    // Handle error
}
Java
// Use an existing store
Store store = existingStore;

// create a pull replication task
// name is the database name of the store being replicated
Task<PullReplication> pullTask = manager.pullReplicationForStore(store.getName());
pullTask.continueWith(new Continuation<PullReplication, Object>() {
    @Override
    public Object then(Task<PullReplication> task) throws Exception {
        if(task.isFaulted()){
            // Handle error
        }else{
            // Start the replication
            PullReplication pull = task.getResult();
            Replicator replicator = ReplicatorFactory.oneway(pull);
            replicator.start();
        }
        return null;
    }
});
이후
Objective-C
// Use an existing datastore
NSURL *remoteStoreUrl = existingRemoteStoreUrl;
CDTDatastoreManager *datastoreManager = existingDatastoreManager;
CDTDatastore *datastore = existingDatastore;

// Create pull replication objects
__block NSError *replicationError;
CDTReplicatorFactory *replicatorFactory = [[CDTReplicatorFactory alloc]initWithDatastoreManager:datastoreManager];
CDTPullReplication *pull = [CDTPullReplication replicationWithSource:remoteStoreUrl target:datastore];
CDTReplicator *replicator = [replicatorFactory oneWay:pull error:&error];
if(replicationError){
    // Handle error
}else{
    // replicator creation was successful
}

[replicator startWithError:&replicationError];
if(replicationError){
    // Handle error
}else{
    // replicator start was successful
}

// (optionally) monitor replication via polling
while (replicator.isActive) {
    [NSThread sleepForTimeInterval:1.0f];
    NSLog(@"replicator state : %@", [CDTReplicator stringForReplicatorState:replicator.state]);
}
Swift
let remoteStoreUrl:NSURL = existingRemoteStoreUrl
let datastoreManager:CDTDatastoreManager = existingDatastoreManager
let datastore:CDTDatastore = existingDatastore


do {
    // store is an existing CDTStore object created using IMFDataManager remoteStore
    let replicatorFactory = CDTReplicatorFactory(datastoreManager: datastoreManager)
    let pull:CDTPullReplication = CDTPullReplication(source: remoteStoreUrl, target: datastore)
    let replicator:CDTReplicator = try replicatorFactory.oneWay(pull)

    // start replication
    try replicator.start()

    // (optionally) monitor replication via polling
    while replicator.isActive() {
        NSThread.sleepForTimeInterval(1.0)
        print("replicator state : \(CDTReplicator.stringForReplicatorState(replicator.state))")
    }

} catch let error as NSError {
    // Handle error
}
Java
// Use an opened Datastore to replicate to
Datastore datastore = existingDatastore;
URI uri = existingURI;

// Create a replicator that replicates changes from the remote
final Replicator replicator = ReplicatorBuilder.pull().from(uri).to(datastore).build();

// Register event listener
replicator.getEventBus().register(new Object() {

    @Subscribe
    public void complete(ReplicationCompleted event) {

        // Handle ReplicationCompleted event
    }

    @Subscribe
    public void error(ReplicationErrored event) {

        // Handle ReplicationErrored event
    }
});

// Start replication
replicator.start();
푸시 복제 실행
이전
Objective-C
/ store is an existing CDTStore object created using IMFDataManager localStore
__block NSError *replicationError;
CDTPushReplication *push = [manager pushReplicationForStore: store.name];
CDTReplicator *replicator = [manager.replicatorFactory oneWay:push error:&replicationError];
if(replicationError){
    // Handle error
}else{
    // replicator creation was successful
}

[replicator startWithError:&replicationError];
if(replicationError){
    // Handle error
}else{
    // replicator start was successful
}

// (optionally) monitor replication via polling
while (replicator.isActive) {
    [NSThread sleepForTimeInterval:1.0f];
    NSLog(@"replicator state : %@", [CDTReplicator stringForReplicatorState:replicator.state]);
}
Swift
// Use an existing store
let store:CDTStore = existingStore

do {
    // store is an existing CDTStore object created using IMFDataManager localStore
    let push:CDTPushReplication = manager.pushReplicationForStore(store.name)
    let replicator:CDTReplicator = try manager.replicatorFactory.oneWay(push)

    // Start replication
    try replicator.start()

    // (optionally) monitor replication via polling
    while replicator.isActive() {
        NSThread.sleepForTimeInterval(1.0)
        print("replicator state : \(CDTReplicator.stringForReplicatorState(replicator.state))")
    }
} catch let error as NSError {
    // Handle error
}
Java
// Use an existing store
Store store = existingStore;

// create a push replication task
// name is the database name of the store being replicated
Task<PushReplication> pushTask = manager.pushReplicationForStore(store.getName());
pushTask.continueWith(new Continuation<PushReplication, Object>() {
    @Override
    public Object then(Task<PushReplication> task) throws Exception {
        if(task.isFaulted()){
            // Handle error
        }else{
            // Start the replication
            PushReplication push = task.getResult();
            Replicator replicator = ReplicatorFactory.oneway(push);
            replicator.start();
        }
        return null;
    }
});
이후
Objective-C
// Use an existing datastore
NSURL *remoteStoreUrl = existingRemoteStoreUrl;
CDTDatastoreManager *datastoreManager = existingDatastoreManager;
CDTDatastore *datastore = existingDatastore;

// Create push replication objects
__block NSError *replicationError;
CDTReplicatorFactory *replicatorFactory = [[CDTReplicatorFactory alloc]initWithDatastoreManager:datastoreManager];
CDTPushReplication *push = [CDTPushReplication replicationWithSource:datastore target:remoteStoreUrl];
CDTReplicator *replicator = [replicatorFactory oneWay:push error:&error];
if(replicationError){
    // Handle error
}else{
    // replicator creation was successful
}

[replicator startWithError:&replicationError];
if(replicationError){
    // Handle error
}else{
    // replicator start was successful
}

// (optionally) monitor replication via polling
while (replicator.isActive) {
    [NSThread sleepForTimeInterval:1.0f];
    NSLog(@"replicator state : %@", [CDTReplicator stringForReplicatorState:replicator.state]);
}
Swift
let remoteStoreUrl:NSURL = existingRemoteStoreUrl
let datastoreManager:CDTDatastoreManager = existingDatastoreManager
let datastore:CDTDatastore = existingDatastore


do {
    // store is an existing CDTStore object created using IMFDataManager remoteStore
    let replicatorFactory = CDTReplicatorFactory(datastoreManager: datastoreManager)
    let push:CDTPushReplication = CDTPushReplication(source: datastore, target: remoteStoreUrl)
    let replicator:CDTReplicator = try replicatorFactory.oneWay(push)

    // start replication
    try replicator.start()

    // (optionally) monitor replication via polling
    while replicator.isActive() {
        NSThread.sleepForTimeInterval(1.0)
        print("replicator state : \(CDTReplicator.stringForReplicatorState(replicator.state))")
    }

} catch let error as NSError {
    // Handle error
}
Java
// Use an opened Datastore to replicate from
Datastore datastore = existingStore;
URI uri = existingURI;

// Create a replicator that replicates changes from the local
// database to the remote datastore.
final Replicator replicator = ReplicatorBuilder.push().from(datastore).to(uri).build();

// Register event listener
replicator.getEventBus().register(new Object() {

    @Subscribe
    public void complete(ReplicationCompleted event) {

        // Handle ReplicationCompleted event
    }

    @Subscribe
    public void error(ReplicationErrored event) {

        // Handle ReplicationErrored event
    }
});

// Start replication
replicator.start();
Inclusive terminology note: The Mobile First Platform team is making changes to support the IBM® initiative to replace racially biased and other discriminatory language in our code and content with more inclusive language. While IBM values the use of inclusive language, terms that are outside of IBM's direct influence are sometimes required for the sake of maintaining user understanding. As other industry leaders join IBM in embracing the use of inclusive language, IBM will continue to update the documentation to reflect those changes.