Implementing the challenge handler in iOS applications
improve this page | report issueOverview
When trying to access a protected resource, the server (the security check) sends back to the client a list containing one or more challenges for the client to handle.
This list is received as a JSON object, listing the security check name with an optional JSON of additional data:
{
  "challenges": {
    "SomeSecurityCheck1":null,
    "SomeSecurityCheck2":{
      "some property": "some value"
    }
  }
}
The client must then register a challenge handler for each security check.
The challenge handler defines the client-side behavior that is specific to the security check.
Creating the challenge handler
A challenge handler is a class that handles challenges sent by the MobileFirst Server, such as displaying a login screen, collecting credentials, and submitting them back to the security check.
In this example, the security check is PinCodeAttempts, which was defined in Implementing the CredentialsValidationSecurityCheck. The challenge sent by this security check contains the number of remaining attempts to log in (remainingAttempts), and an optional errorMsg.
Create a Swift class that extends SecurityCheckChallengeHandler:
open class PinCodeChallengeHandler : SecurityCheckChallengeHandlerSwift {

}
Handling the challenge
The minimum requirement from the SecurityCheckChallengeHandler protocol is to implement the handleChallenge method, which prompts the user to provide the credentials. The handleChallenge method receives the challenge JSON as a Dictionary.
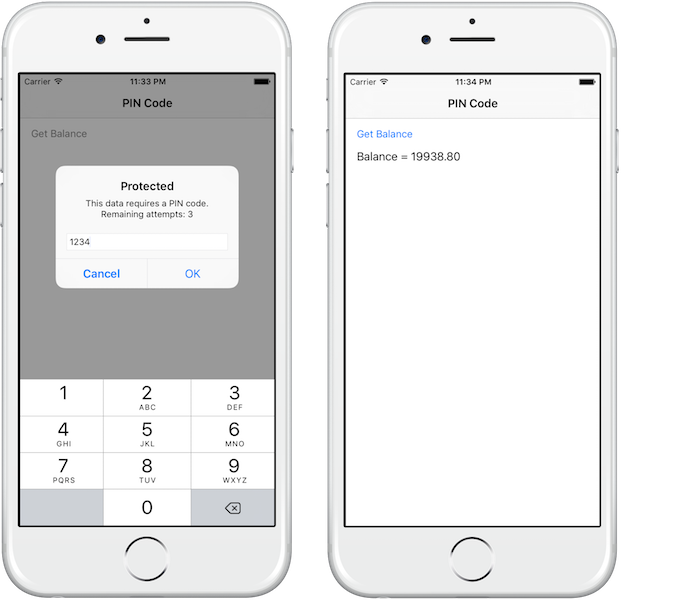
In this example, an alert prompts the user to enter the PIN code:
override open func handleChallenge(challengeResponse: [AnyHashable: Any]!) {
  var errorMsg : String
  if challengeResponse!["errorMsg"] is NSNull {
      errorMsg = "This data requires a PIN code."
  }
  else{
      errorMsg = challengeResponse!["errorMsg"] as! String
  }
  let remainingAttempts = challengeResponse!["remainingAttempts"] as! Int + 2;

  showPopup(errorMsg,remainingAttempts: remainingAttempts);
}
The implementation of
showPopupis included in the sample application.
If the credentials are incorrect, you can expect the framework to call handleChallenge again.
Submitting the challenge’s answer
After the credentials have been collected from the UI, use the WLChallengeHandler’s submitChallengeAnswer(answer: [NSObject : AnyObject]!) method to send an answer back to the security check. In this example, PinCodeAttempts expects a property called pin containing the submitted PIN code:
self.submitChallengeAnswer(["pin": pinTextField.text!])
Cancelling the challenge
In some cases, such as clicking a Cancel button in the UI, you want to tell the framework to discard this challenge completely.
To achieve this, call:
self.cancel()
Handling failures
Some scenarios may trigger a failure (such as maximum attempts reached). To handle these, implement the SecurityCheckChallengeHandler’s handleFailure method.
The structure of the Dictionary passed as a parameter greatly depends on the nature of the failure.
override open func handleFailure(failureResponse: [AnyHashable: Any]!) {
    if let errorMsg = failureResponse["failure"] as? String {
        showError(errorMsg)
    }
    else{
        showError("Unknown error")
    }
}
The implementation of
showErroris included in the sample application.
Handling successes
Optionally, you can also choose to do something before the framework closes the challenge handler flow by implementing the SecurityCheckChallengeHandler’s handleSuccess(successResponse: [AnyHashable: Any]!) method. Here again, the content and the structure of the success Dictionary depends on what the security check sends.
Registering the challenge handler
For the challenge handler to listen for the right challenges, you must tell the framework to associate the challenge handler with a specific security check name.
To do so, initialize the challenge handler with the security check as follows:
var someChallengeHandler = SomeChallengeHandler(securityCheck: "securityCheckName”);
You must then register the challenge handler instance:
WLClientSwift.sharedInstance().registerChallengeHandler(challengeHandler: someChallengeHandler);
In this example, in one line:
WLClientSwift.sharedInstance().registerChallengeHandler(challengeHandler: PinCodeChallengeHandler(securityCheck: securityCheck));
Note: Registering the challenge handler should only happen once in the entire application lifecycle. It is recommended to use the iOS AppDelegate class to do it.
Sample application
The sample PinCodeSwift is an iOS Swift application that uses WLResourceRequest to get a bank balance.
The method is protected with a PIN code, with a maximum of 3 attempts.
Click to download the SecurityAdapters Maven project.
Click to download the iOS Swift Native project.
Sample usage
Follow the sample’s README.md file for instructions.

Inclusive terminology note: The Mobile First Platform team is making changes to support the IBM® initiative to replace racially biased and other discriminatory language in our code and content with more inclusive language. While IBM values the use of inclusive language, terms that are outside of IBM's direct influence are sometimes required for the sake of maintaining user understanding. As other industry leaders join IBM in embracing the use of inclusive language, IBM will continue to update the documentation to reflect those changes.