Handling Push Notifications in Android
improve this page | report issueOverview
Before Android applications are able to handle any received push notifications, support for Google Play Services needs to be configured. Once an application has been configured, MobileFirst-provided Notifications API can be used in order to register & unregister devices, and subscribe & unsubscribe to tags. In this tutorial, you will learn how to handle push notification in Android applications.
Prerequisites:
- Make sure you have read the following tutorials:
- MobileFirst Server to run locally, or a remotely running MobileFirst Server.
- MobileFirst CLI installed on the developer workstation
Jump to:
- Notifications configuration
- Notifications API
- Handling a push notification
- Sample application
- Migrate your client Apps on Android to FCM
Notifications Configuration
Create a new Android Studio project or use an existing one.
If the MobileFirst Native Android SDK is not already present in the project, follow the instructions in the Adding the Mobile Foundation SDK to Android applications tutorial.
Project setup
Google Cloud Messaging (GCM) has been discontinued and is integrated with Firebase Cloud Messaging (FCM).
Setting up an application in FCM is a bit different compared to the old GCM model.
- To use Firebase messaging, you need a google-services.json file. Click here for documentation on how to get it.
- In Add Firebase to your Android app window, use
com.ibm.mobilefirstplatform.clientsdk.android.pushas the Package Name.
- In Add Firebase to your Android app window, use
-
In Android → Gradle scripts, select the build.gradle (Module: app) file and add the following lines to
dependencies:xml implementation group: 'com.ibm.mobile.foundation', name: 'ibmmobilefirstplatformfoundationpush', version: '8.0.+', ext: 'aar', transitive: trueOr in a single line:
xml implementation 'com.ibm.mobile.foundation:ibmmobilefirstplatformfoundationpush:8.0.+'Note: If you are using Google Dynamic Delivery feature and would like to call MobileFirst APIs in a feature module then use
apideclaration instead ofimplementation. Usingimplementationwould restrict using MobileFirst APIs in the same module itself while usingapiwould make MobileFirst APIs available across all modules present in the app including feature modules.For more details read API and implementation separation.
api 'com.ibm.mobile.foundation:ibmmobilefirstplatformfoundationpush:8.0.+'
-
Configure your Gradle file. Add the following to the app’s
build.gradlefiledependencies { ...... compile 'com.google.firebase:firebase-messaging:17.6.0' ..... } apply plugin: 'com.google.gms.google-services'- Add the following dependency to the root
build.gradlefile’s buildscript sectionclasspath 'com.google.gms:google-services:3.0.0'
Note: If you are using Android Studio v3.2 or earlier, make sure that each dependency line only has one version number specified.
- Add the following dependency to the root
- In Android → app → manifests, open the
AndroidManifest.xmlfile.-
Add the following permissions to the top the
manifesttag:<!-- Permissions --> <uses-permission android:name="android.permission.WAKE_LOCK" /> -
Add the following to the
applicationtag:```xml
<!-- MFPPush Intent Service --><!-- MFPPush Instance ID Listener Service --> <service android:name="com.ibm.mobilefirstplatform.clientsdk.android.push.api.MFPPush" android:exported="true"> <intent-filter> <action android:name="com.google.firebase.INSTANCE_ID_EVENT" /> </intent-filter> </service>
android:theme="@android:style/Theme.NoDisplay"/> ``` * Add the following `intent-filter` to the application's activity.```xml
Note: Be sure to replace
your.application.package.namewith the actual package name of your application. -
-
Open the app in Android Studio. Copy the
google-services.jsonfile that you have created in the step-1 inside the app directory. Note that thegoogle-service.jsonfile includes the package name you have added. - Compile the SDK. Build the application.
Notifications API
MFPPush Instance
All API calls must be called on an instance of MFPPush. This can be done by creating a class level field such as private MFPPush push = MFPPush.getInstance();, and then calling push.<api-call> throughout the class.
Alternatively you can call MFPPush.getInstance().<api_call> for each instance in which you need to access the push API methods.
Challenge Handlers
If the push.mobileclient scope is mapped to a security check, you need to make sure matching challenge handlers exist and are registered before using any of the Push APIs.
Learn more about challenge handlers in the credential validation tutorial.
Client-side
| Java Methods | Description |
|---|---|
initialize(Context context); |
Initializes MFPPush for supplied context. |
isPushSupported(); |
Does the device support push notifications. |
registerDevice(JSONObject, MFPPushResponseListener); |
Registers the device with the Push Notifications Service. |
getTags(MFPPushResponseListener) |
Retrieves the tag(s) available in a push notification service instance. |
subscribe(String[] tagNames, MFPPushResponseListener) |
Subscribes the device to the specified tag(s). |
getSubscriptions(MFPPushResponseListener) |
Retrieves all tags the device is currently subscribed to. |
unsubscribe(String[] tagNames, MFPPushResponseListener) |
Unsubscribes from a particular tag(s). |
unregisterDevice(MFPPushResponseListener) |
Unregisters the device from the Push Notifications Service |
Initialization
Required for the client application to connect to MFPPush service with the right application context.
- The API method should be called first before using any other MFPPush APIs.
- Registers the callback function to handle received push notifications.
MFPPush.getInstance().initialize(this);
Is push supported
Checks if the device supports push notifications.
Boolean isSupported = MFPPush.getInstance().isPushSupported();

if (isSupported ) {
    // Push is supported
} else {
    // Push is not supported
}
Register device
Register the device to the push notifications service.
MFPPush.getInstance().registerDevice(null, new MFPPushResponseListener<String>() {
    @Override
    public void onSuccess(String s) {
        // Successfully registered
    }

    @Override
    public void onFailure(MFPPushException e) {
        // Registration failed with error
    }
});
Get tags
Retrieve all the available tags from the push notification service.
MFPPush.getInstance().getTags(new MFPPushResponseListener<List<String>>() {
    @Override
    public void onSuccess(List<String> strings) {
        // Successfully retrieved tags as list of strings
    }

    @Override
    public void onFailure(MFPPushException e) {
        // Failed to receive tags with error
    }
});
Subscribe
Subscribe to desired tags.
String[] tags = {"Tag 1", "Tag 2"};

MFPPush.getInstance().subscribe(tags, new MFPPushResponseListener<String[]>() {
    @Override
    public void onSuccess(String[] strings) {
        // Subscribed successfully
    }

    @Override
    public void onFailure(MFPPushException e) {
        // Failed to subscribe
    }
});
Get subscriptions
Retrieve tags the device is currently subscribed to.
MFPPush.getInstance().getSubscriptions(new MFPPushResponseListener<List<String>>() {
    @Override
    public void onSuccess(List<String> strings) {
        // Successfully received subscriptions as list of strings
    }

    @Override
    public void onFailure(MFPPushException e) {
        // Failed to retrieve subscriptions with error
    }
});
Unsubscribe
Unsubscribe from tags.
String[] tags = {"Tag 1", "Tag 2"};

MFPPush.getInstance().unsubscribe(tags, new MFPPushResponseListener<String[]>() {
    @Override
    public void onSuccess(String[] strings) {
        // Unsubscribed successfully
    }

    @Override
    public void onFailure(MFPPushException e) {
        // Failed to unsubscribe
    }
});
Unregister
Unregister the device from push notification service instance.
MFPPush.getInstance().unregisterDevice(new MFPPushResponseListener<String>() {
    @Override
    public void onSuccess(String s) {
        disableButtons();
        // Unregistered successfully
    }

    @Override
    public void onFailure(MFPPushException e) {
        // Failed to unregister
    }
});
Handling a push notification
In order to handle a push notification you will need to set up a MFPPushNotificationListener. This can be achieved by implementing one of the following methods.
Option One
In the activity in which you wish the handle push notifications.
- Add
implements MFPPushNofiticationListenerto the class declaration. - Set the class to be the listener by calling
MFPPush.getInstance().listen(this)in theonCreatemethod. -
Then you will need to add the following required method:
@Override public void onReceive(MFPSimplePushNotification mfpSimplePushNotification) { // Handle push notification here } - In this method you will receive the
MFPSimplePushNotificationand can handle the notification for the desired behavior.
Option Two
Create a listener by calling listen(new MFPPushNofiticationListener()) on an instance of MFPPush as outlined below:
MFPPush.getInstance().listen(new MFPPushNotificationListener() {
    @Override
    public void onReceive(MFPSimplePushNotification mfpSimplePushNotification) {
        // Handle push notification here
    }
});
Migrating to FCM SDK v19.x
For an existing application using old version of FCM SDK, to use latest FCM SDK v19.x and above you need to migrate the android project to AndroidX. Please add below to the application.
-
In the app’s build.gradle file
-
Remove below dependencies from the
build.gradlefile``` dependencies { ... implementation 'com.android.support:appcompat-v7:28.0.0' implementation 'com.android.support:design:28.0.0' implementation 'com.android.support:support-v4:28.0.0' implementation 'com.google.firebase:firebase-messaging:17.6.0' ... } ``` -
Replace with below dependencies
```
	dependencies {
 			 ...
		implementation "com.google.firebase:firebase-messaging:20.0.0"
      implementation "androidx.appcompat:appcompat:1.1.0'"
      implementation "androidx.legacy:legacy-support-v4:1.0.0"
      implementation "com.google.android.material:material:1.1.0"
      ...
  }   ```
-
-
Configure the AndroidManifest file. Following changes are required in the
AndroidManifest.xml-
The below entries need modification :
<service android:exported="true" android:name="com.ibm.mobilefirstplatform.clientsdk.android.push.api.MFPPushIntentService"> <intent-filter> <action android:name="com.google.firebase.MESSAGING_EVENT" /> </intent-filter> </service> -
Modify the entries to :
  <service android:exported="true" android:name="com.ibm.mobilefirstplatform.clientsdk.android.push.api.MFPPushNewIntentService">
      <intent-filter>
  		<action android:name="com.google.firebase.MESSAGING_EVENT" />
      </intent-filter>
  </service>
-
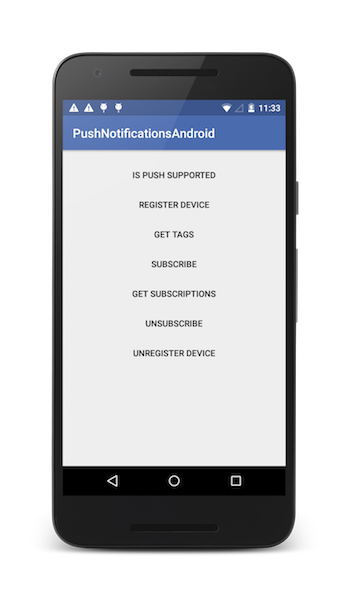
Sample application
Click to download the Android Studio project.
Sample usage
Follow the sample’s README.md file for instructions.
▲Inclusive terminology note: The Mobile First Platform team is making changes to support the IBM® initiative to replace racially biased and other discriminatory language in our code and content with more inclusive language. While IBM values the use of inclusive language, terms that are outside of IBM's direct influence are sometimes required for the sake of maintaining user understanding. As other industry leaders join IBM in embracing the use of inclusive language, IBM will continue to update the documentation to reflect those changes.