Testing and Debugging Adapters
improve this page | report issueOverview
You can use IDEs, such as Eclipse, IntelliJ, or similar ones, to test Java and JavaScript adapters, and debug Java code that is implemented for use in Java or JavaScript adapters.
This tutorial demonstrates how to test adapters by using the MobileFirst CLI and by using Postman, and also how to debug a Java adapter by using the Eclipse IDE.
Jump to
Testing Adapters
Adapters are available via a REST interface. This means that if you know the URL of a resource, you can use HTTP tools such as Postman to test requests and pass URL parameters, path parameters, body parameters or headers as you see fit.
The structure of the URL used to access the adapter resource is:
- In JavaScript adapters -
http://hostname-or-ip-address:port-number/mfp/api/adapters/{adapter-name}/{procedure-name} - In Java adapters -
http://hostname-or-ip-address:port-number/mfp/api/adapters/{adapter-name}/{path}
Passing parameters
- When using Java adapters, you can pass parameters in the URL, body, form, etc, depending on how you configured your adapter.
- When using JavaScript adapters, you pass parameters as
params=["param1", "param2"]. In other words, a JavaScript procedure receives only one parameter calledparamswhich needs to be an array of ordered, unnamed values. This parameter can either be in the URL (GET) or in the body (POST) usingContent-Type: application/x-www-form-urlencoded.
Handling security
The Mobile Foundation security framework requires an access token for any adapter resource even if the resource is not explicitly assigned a scope. So unless you specifically disabled security, the endpoint is always protected.
To disable security in Java adapters, attach the OAuthSecurity annotation to the method/class:
@OAuthSecurity(enabled=false)
To disable security in JavaScript adapters, add the secured attribute to the procedure:
<procedure name="adapter-procedure-name" secured="false"/>
Alternatively, the development version of the MobileFirst Server includes a test token endpoint to bypass the security challenges.
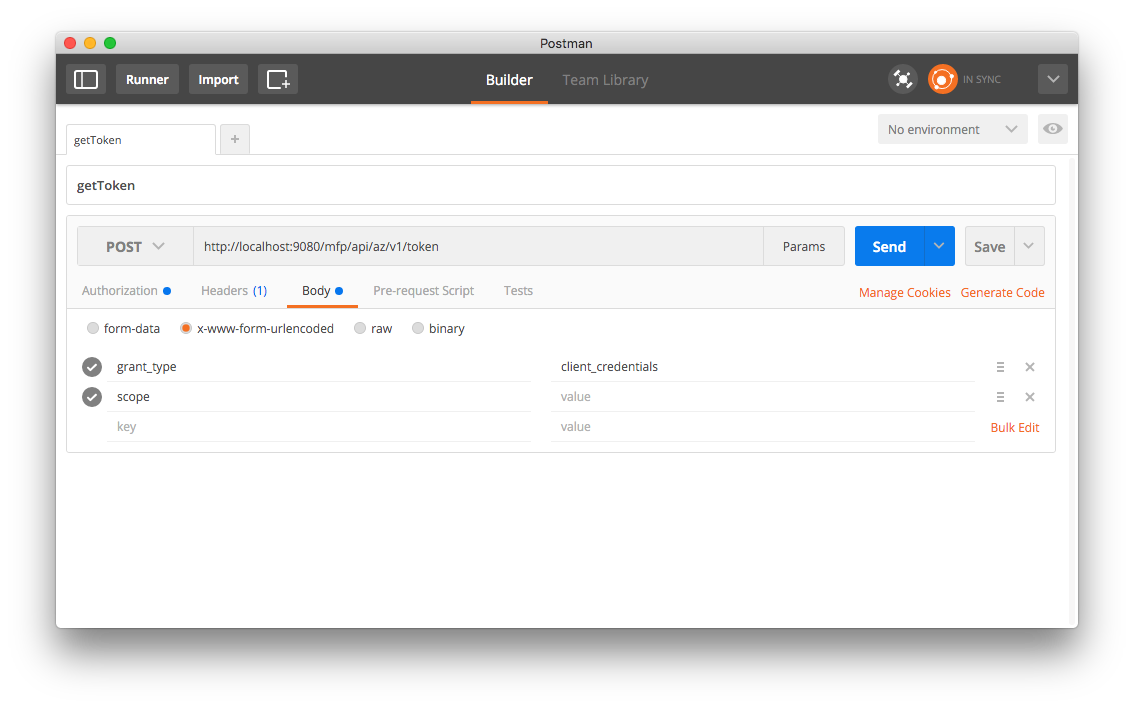
Using Postman
Test Token
To receive a Test Token, either click the “Run in Postman” button below to import a Collection to your Postman app that contains a ready request, or follow the next steps to create the request yourself.

-
Use your HTTP client (Postman) to make an HTTP
POSTrequest tohttp://<IP>:<PORT>/mfp/api/az/v1/tokenwith the following parameters usingContent-Type: application/x-www-form-urlencoded:grant_type- Set the value toclient_credentials.scope- Set the value to the protecting scope of your resource. If your resource is not assigned a protecting scope, omit this parameter to apply the default scope (RegisteredClient). For more information, see Scopes.
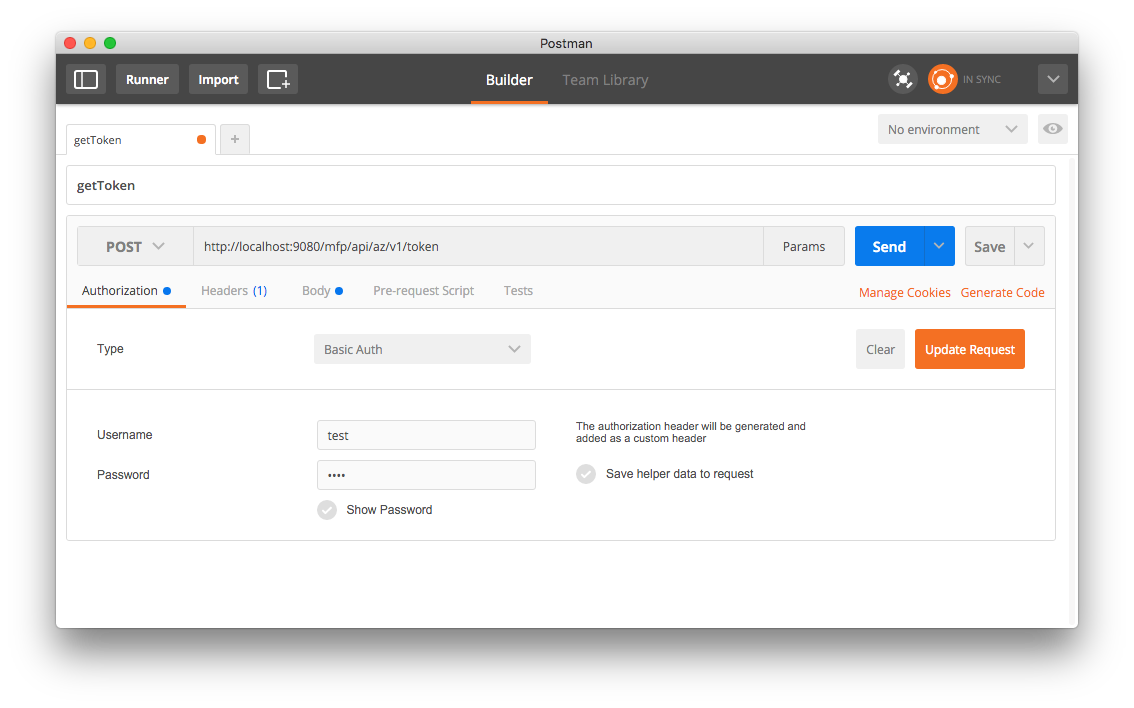
-
Add an
authorization headerusingBasic authenticationwith Confidential Client ID (“test”) and Secret (“test”).For more information about confidential clients, see Confidential Clients.
The result is a JSON object with a temporary valid access token:
{
  "access_token": "eyJhbGciOiJSUzI1NiIsImp3ayI6eyJlIjoiQVFBQiIsIm4iOiJBTTBEZDd4QWR2NkgteWdMN3I4cUNMZEUtM0kya2s0NXpnWnREZF9xczhmdm5ZZmRpcVRTVjRfMnQ2T0dHOENWNUNlNDFQTXBJd21MNDEwWDlJWm52aHhvWWlGY01TYU9lSXFvZS1ySkEwdVp1dzJySGhYWjNXVkNlS2V6UlZjQ09Zc1FOLW1RSzBtZno1XzNvLWV2MFVZd1hrU093QkJsMUVocUl3VkR3T2llZzJKTUdsMEVYc1BaZmtOWkktSFU0b01paS1Uck5MelJXa01tTHZtMDloTDV6b3NVTkExNXZlQ0twaDJXcG1TbTJTNjFuRGhIN2dMRW95bURuVEVqUFk1QW9oMmluSS0zNlJHWVZNVVViTzQ2Q3JOVVl1SW9iT2lYbEx6QklodUlDcGZWZHhUX3g3c3RLWDVDOUJmTVRCNEdrT0hQNWNVdjdOejFkRGhJUHU4Iiwia3R5IjoiUlNBIiwia2lkIjoidGVzdCJ9fQ.eyJpc3MiOiJjb20uaWJtLm1mcCIsInN1YiI6InRlc3QiLCJhdWQiOiJjb20uaWJtLm1mcCIsImV4cCI6MTQ1MjUxNjczODAwNSwic2NvcGUiOiJ4eCJ9.vhjSkv5GShCpcDSu1XCp1FlgSpMHZa-fcJd3iB4JR-xr_3HOK54c36ed_U5s3rvXViao5E4HQUZ7PlEOl23bR0RGT2bMGJHiU7c0lyrMV5YE9FdMxqZ5MKHvRnSOeWlt2Vc2izh0pMMTZd-oL-0w1T8e-F968vycyXeMs4UAbp5Dr2C3DcXCzG_h9jujsNNxgXL5mKJem8EpZPolQ9Rgy2bqt45D06QTW7J9Q9GXKt1XrkZ9bGpL-HgE2ihYeHBygFll80M8O56By5KHwfSvGDJ8BMdasHFfGDRZUtC_yz64mH1lVxz5o0vWqPwEuyfslTNCN-M8c3W9-6fQRjO4bw",
  "token_type": "Bearer",
  "expires_in": 3599,
  "scope": "**"
}
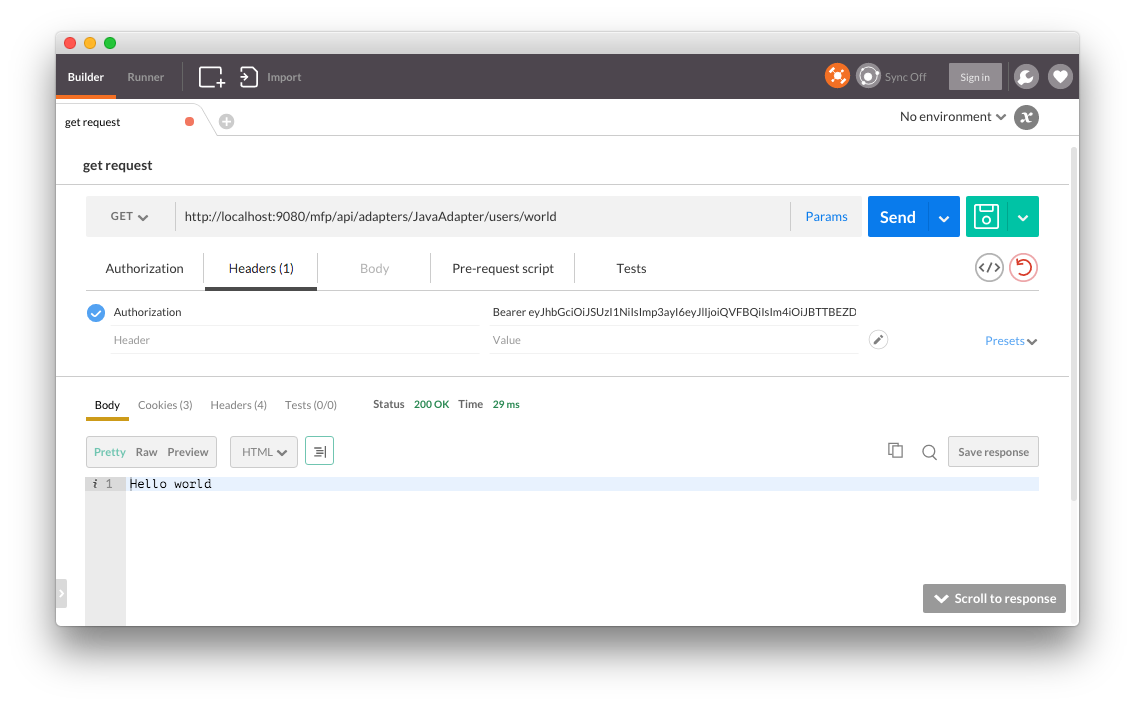
Sending request
Now with any future request to adapter endpoints, add an HTTP header with the name Authorization and the value you received previously (starting with Bearer). The security framework will skip any security challenges protecting your resource.
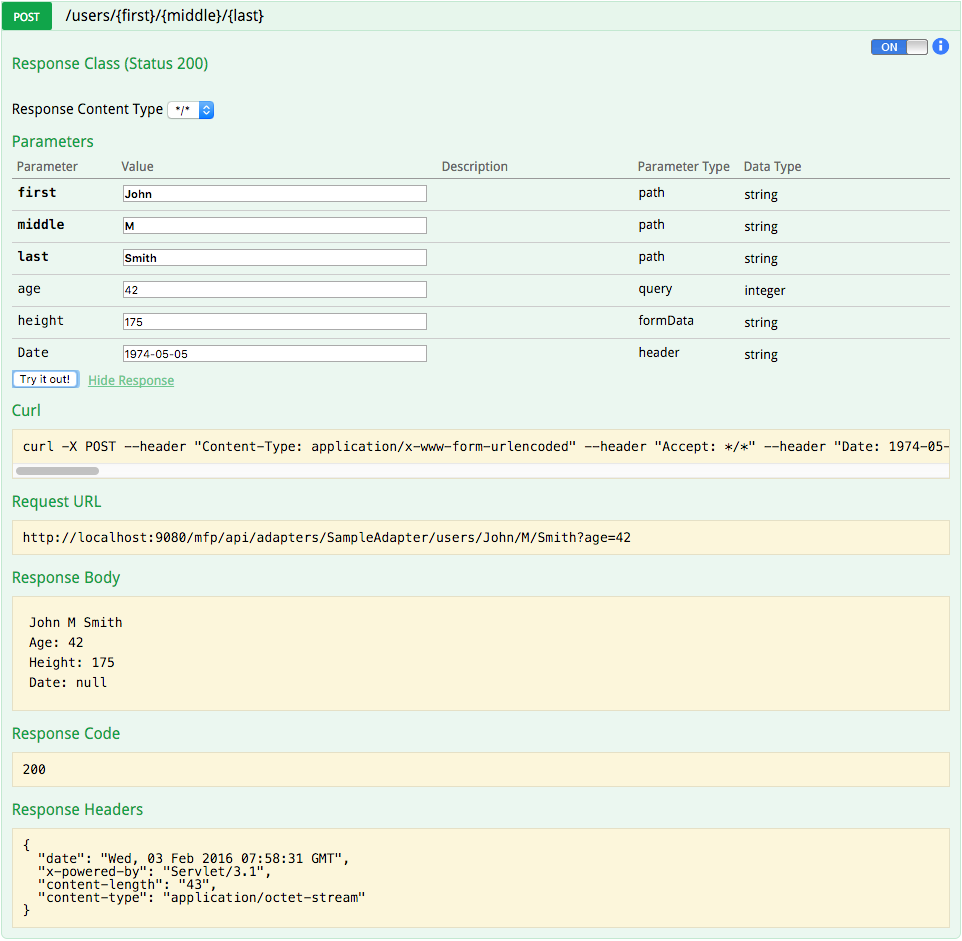
Using Swagger
The Swagger docs UI is a visual representation of an adapter’s REST endpoints.
Using Swagger, a developer can test the adapter endpoints before they are consumed by a client application.
To access Swagger:
- Open the MobileFirst Operations Console and select an adapter from the adapters list.
- Click on the Resources tab.
- Click on the View swagger Docs button.
- Click on the Show/Hide button.


Adding a test token
To add a Test Token to the request, so that the security framework skips any security challenges protecting your resource, click the on/off switch button on the right corner of an endpoint’s operation.
You will be asked to select which scopes you want to grant to the Swagger UI (for testing purposes, you can select all). If you are using the Swagger UI for the first time, you might be required to log in with a Confidential Client ID and Secret. For this, you will need to create a new confidential client with * as its Allowed Scope.
Learn more about Confidential Client in the Confidential Client tutorial.
Sending Request
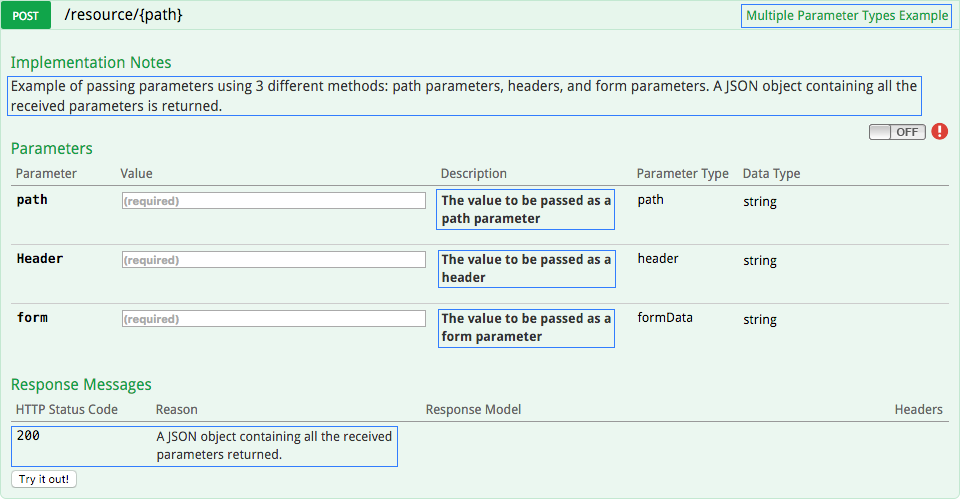
Expand the endpoint’s operation, enter the required parameters (if needed) and click on the Try it out! button.
Swagger Annotations
Available only in Java adapters.
To generate Swagger documentation for Java adapters, use Swagger-supplied annotations in your Java implementation.
To learn more about Swagger Annotations, see the Swagger documentation.
@ApiOperation(value = "Multiple Parameter Types Example", notes = "Example of passing parameters by using 3 different methods: path parameters, headers, and form parameters. A JSON object containing all the received parameters is returned.")
@ApiResponses(value = { @ApiResponse(code = 200, message = "A JSON object containing all the received parameters returned.") })
@POST
@Produces(MediaType.APPLICATION_JSON)
@Path("/{path}")
public Map<String, String> enterInfo(
    @ApiParam(value = "The value to be passed as a path parameter", required = true) @PathParam("path") String path,
    @ApiParam(value = "The value to be passed as a header", required = true) @HeaderParam("Header") String header,
    @ApiParam(value = "The value to be passed as a form parameter", required = true) @FormParam("form") String form) {
  Map<String, String> result = new HashMap<String, String>();

  result.put("path", path);
  result.put("header", header);
  result.put("form", form);

  return result;
}
Debugging Adapters
JavaScript adapters
You can debug JavaScript code in JavaScrit adapters by using the MFP.Logger API.
Available logging levels, from least to most verbose, are: MFP.Logger.error, MFP.Logger.warn, MFP.Logger.info and MFP.Logger.debug.
The logs are then printed to the log file of the application server.
Be sure to set the server verbosity level accordingly, otherwise you will not see the logging in the log file.
Java adapters
Before an adapter’s Java code can be debugged, Eclipse needs to be configured as follows:
-
Maven integration - Starting Eclipse Kepler (v4.3), Maven support is built-in in Eclipse.
If your Eclipse instance does not support Maven, follow the m2e instructions to add Maven support. -
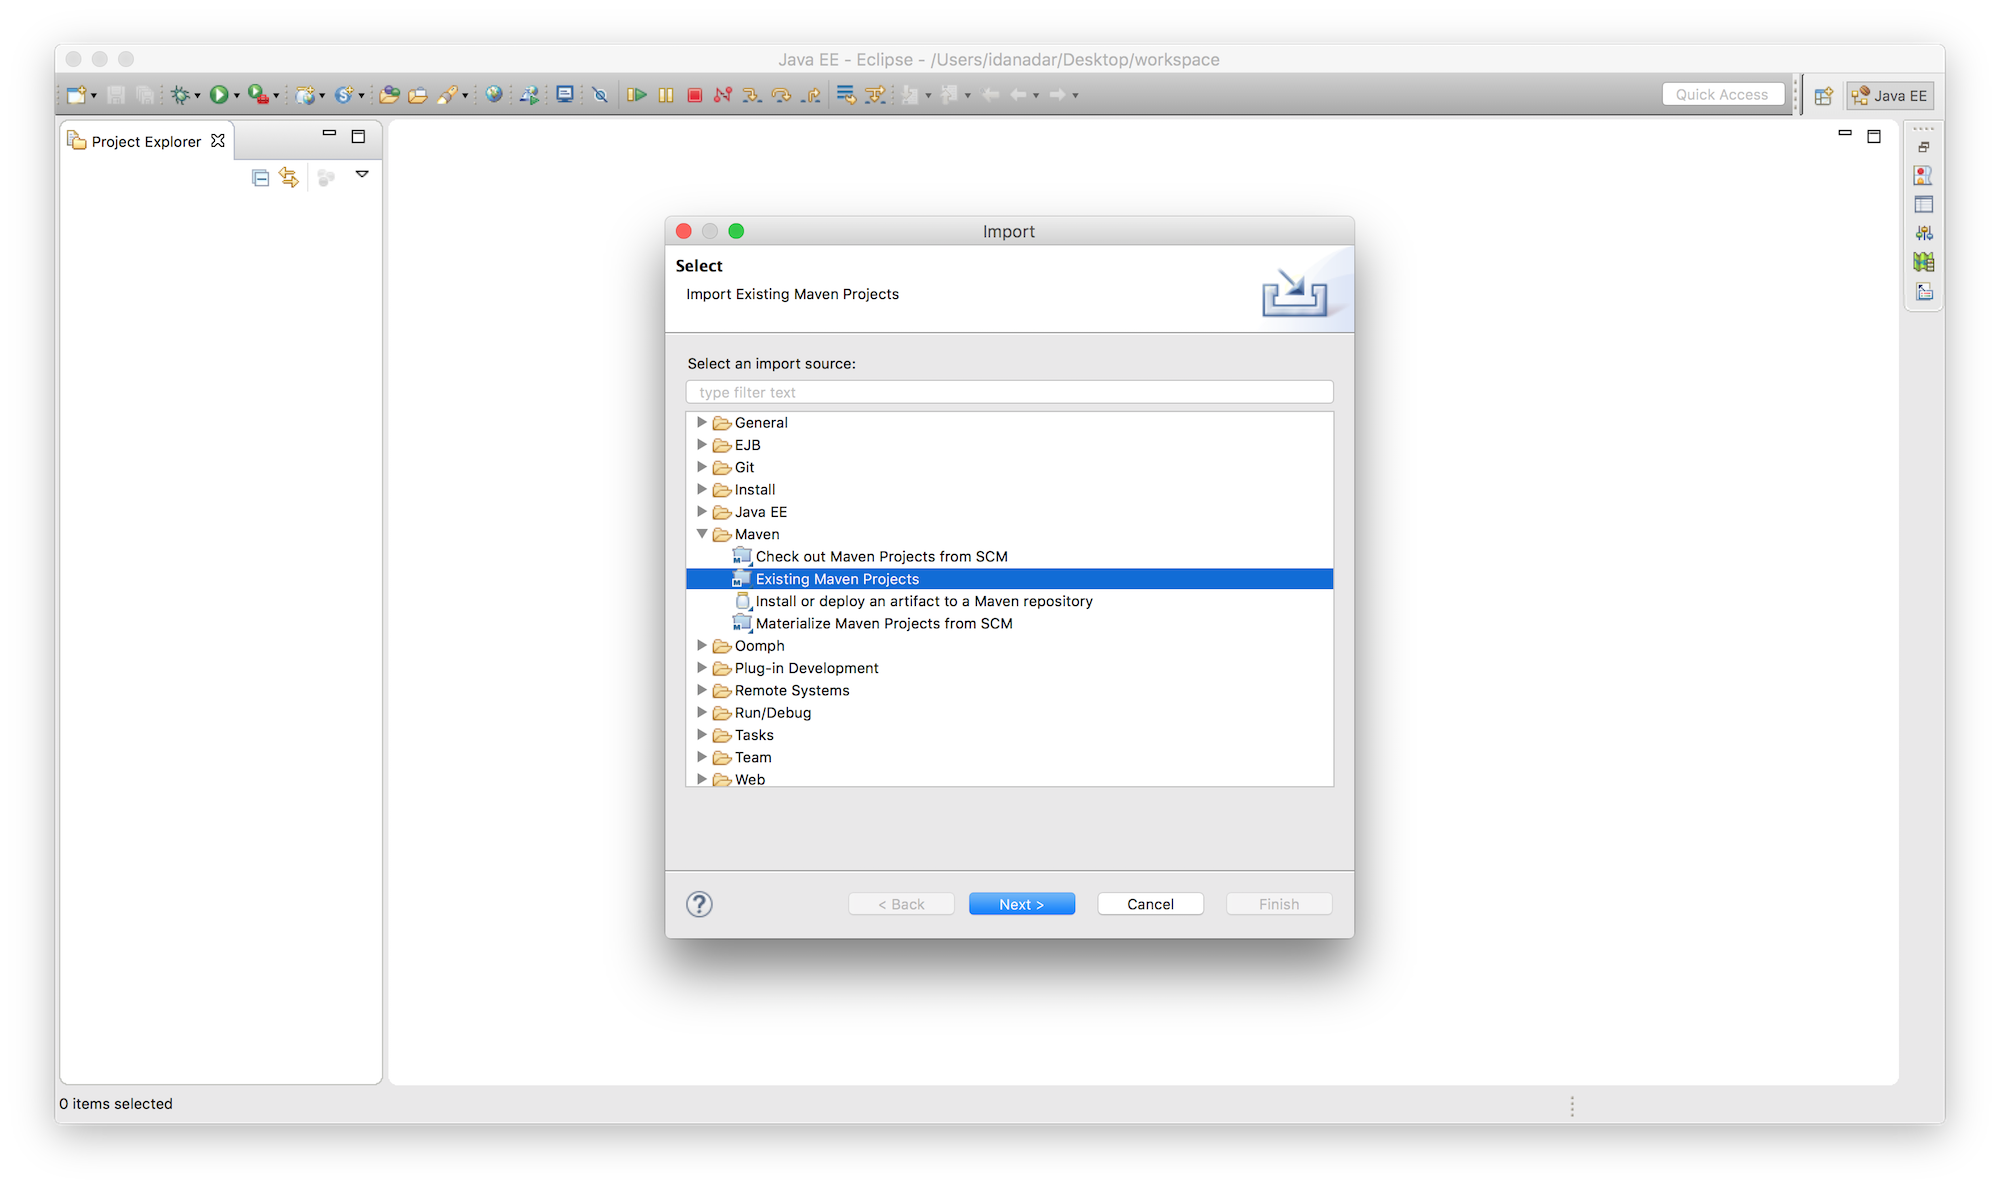
Once Maven is available in Eclipse, import the adapter Maven project:
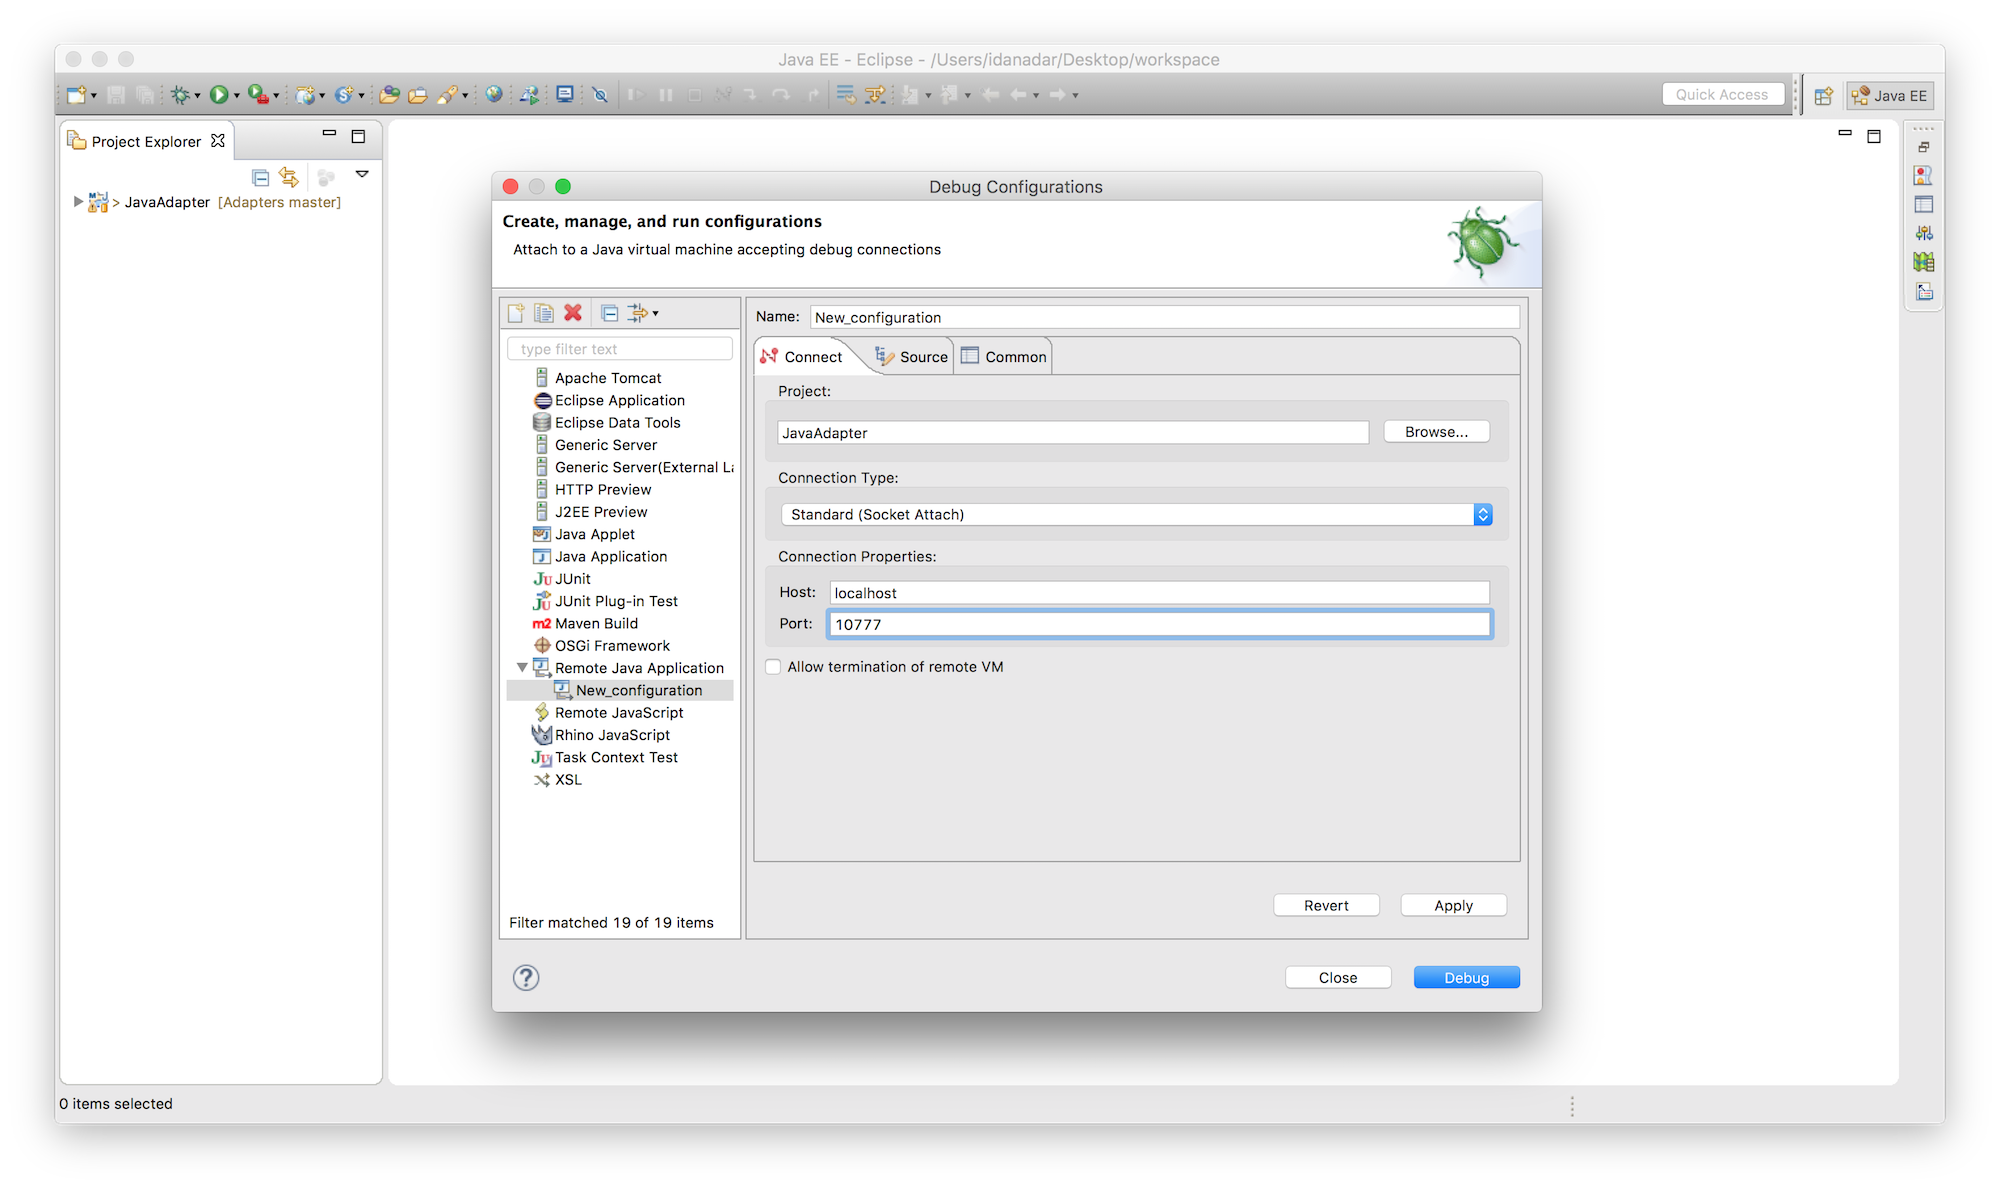
- Provide debugging parameters:
- Click Run → Debug Configurations.
- Double-click on Remote Java application.
- Provide a Name for this configuration.
- Set the Host value: use “localhost” if running a local server, or provide your remote server host name.
- Set the Port value to “10777”.
- Click Browse and select the Maven project.
- Click Debug.
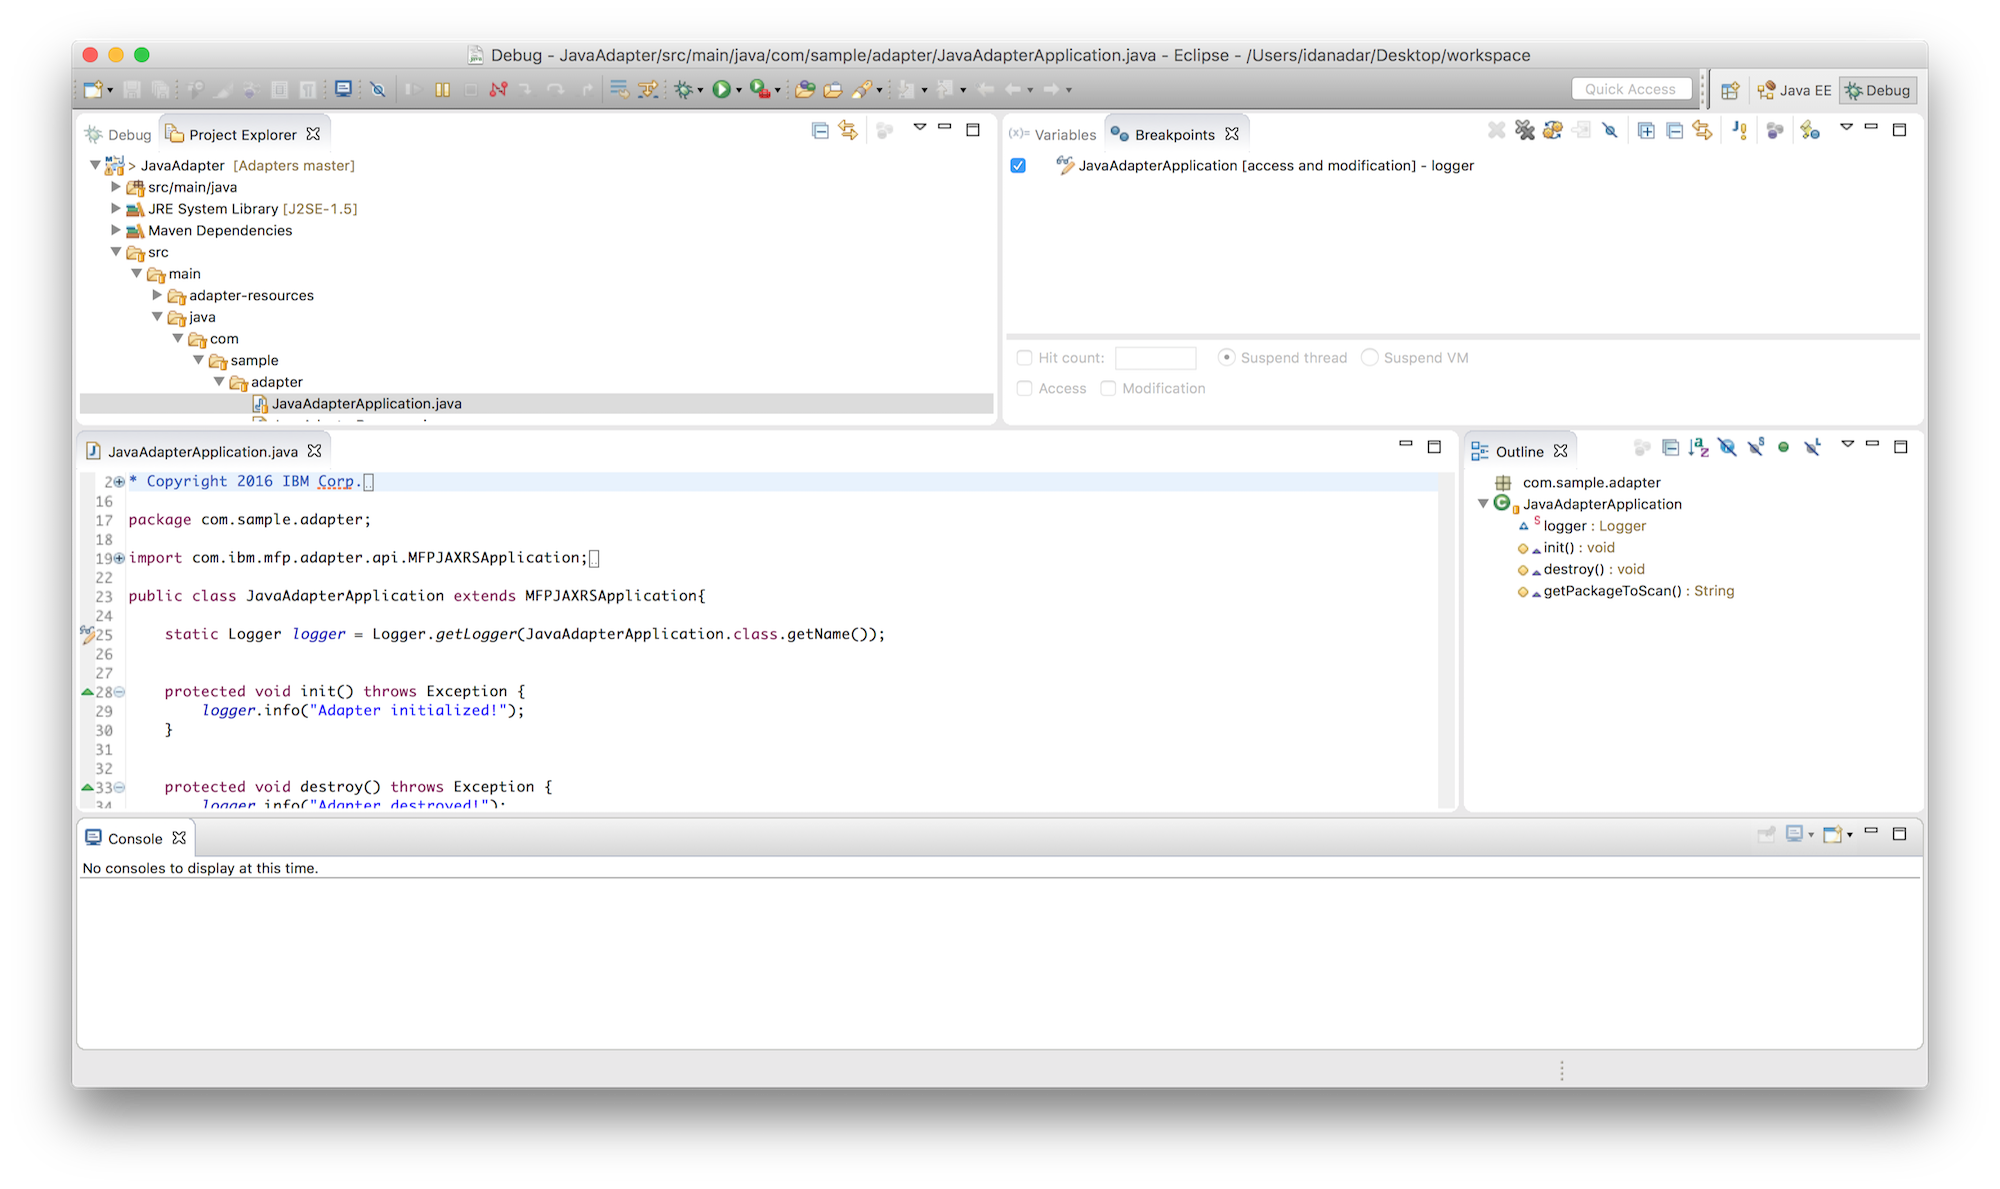
-
Click on Window → Show View → Debug to enter debug mode. You can now debug the Java code normally as you would do in a standard Java application. You need to issue a request to the adapter to make the code run and hit any set breakpoints. This can be accomplished by following the instructions on how to call an adapter resource in the Testing adapters section.
▲For instructions how to use IntelliJ to debug Java adapters see the Using IntelliJ to Develop MobileFirst Java Adapters Blog Post.
Inclusive terminology note: The Mobile First Platform team is making changes to support the IBM® initiative to replace racially biased and other discriminatory language in our code and content with more inclusive language. While IBM values the use of inclusive language, terms that are outside of IBM's direct influence are sometimes required for the sake of maintaining user understanding. As other industry leaders join IBM in embracing the use of inclusive language, IBM will continue to update the documentation to reflect those changes.