Integrating MobileFirst Foundation 8.0 in Angular 10 web apps
Raja Rahul April 23, 2021
MobileFirst_Foundation Web Angular


Angular is a TypeScript based open source front-end web application platform that helps you rapidly build a web application. The latest stable version of Angular is 10. More details about the new features of Angular 10 can be found in this blog post.
This post will walk you through how to create, build Angular version 10 application implemented with MobileFirst Foundation Web SDK and run it on a browser.
Install MobileFirst Components and SDKs
Ensure that you have NodeJS and npm downloaded and installed.
MobileFirst CLI
Install the MobileFirst CLI by running the following command:
npm install -g mfpdev-cli
Angular CLI
Install latest Angular version 10 CLI by running following command:
npm install -g @angular/cli@10.0.5
MobileFirst 8.0 Server
Ensure that you have installed and started latest iFix version of MobileFirst 8.0 server locally. More details on how to run MobileFirst Platform Foundation(MFP) Server locally is here.
Create a New Angular Project
Create a new Angular 10 project by entering the command below.
ng new mfp-userlogin-angular
Add the MobileFirst Web SDK
The MobileFirst Web SDK is provided as a npm plugin. Navigate to the application folder and install Mobilefirst Web SDK plugin by running following command:
cd mfp-userlogin-angular
npm i ibm-mfp-web-sdk --save
Register App on MobileFirst Server
Register the application which you have created with MobileFirst 8.0 Server by running following command.
mfpdev app register
and enter applicationId as com.mfp.userlogin.
Note: Ensure you have your MobileFirst Server running while running the above command.
Open your MobileFirst console and confirm that your app has been registered.
Implement the MobileFirst Adapter
MobileFirst adapters provide a way to retrieve and manage data for your mobile client app on the server side.
For this tutorial, I am using the ResourceAdapter to call a resource API and UserLogin for security in the project.
Download both the adapters and build it by running the following command
mfpdev adapter build
and deploy them to your MobileFirst server.
mfpdev adapter deploy
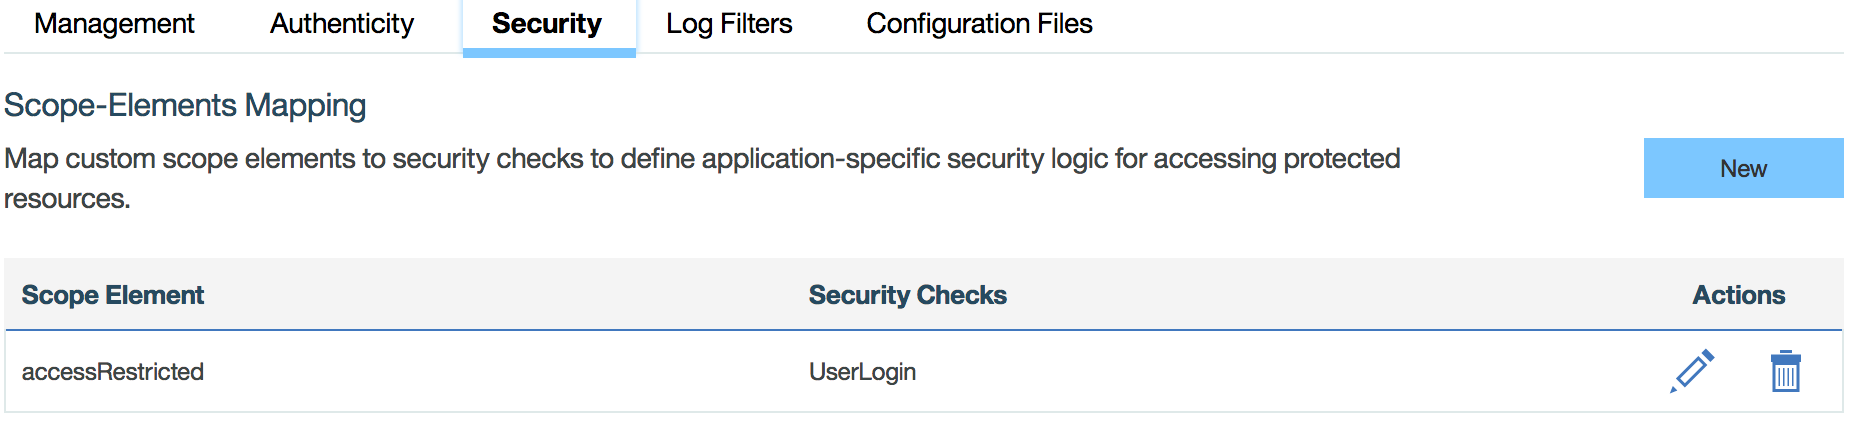
Security
The URL that gets the balance in the ResourceAdapter is protected by a OAuth Scope named accessRestricted.
@OAuthSecurity(scope="accessRestricted")
In the Security tab of your registered app in the MobileFirst Operations Console’s dashboard, select the New button under the Scope-Elements Mapping section.
Enter accessRestricted in the scope element and select UserLogin in the Custom Security Checks section.
Import MobileFirst SDK in Application
Create a new typescript file with a name custom-typings.d.ts inside src folder and add the following code.
/// <reference path="../node_modules/ibm-mfp-web-sdk/lib/typings/ibmmfpf.d.ts"/>
Add following code snippet inside Scripts tag of angular.json file which is located at the root of the project.
 "node_modules/ibm-mfp-web-sdk/ibmmfpf.js",
 "node_modules/sjcl/sjcl.js",
 "node_modules/jssha/src/sha.js"
Add code to call resource adapter and handle MFP challenge
Add logic to do resource request call to the resource adapter endpoint and logic to handle challenges from MobileFirst Server in the typescript file of the home page which is located at src/app/app.component.ts. The file contents look as below.
import { Component } from '@angular/core';
import './app.component.css';

@Component({
  selector: 'app-root',
  templateUrl: './app.component.html',
  styleUrls: ['app.component.css']
})
export class AppComponent {
  balance: string;
  message: string;

  UserLoginChallengeHandler: WL.Client.SecurityCheckChallengeHandler;
  title = 'MobileFirst UserLogin';
  constructor() {
    WL.Client.init({mfpContextRoot:"/mfp",applicationId:"com.mfp.userlogin"});
    this.MFPInitComplete();

  }

  getBalance() {
  var resourceRequest = new WL.ResourceRequest("/adapters/ResourceAdapter/balance",WL.ResourceRequest.GET);
  resourceRequest.send().then(
     (response) => {
      console.log('-->  getBalance(): Success ', response);
      this.balance = 'Your Balance is : ' + response.responseText;
     }, (error) => {
      console.log('-->  getBalance():  ERROR ', error.responseText);
      this.balance = error.responseText;
     }
   )
  }

   // MFP Init complete function
   MFPInitComplete() {
    console.log('--> MFPInitComplete function called');
    this.registerChallengeHandler();  // register a ChallengeHandler callback for UserLogin security check
  }

  registerChallengeHandler() {
    this.UserLoginChallengeHandler = WL.Client.createSecurityCheckChallengeHandler("UserLogin");
    this.UserLoginChallengeHandler.handleChallenge = ((challenge: any) => {
      console.log('--> UserLoginChallengeHandler.handleChallenge called');
      this.displayLoginChallenge(challenge);
    });
  }

  displayLoginChallenge(response) {
    if (response.errorMsg) {
    this.message = response.errorMsg + ' <br> Remaining attempts: ' + response.remainingAttempts;
      console.log('--> displayLoginChallenge ERROR: ' + this.message);
    }
     // set modal open
     var modal = document.querySelector('#loginModal');
     modal.classList.add('open');
     // set overlay
     var overlay = document.querySelector('.overlay');
     overlay.classList.add('show');
  }

  submitChallenge(userId: String, pass: String) {
    var modal = document.querySelector('#loginModal');
    modal.classList.remove("open");
    var overlay = document.querySelector('.overlay');
    overlay.classList.remove('show');
    this.UserLoginChallengeHandler.submitChallengeAnswer({
      username: userId,
      password: pass
    });
  }

}
Here WL.Client.init() API intializes the SDK, registerChallengeHandler() function handles the UserLogin challenges from MobileFirst Server and getBalance() function does the resource request call to Resource Adapter.
Update the view
Replace the content of app.component.html with following code. The file is located at the path src/app/app.component.html
<div style="text-align:center">
  <h4>
    Welcome to !
  </h4>
</div>
<section class="page-body">
  <h6>Click on Get Balance button to view your account balance.</h6>
  <button mat-button data-target="loginModal" class="modal-trigger waves-effect waves-light btn" (click)="getBalance()" cdkFocusInitial>Get Balance</button>
  <br/>
  <br/>
  <h6>{{ balance }}</h6>
    <div class="login-container modal" id="loginModal">
        <div class="login-modal modal-content">
          <h4>MobileFirst Login Gateway</h4 >
          <div class="mfp-modal">
              <h6>{{ message }}</h6>
              <br/>
              <form class="mfp-form">
                <div class="full-width form-field">
                  <input #userId type="text" placeholder="User Name" value="vittal">
                </div>
                <div class="full-width form-field">
                  <input #pass type="password"  placeholder="Password" value="vittal">
                </div>
              </form>
            </div>
            <br/>
            <div class="action-buttons modal-footer center">
              <button class="modal-close-btn waves-effect waves-light btn" (click)="submitChallenge(userId.value, pass.value)" >Login</button>
            </div>
        </div>
    </div>
</section>
<div class="overlay"></div>
- The Get Balance action calls the
getBalancefunction. - To display the value of a variable in your view, you surround it with double curly brackets:
{{ balance }}
Replace the content of styles.css with following code.
/* You can add global styles to this file, and also import other style files */
 .cdk-overlay-container{
    justify-content: center;
    display: flex;
}

.example-form {
  min-width: 150px;
  max-width: 500px;
  width: 100%;
}

.example-full-width {
  width: 100%;
}

.modal.open{
  z-index: 1003;
  display: block;
  opacity: 1;
  top: 10%;
  transform: scaleX(1) scaleY(1);
}

.center{
  text-align: center !important;
}
.page-body{
  text-align: center;
  padding: 2rem;
}
.overlay{
  position: fixed;
    display: none;
    width: 100%;
    height: 100%;
    top: 0;
    left: 0;
    right: 0;
    bottom: 0;
    background-color: rgba(0,0,0,0.5);
    z-index: 2;
    cursor: pointer;
}
.overlay.show{
  display: block !important;
}
Add the following snippet inside <head> tag of index.html file.
<link rel="stylesheet" href="https://cdnjs.cloudflare.com/ajax/libs/materialize/1.0.0-rc.2/css/materialize.min.css">
<script src="https://cdnjs.cloudflare.com/ajax/libs/materialize/1.0.0-rc.2/js/materialize.min.js">
</script>
Setup Proxy
MobileFirst Web SDK requires proxy to be setup such that all MobileFirst API Calls needs to be forwarded to the MobileFirst Server.
Create a new json file with a name proxy.conf.json inside project folder and add the following code.
{
   "/mfp": {
      "target": "http://localhost:9080",
      "secure": false
   }
}
The above configuration forwards all the requests which contains /mfp in the request path to the mobilefirst server which runs on the port 9080 by default. More details on setting up proxy in Angular Application can be found in the readme file of Angular CLI.
Test the Application
Run the web application in the browser by running the following command.
ng serve --proxy-config proxy.conf.json
This step launches the web application in the URL http://localhost:4200/.
Click the Get Balance to view the balance amount.
This button internally calls the ResourceAdapter and you will need to enter your authorization. After your username and password is validated, your balance is shown in the app.

This tutorial has demonstrated the security capability of MobileFirst in an Angular 10 web application using MobileFirst Web SDK.
Source code of the application is available in Github.
Inclusive terminology note: The Mobile First Platform team is making changes to support the IBM® initiative to replace racially biased and other discriminatory language in our code and content with more inclusive language. While IBM values the use of inclusive language, terms that are outside of IBM's direct influence are sometimes required for the sake of maintaining user understanding. As other industry leaders join IBM in embracing the use of inclusive language, IBM will continue to update the documentation to reflect those changes.