등록
improve this page | report issue개요
이 샘플은 사용자 정의 등록 프로세스 및 설정 권한 부여를 보여줍니다. 이 일회성 등록 프로세스 동안 사용자는 PIN 코드를 정의하기 위해 사용자 이름과 비밀번호를 입력하도록 요청됩니다.
전제조건: ExternalizableSecurityCheck 및 설정 학습서를 읽으십시오.
다음으로 이동:
애플리케이션 플로우
- 애플리케이션이 처음으로 시작될 때(등록 전에) 공용 데이터 가져오기 및 등록의 두 개 단추가 있는 UI가 표시됩니다.
- 사용자가 등록을 시작하기 위해 등록 단추를 누르면 로그인 양식이 프롬프트로 표시되고 PIN 코드를 설정하도록 요청됩니다.
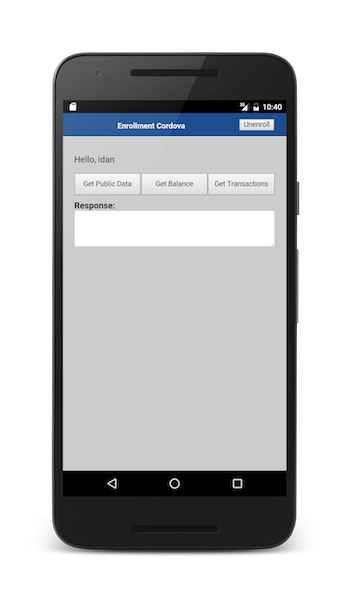
- 사용자가 성공적으로 등록한 후 UI는 공용 데이터 가져오기, 잔고 가져오기, 거래 가져오기, 로그아웃의 네 가지 단추를 포함하게 됩니다. 사용자는 PIN 코드를 입력하지 않고 네 개 단추 모두에 액세스할 수 있습니다.
- 애플리케이션이 두 번째 실행될 때(등록 후) UI가 여전히 네 개 단추를 포함합니다. 하지만 사용자가 거래 가져오기* 단추를 클릭할 경우 PIN 코드를 입력하도록 요청됩니다.
PIN 코드 입력 시도에 세 번 실패한 후에는 사용자 이름과 비밀번호로 다시 인증받고 PIN 코드를 재설정하도록 프롬프트가 표시됩니다.
지속적 속성에 데이터 저장
보호된 데이터를 등록된 클라이언트의 사용자 속성에 대한 컨테이너인 PersistentAttributes 오브젝트에 저장하도록 선택할 수 있습니다. 오브젝트는 보안 검사 클래스 또는 어댑터 자원 클래스 중 하나에서 액세스할 수 있습니다.
제공된 샘플 애플리케이션에서 PersistentAttributes 오브젝트는 PIN 코드를 저장하기 위해 어댑터 자원 클래스에 사용됩니다.
-
setPinCode 자원은 pinCode 속성을 추가하고 변경을 저장하기 위해
AdapterSecurityContext.storeClientRegistrationData()메소드를 호출합니다.@POST @OAuthSecurity(scope = "setPinCode") @Path("/setPinCode/{pinCode}") public Response setPinCode(@PathParam("pinCode") String pinCode){ ClientData clientData = adapterSecurityContext.getClientRegistrationData(); clientData.getProtectedAttributes().put("pinCode", pinCode); adapterSecurityContext.storeClientRegistrationData(clientData); return Response.ok().build(); }여기서
users는AuthenticatedUser오브젝트를 포함하는EnrollmentUserLogin이라는 키를 갖습니다. -
unenroll 자원은 pinCode 속성을 삭제하고 변경을 저장하기 위해
AdapterSecurityContext.storeClientRegistrationData()메소드를 호출합니다.@DELETE @OAuthSecurity(scope = "unenroll") @Path("/unenroll") public Response unenroll(){ ClientData clientData = adapterSecurityContext.getClientRegistrationData(); if (clientData.getProtectedAttributes().get("pinCode") != null){ clientData.getProtectedAttributes().delete("pinCode"); adapterSecurityContext.storeClientRegistrationData(clientData); } return Response.ok().build(); }
보안 검사
등록 샘플은 세 개의 보안 검사를 포함합니다.
EnrollmentUserLogin
EnrollmentUserLogin 보안 검사는 인증된 사용자만 PIN 코드를 설정할 수 있도록 setPinCode 자원을 보호합니다. 이 보안 검사는 금방 만료되고 “처음 경험”하는 동안에만 유지됨을 의미합니다. 추가 isLoggedIn 및 getRegisteredUser 메소드를 제외하고 UserAuthenticationSecurityCheck 구현 학습서에서 설명한 UserLogin 보안 검사와 동일합니다.
isLoggedIn 메소드는 보안 검사 상태가 SUCCESS일 경우 true를 리턴하고 그 외의 경우는 false를 리턴합니다.
getRegisteredUser 메소드는 인증된 사용자를 리턴합니다.
public boolean isLoggedIn(){
    return getState().equals(STATE_SUCCESS);
}
public AuthenticatedUser getRegisteredUser() {
    return registrationContext.getRegisteredUser();
}
EnrollmentPinCode
EnrollmentPinCode 보안 검사는 거래 가져오기 자원을 보호하고 몇 가지 변경사항을 제외하고는 CredentialsValidationSecurityCheck 구현 학습서에 설명된 PinCodeAttempts 보안 검사와 유사합니다.
이 학습서의 예제에서 EnrollmentPinCode는 EnrollmentUserLogin에 종속됩니다. EnrollmentUserLogin에 성공적으로 로그인한 후 사용자는 PIN 코드를 입력하도록 요청받습니다.
@SecurityCheckReference
private transient EnrollmentUserLogin userLogin;
애플리케이션이 처음으로 시작되고 사용자가 성공적으로 등록한 경우, 사용자는 방금 설정한 PIN 코드를 입력하지 않고도 거래 가져오기 자원에 액세스할 수 있어야 합니다. 이를 위해 authorize 메소드는 EnrollmentUserLogin.isLoggedIn 메소드를 사용하여 사용자가 로그인되어 있는지를 확인합니다. 이는 EnrollmentUserLogin이 만료되지 않는 한 사용자가 거래 가져오기에 액세스할 수 있음을 의미합니다.
@Override

public void authorize(Set<String> scope, Map<String, Object> credentials, HttpServletRequest request, AuthorizationResponse response) {
    if (userLogin.isLoggedIn()){
        setState(STATE_SUCCESS);
        response.addSuccess(scope, userLogin.getExpiresAt(), getName());
    }
}
사용자가 세 번의 시도 후 PIN 코드 입력에 실패하면 사용자 이름과 비밀번호를 사용하고 PIN 코드를 재설정하여 사용자가 인증을 받도록 프롬프트되기 전에 pinCode 속성이 삭제되도록 학습서가 설계되어 있습니다.
@Override

public void authorize(Set<String> scope, Map<String, Object> credentials, HttpServletRequest request, AuthorizationResponse response) {
    PersistentAttributes attributes = registrationContext.getRegisteredProtectedAttributes();
    if (userLogin.isLoggedIn()){
        setState(STATE_SUCCESS);
        response.addSuccess(scope, userLogin.getExpiresAt(), getName());
    } else {
        super.authorize(scope, credentials, request, response);
        if (getState().equals(STATE_BLOCKED)){
            attributes.delete("pinCode");
        }
    }
}
validateCredentials 메소드는 PinCodeAttempts 보안 검사와 동일하며, 여기서 인증 정보는 저장된 pinCode 속성에 해당합니다.
@Override

protected boolean validateCredentials(Map<String, Object> credentials) {
    PersistentAttributes attributes = registrationContext.getRegisteredProtectedAttributes();
    if(credentials!=null &&  credentials.containsKey("pin")){
        String pinCode = credentials.get("pin").toString();

        if(pinCode.equals(attributes.get("pinCode"))){
            errorMsg = null;
            return true;
        }
        else {
            errorMsg = "The pin code is not valid. Hint: " + attributes.get("pinCode");
        }
    }
    else{
        errorMsg = "The pin code was not provided.";
    }
    //In any other case, credentials are not valid
    return false;
}
IsEnrolled
IsEnrolled 보안 검사는 다음을 보호합니다.
- 등록된 사용자만 잔고를 볼 수 있도록 getBalance 자원을 보호합니다.
- 등록된 사용자만 거래를 가져올 수 있도록 거래 자원을 보호합니다.
- 이전에 설정된 경우에만 pinCode를 삭제할 수 있도록 등록 취소 자원을 보호합니다.
보안 검사 작성
Java 어댑터를 작성하고 ExternalizableSecurityCheck를 확장하는 IsEnrolled라는 Java 클래스를 추가하십시오.
public class IsEnrolled  extends ExternalizableSecurityCheck{
    protected void initStateDurations(Map<String, Integer> durations) {}

    public void authorize(Set<String> scope, Map<String, Object> credentials, HttpServletRequest request, AuthorizationResponse response) {}

    public void introspect(Set<String> scope, IntrospectionResponse response) {}
}
IsEnrolledConfig 구성 클래스
ExternalizableSecurityCheckConfig를 확장하는 IsEnrolledConfig 구성 클래스를 작성하십시오.
public class IsEnrolledConfig extends ExternalizableSecurityCheckConfig {

    public int successStateExpirationSec;

    public IsEnrolledConfig(Properties properties) {
        super(properties);
        successStateExpirationSec = getIntProperty("expirationInSec", properties, 8000);
    }
}
createConfiguration 메소드를 IsEnrolled
클래스에 추가하십시오.
public class IsEnrolled  extends ExternalizableSecurityCheck{
    @Override
    public SecurityCheckConfiguration createConfiguration(Properties properties) {
        return new IsEnrolledConfig(properties);
    }
}
initStateDurations 메소드
SUCCESS 상태의 기간을 successStateExpirationSec로 설정하십시오.
@Override
protected void initStateDurations(Map<String, Integer> durations) {
    durations.put (SUCCESS_STATE, ((IsEnrolledConfig) config).successStateExpirationSec);
}
authorize 메소드
코드 샘플은 사용자가 등록되었는지 간단히 확인하고 이에 따라 성공 또는 실패를 리턴합니다.
public void authorize(Set<String> scope, Map<String, Object> credentials, HttpServletRequest request, AuthorizationResponse response) {
    PersistentAttributes attributes = registrationContext.getRegisteredProtectedAttributes();
    if (attributes.get("pinCode") != null){
        setState(SUCCESS_STATE);
        response.addSuccess(scope, getExpiresAt(), this.getName());
    } else  {
        setState(STATE_EXPIRED);
        Map <String, Object> failure = new HashMap<String, Object>();
        failure.put("failure", "User is not enrolled");
        response.addFailure(getName(), failure);
    }
}
-
pinCode속성이 존재하는 경우: setState메소드를 사용하여 상태를 SUCCESS로 설정하십시오.-
addSuccess메소드를 사용하여 성공을 응답 오브젝트에 추가하십시오. -
pinCode속성이 존재하지 않는 경우: setState메소드를 사용하여 상태를 EXPIRED로 설정하십시오.addFailure메소드를 사용하여 실패를 응답 오브젝트에 추가하십시오.
IsEnrolled 보안 검사는 EnrollmentUserLogin에 종속됩니다.
@SecurityCheckReference
private transient EnrollmentUserLogin userLogin;
다음 코드를 추가하여 활성 사용자를 설정하십시오.
public void authorize(Set<String> scope, Map<String, Object> credentials, HttpServletRequest request, AuthorizationResponse response) {
    PersistentAttributes attributes = registrationContext.getRegisteredProtectedAttributes();
    if (attributes.get("pinCode") != null){
        // Is there a user currently active?
        if (!userLogin.isLoggedIn()){
            // If not, set one here.
            authorizationContext.setActiveUser(userLogin.getRegisteredUser());
        }
        setState(SUCCESS_STATE);
        response.addSuccess(scope, getExpiresAt(), this.getName());
    } else  {
        setState(STATE_EXPIRED);
        Map <String, Object> failure = new HashMap<String, Object>();
        failure.put("failure", "User is not enrolled");
        response.addFailure(getName(), failure);
    }
}
그런 다음 transactions 자원이 표시 이름을 제공하기 위해 현재 AuthenticatedUser 오브젝트를 가져옵니다.
@GET
@Produces(MediaType.TEXT_PLAIN)
@OAuthSecurity(scope = "transactions")
@Path("/transactions")

public String getTransactions(){
  AuthenticatedUser currentUser = securityContext.getAuthenticatedUser();
  return "Transactions for " + currentUser.getDisplayName() + ":\n{'date':'12/01/2016', 'amount':'19938.80'}";
}
securityContext에 대한 자세한 정보는 Java 어댑터 학습서에서 보안 API 절을 참조하십시오.
다음을 추가하여 등록된 사용자를 응답 오브젝트에 추가하십시오.
public void authorize(Set<String> scope, Map<String, Object> credentials, HttpServletRequest request, AuthorizationResponse response) {
    PersistentAttributes attributes = registrationContext.getRegisteredProtectedAttributes();
    if (attributes.get("pinCode") != null){
        // Is there a user currently active?
        if (!userLogin.isLoggedIn()){
            // If not, set one here.
            authorizationContext.setActiveUser(userLogin.getRegisteredUser());
        }
        setState(SUCCESS_STATE);
        response.addSuccess(scope, getExpiresAt(), getName(), "user", userLogin.getRegisteredUser());
    } else  {
        setState(STATE_EXPIRED);
        Map <String, Object> failure = new HashMap<String, Object>();
        failure.put("failure", "User is not enrolled");
        response.addFailure(getName(), failure);
    }
}
샘플 코드에서 IsEnrolled 인증 확인 핸들러의 handleSuccess
메소드는 표시 이름을 제공하기 위해 사용자 오브젝트를 사용합니다.
샘플 애플리케이션
보안 검사
EnrollmentUserLogin, EnrollmentPinCode 및 IsEnrolled 보안 검사는 등록 Maven 프로젝트 아래의 SecurityChecks 프로젝트에서 사용 가능합니다.
보안 검사 Maven 프로젝트를 다운로드하려면 클릭하십시오.
애플리케이션
샘플 애플리케이션은 OS(Swift), Android, Cordova 및 웹에서 사용 가능합니다.
- Cordova 프로젝트를 다운로드하려면 클릭하십시오.
- iOS Swift 프로젝트를 다운로드하려면 클릭하십시오.
- Android 프로젝트를 다운로드하려면 클릭하십시오.
- 웹 앱 프로젝트를 다운로드하려면 클릭하십시오.
샘플 사용법
샘플의 README.md 파일에 있는 지시사항을 따르십시오.
▲Inclusive terminology note: The Mobile First Platform team is making changes to support the IBM® initiative to replace racially biased and other discriminatory language in our code and content with more inclusive language. While IBM values the use of inclusive language, terms that are outside of IBM's direct influence are sometimes required for the sake of maintaining user understanding. As other industry leaders join IBM in embracing the use of inclusive language, IBM will continue to update the documentation to reflect those changes.