Ionic 엔드-투-엔드 데모
improve this page | report issue개요
이 데모의 목적은 엔드-투-엔드 플로우를 설명하는 것입니다. 다음 단계가 수행됩니다.
- MobileFirst 클라이언트 SDK에 사전 번들로 제공되는 샘플 애플리케이션이 등록되고 MobileFirst Operations Console에서 다운로드됩니다.
- 새 어댑터 또는 제공된 어댑터가 MobileFirst Operations Console에 배치됩니다.
- 자원 요청을 하도록 애플리케이션 로직이 변경됩니다.
종료 결과:
- MobileFirst Server ping 실행에 성공함.
- 어댑터를 사용하여 데이터 검색에 성공함.
전제조건:
- iOS용 Xcode, Android용 Android Studio 또는 Windows 10 UWP용 Visual Studio 2015
- Ionic CLI
- 선택사항. MobileFirst CLI(다운로드).
- 선택사항. 독립형 MobileFirst Server(다운로드).
1단계. MobileFirst Server 시작
Mobile Foundation 인스턴스를 작성했는지 확인하거나, MobileFirst Developer Kit를 사용하는 경우 서버의 폴더로 이동해서 ./run.sh(Mac 및 Linux의 경우) 또는 run.cmd(Windows의 경우) 명령을 실행하십시오.
2단계. 애플리케이션 작성 및 등록
브라우저에서 URL: http://your-server-host:server-port/mfpconsole을 로드하여 MobileFirst Operations Console을 여십시오. 서버가 로컬로 실행 중인 경우 http://localhost:9080/mfpconsole을 사용하십시오. username/password는 admin/admin입니다.
- 애플리케이션 옆에 있는 새로 작성 단추를 클릭하십시오.
- 플랫폼 목록(Android, iOS, Windows, 브라우저)에서 플랫폼을 선택하십시오.
- 애플리케이션 ID로 com.ibm.mfpstarterionic을 입력하십시오.
- 버전으로 1.0.0을 입력하십시오.
- 애플리케이션 등록을 클릭하십시오.
- Github에서 Ionic 샘플 애플리케이션을 다운로드하십시오.
3단계: Ionic 애플리케이션에 MobileFirst SDK 추가
아래 단계에 따라 다운로드한 Ionic 샘플 애플리케이션에 MobileFirst Ionic SDK를 추가하십시오.
-
기존 Ionic 프로젝트의 루트로 이동하고 MobileFirst 핵심 Ionic Cordova 플러그인을 추가하십시오.
-
다음 명령을 사용하여 Ionic 프로젝트의 루트로 디렉토리를 변경하십시오.
cd MFPStarterIonic -
Ionic CLI 명령
ionic cordova plugin add cordova-plugin-name을 사용하여 MobileFirst 플러그인을 추가하십시오. 예:ionic cordova plugin add cordova-plugin-mfp위 명령은 Ionic 프로젝트에 MobileFirst Core SDK 플러그인을 추가합니다.
-
Ionic CLI 명령
ionic cordova platform add ios|android|windows|browser를 사용하여 Cordova 프로젝트에 하나 이상의 지원되는 플랫폼을 추가하십시오. 예:cordova platform add ios -
ionic cordova prepare command를 실행하여 애플리케이션 자원을 준비하십시오.ionic cordova prepare
4단계. 애플리케이션 로직 편집
-
선택한 코드 편집기에서 Ionic 프로젝트를 여십시오.
-
src/js/index.js 파일을 선택하고 다음 코드 스니펫을 붙여넣어 기존
WLAuthorizationManager.obtainAccessToken()함수를 대체하십시오.
   WLAuthorizationManager.obtainAccessToken("").then(
      (token) => {
        console.log('-->  pingMFP(): Success ', token);
        this.zone.run(() => {
          this.title = "Yay!";
          this.status = "Connected to MobileFirst Server";
        });
        var resourceRequest = new WLResourceRequest( "/adapters/javaAdapter/resource/greet/",
        WLResourceRequest.GET
        );

        resourceRequest.setQueryParameter("name", "world");
            resourceRequest.send().then(
                (response) => {
                    // Will display "Hello world" in an alert dialog.
                    alert("Success: " + response.responseText);
                },
                (error) => {
                    alert("Failure: " + JSON.stringify(error));
                }
            );
      }, (error) => {
        console.log('-->  pingMFP(): failure ', error.responseText);
        this.zone.run(() => {
         this.title = "Bummer...";
         this.status = "Failed to connect to MobileFirst Server";
        });
      }
    );
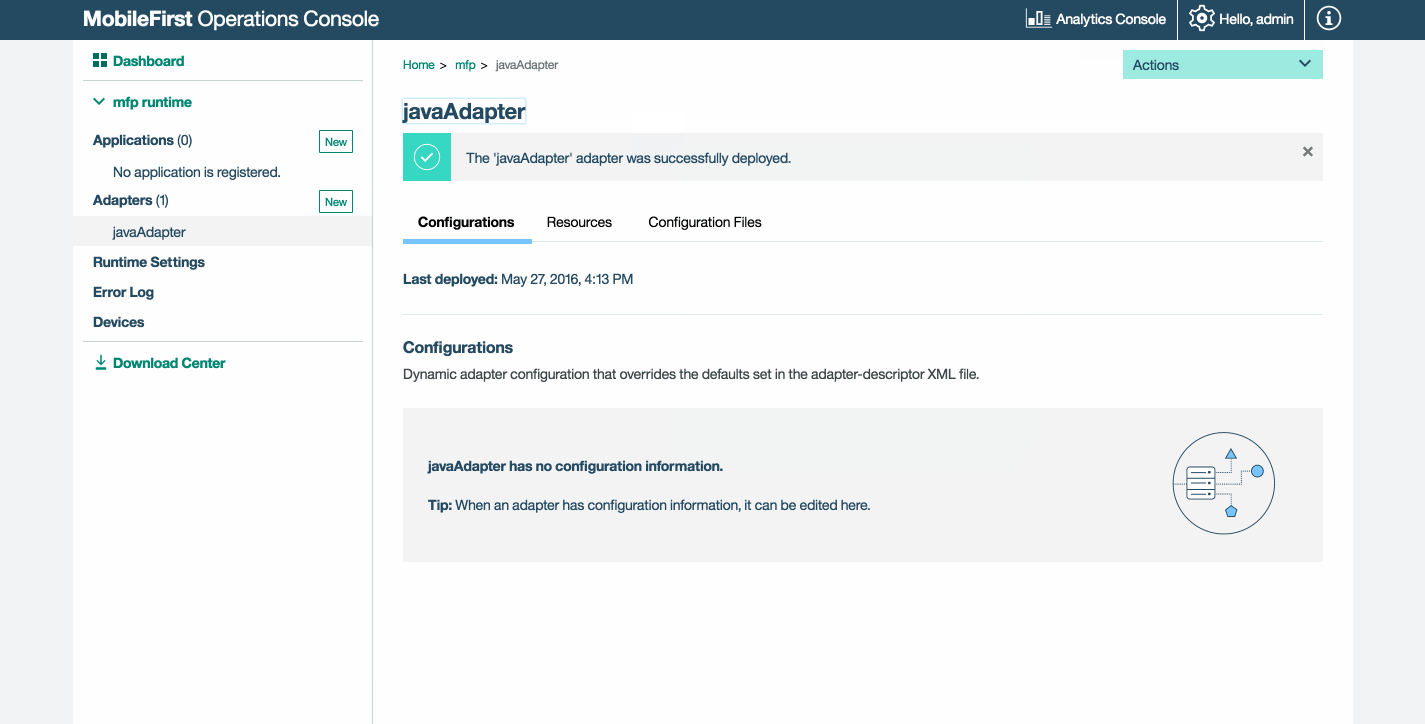
5단계. 어댑터 배치
이 .adapter 아티팩트를 다운로드하고 조치 → 어댑터 배치 조치를 사용하여 MobileFirst Operations Console에서 이를 배치하십시오.
그렇지 않으면 어댑터 옆에 있는 새로 작성 단추를 클릭하십시오.
-
조치 → 샘플 다운로드 옵션을 선택하십시오. Hello World Java 어댑터 샘플을 다운로드하십시오.
Maven 및 MobileFirst CLI가 설치되지 않은 경우, 화면상의 개발 환경 설정 지시사항을 따르십시오.
-
명령행 창에서 어댑터의 Maven 프로젝트 루트 폴더로 이동해서 다음 명령을 실행하십시오.
mfpdev adapter build -
빌드가 완료되면 조치 → 어댑터 배치 조치를 사용하여 MobileFirst Operations Console에서 이를 배치하십시오. [adapter]/target 폴더에서 어댑터를 찾을 수 있습니다.
6단계. 애플리케이션 테스트
- 명령행 창에서 Cordova 프로젝트의 루트 폴더로 이동하십시오.
ionic cordova platform add ios|android|windows|browser명령을 실행하여 플랫폼을 추가하십시오.- Ionic 프로젝트에서 config.xml 파일을 선택하고 프토토콜, 호스트, 포트 특성이 사용자의 MobileFirst Server에 대한 올바른 값을 갖도록
<mfp:server ... url=" "/>값을 편집하십시오.- 로컬 MobileFirst Server를 사용 중인 경우, 일반적으로 값은 http, localhost 및 9080입니다.
- 원격 MobileFirst Server를 사용 중인 경우(IBM Cloud에서), 일반적으로 값은 https, your-server-address 및 443입니다.
- IBM Cloud Private에서 Kubernetes 클러스터를 사용 중이고 배치 유형이 NodePort이면, 포트 값이 일반적으로 Kubernetes 클러스터의 서비스에서 공개하는 NodePort입니다.
또는 MobileFirst CLI를 설치한 경우에는 프로젝트 루트 폴더로 이동해서
mfpdev app register명령을 실행하십시오. 원격 MobileFirst Server가 사용된 경우 다음 명령을 실행하여 서버를 추가하십시오.mfpdev server add그런 다음 예를 들어 다음과 같은 명령으로 앱을 등록하십시오.
mfpdev app register myIBMCloudServer
디바이스가 연결된 경우 애플리케이션이 해당 디바이스에 설치되어 실행됩니다. 그렇지 않으면 시뮬레이터 또는 에뮬레이터가 사용됩니다.
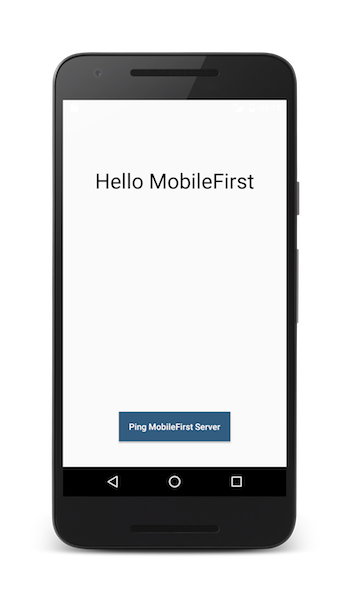
결과
- MobileFirst Server Ping 단추를 클릭하면 MobileFirst Server에 연결됨이 표시됩니다.
- 애플리케이션이 MobileFirst Server에 연결할 수 있는 경우, 배치된 Java 어댑터를 사용하는 자원 요청 호출이 발생합니다. 그 후에 어댑터 응답이 경보에 표시됩니다.
다음 단계
애플리케이션에서 어댑터 사용하기 및 MobileFirst 보안 프레임워크를 사용하여 푸시 알림과 같은 추가 서비스를 통합하는 방법에 대해 더 학습합니다.
- 애플리케이션 개발 학습서 검토
- 어댑터 개발 학습서 검토
- 인증 및 보안 학습서 검토
- 알림 학습서 검토
- 모든 학습서 검토
Inclusive terminology note: The Mobile First Platform team is making changes to support the IBM® initiative to replace racially biased and other discriminatory language in our code and content with more inclusive language. While IBM values the use of inclusive language, terms that are outside of IBM's direct influence are sometimes required for the sake of maintaining user understanding. As other industry leaders join IBM in embracing the use of inclusive language, IBM will continue to update the documentation to reflect those changes.