iOS - Cloudant NoSQL DB API
improve this page | report issueOverview
This tutorial shows how to apply technology available in IBM MobileFirst Platform Foundation to store data for iOS mobile applications. By using Cloudant NoSQL DB APIs, you can complete specific database operations, such as creating, reading, updating, deleting, and synchronizing data between local and remote databases. This tutorial provides a basic overview of these APIs and explains how to configure and run the sample, in the following topics:
- Using the IMFData SDK
- Creating local data stores
- Creating remote data stores
- Setting user permissions for remote stores
- Modeling data for iOS applications
- Creating and updating data
- Supporting synchronization and offline storage
- Running the iOS sample
- Obtaining and configuring the required SDKs
- Enabling encryption
- BlueList application flow
Using the IMFData SDK
After the IMFData SDK is installed, you can begin to initialize and use the SDK in your native iOS application.
// Initialize the IMFDataManager
IMFDataManager *manager = [IMFDataManager initializeWithUrl:cloudantProxyUrl];
The value for cloudantProxyUrl is the URL of the MobileFirst Data Proxy as it was configured during installation. The URL includes the IP address, host, and context root that you defined.
For example: http://localhost:10080/imf-data-proxy
In the native iOS sample that comes with this tutorial, the value for the cloudantProxyUrl is set in the bluelist.plist file.
Creating local data stores
You can create a Store object to allow your application to access a local database, which can be used even when the application is offline.
//Get reference to IMFDataManager
IMFDataManager *manager = [IMFDataManager sharedInstance];
NSString *dbname=@"todosdb";
NSError *error = nil;
//Create local store
CDTStore *datastore = [manager localStore:dbname error:&error];
if (error) {
        [NSException raise:@"DBCreationFailure" format: @"Could not create DB with name %@", dbname];
    }
    else{
        NSLog(@"Local data store created successfully");
    }
Creating remote data stores
You can also create a Store object to allow your application to access a remote database.
// Get reference to data manager
IMFDataManager *manager = [IMFDataManager sharedInstance];
NSString *dbname = @"todosdb";
// Create remote store
[manager remoteStore:dbname completionHandler:^(CDTStore *store, NSError *error) {
    if(error){
        // Handle error
    }else{
        CDTStore *remotedatastore = store;
        NSLog(@"Successfully created store);
    }
}];
Setting user permissions for remote stores
You can set specific permissions for users to access remote stores.
[manager setCurrentUserPermissions: DB_ACCESS_GROUP_MEMBERS forStoreName: @"todosdb" completionHander:^(BOOL success, NSError *error) {
    if(error){
        // Handle error
    }else{
        // setting permissions was successful
    }
}];
Note: In the sample, the user is authenticated via OAuth. OAuth has been configured through adapter-based authentication. You can find further instructions on setting up access with OAuth capabilities and the MobileFirst Data Proxy in configuring OAuth security documentation.
Modeling data for iOS applications
In iOS applications, you can use the CDTDataObjectMapper class to map native objects to the JSON document format. When you create a data store with the IMFDataManager API, a CDTDataObjectMapper is created automatically and is set on the CDTStore object. In the sample, a custom TodoItem class enables you to store custom data as objects in the application. When you create a custom CDTDataObjectMapper class, make sure that it meets the following requirements:
- Conform to the
IMFDataObjectprotocol. - Have the
IMFDataObjectprotocol metadata property set on the class interface. - Extend
NSObject.
TodoItem implementation (TodoItem.h)
@interface TodoItem : NSObject <CDTDataObject>
@property NSString *name;
@property NSNumber *priority;<
//Required by the IMFDataObject protocol
@property (strong, nonatomic, readwrite) CDTDataObjectMetadata *metadata;
@end
You must then register the class and data type with the CDTDataObjectMapper. In the sample, the TableViewController does that after the store is created.
//using the existing store
[self.datastore.mapper setDataType:@"TodoItem" forClassName:NSStringFromClass([TodoItem class])];
Creating and updating data
Using the same operation, you can save new objects and save changes to existing objects in a data store.
Creating Todo Items
//using a store that was created previously
- (void) createItem: (TodoItem*) item {
    //save will perform a create because the item object does not exist yet in the DB.
    [self.datastore save:item completionHandler:^(NSObject *object, NSError *error) {
        if (error) {
            NSLog(@"createItem failed with error: %@", error);
        } else {
            [self listItems:nil];
        }
    }];
}
Updating Todo Items
//using a store that was created previously
- (void) updateItem: (TodoItem*) item
{<
    //save will perform a create because the CDTDocumentRevision already exists.
    [self.datastore save:item completionHandler:^(NSObject *object, NSError *error) {
        if (error) {
            NSLog(@"updateItem failed with error: %@", error);
        } else {
            [self listItems:nil];
        }
    }];
}
Deleting data
To delete an object in a data store, pass the object to the delete: completionHandler method:
//using a store that was created previously
-(void) deleteItem: (TodoItem*) item
{
    [self.datastore delete:item completionHandler:^(NSString *deletedObjectId, NSString *deletedRevisionId, NSError *error) {
        if (error != nil) {
            NSLog(@"deleteItem failed with error: %@", error);
        } else {
            [self listItems:nil];
        }
    }];
}
Querying data
You can query for objects that have an object mapper. The Cloudant query API provides convenient methods for querying with NSPredicate and for querying by data type. For more information about these functions, see Querying data in the user documentation.
Supporting synchronization and offline storage
By using the data manager API, you can synchronize data between local storage on the device and remote stored instances.
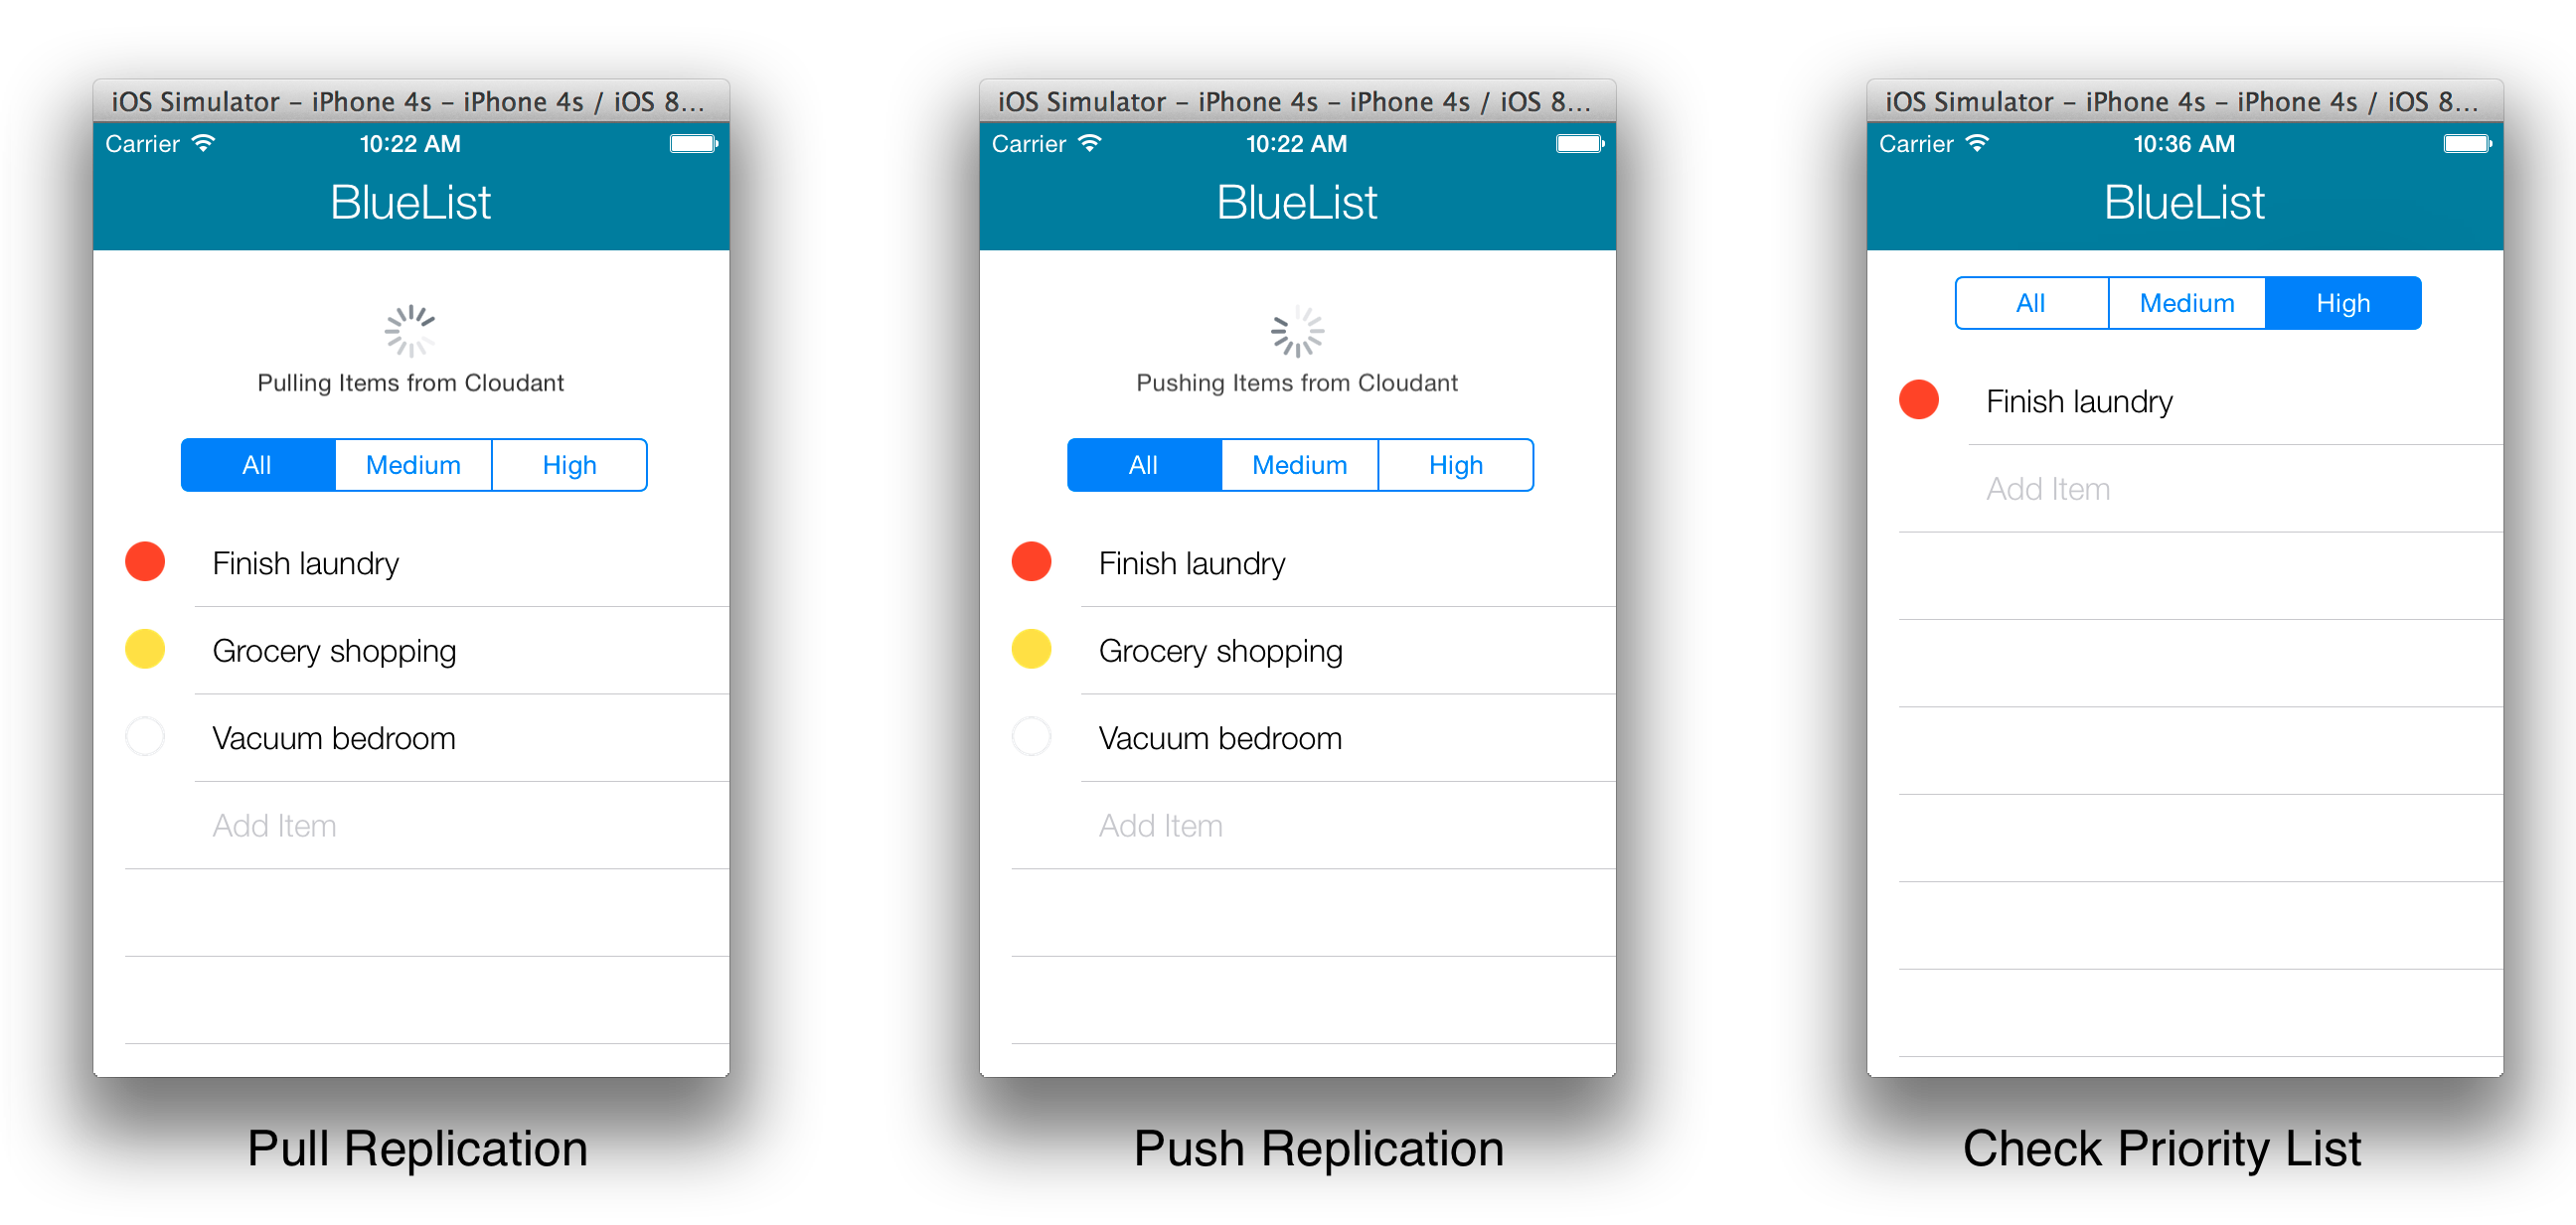
Pull replication
When pull replication runs, the local database within the mobile device is updated with what exists in the remote database.
- (void)pullItems {
// store is an existing CDTStore object created using IMFDataManager remoteStore
NSError *replicationError;
CDTPullReplication *pull = [manager pullReplicationForStore: store.name];
CDTReplicator *replicator = [manager.replicatorFactory oneWay:pull error:&replicationError];
if(replicationError){
    // Handle error
}else{
    // replicator creation was successful
}
[replicator startWithError:&replicationError];
if(replicationError){
    // Handle error
}else{
    // replicator start was successful
}
}
Push replication
When push replication runs, the data from the local database within the mobile device is sent to the remote database.
- (void)pushItems {
    // store is an existing CDTStore object created using IMFDataManager localStore
    NSError *replicationError;
    CDTPushReplication *push = [manager pushReplicationForStore: store.name];
    CDTReplicator *replicator = [manager.replicatorFactory oneWay:push error:&replicationError];
    if(replicationError){
        // Handle error
    }else{
        // replicator creation was successful
    }
    [replicator startWithError:&replicationError];
    if(replicationError){
        // Handle error
    }else{
        // replicator start was successful
    }
}
Note: The code snippets above might be different from the code that you can see in the sample. These snippets have been created to give the clearest and most understandable outline of the APIs and how they are used. For the sample to be easier to use, all the implementation for the above operations can be found in the TableViewController.
Running the iOS sample
Make sure that you have properly configured and started the following instances:
- MobileFirst Server with
CloudantAuthenticationAdapterandiOSBlueListNative API deployed - Cloudant Data Local Layer Edition
- MobileFirst Data Proxy Server configured against MobileFirst Server and the Cloudant Data Layer Local Edition
If you have not completed some of these tasks, review the proper setup section of the Working with Cloudant NoSQL DB API tutorial.
Obtaining and configuring the required SDKs
- Make sure that you have correctly installed and set up CocoaPods. If you have not done so, complete the following:
- Install CocoaPods by entering the following terminal command:
$ sudo gem install cocoapods - Set up CocoaPods by entering the following terminal command:
$ pod setup
The next step is to download and install the required dependencies for this project by using the provided
Podfile. If you want to create or have your ownpodfile, include the following content:source 'https://github.com/CocoaPods/Specs.git' platform :ios, '7.0' pod 'IMFDataLocal', '1.0.0' - Install CocoaPods by entering the following terminal command:
podfile, navigate to the Xcode project directory in terminal (in the sample: /BlueList-On-Premise/iOS/objective-c/) and run the following command:
$ pod install
Note: For the pod install command to work correctly, your podfile must be named Podfile or podfile.
bluelist-objective-c.xcworkspace file. When using CocoaPods, you must use the .xcworkspace file instead of the .xcodeproject file because of how the dependencies are configured. This pod installation will also pull in the IBMMobileFirstPlatformFoundation framework as it is a required dependency of IMFDataLocal.
- In the
bluelist.plistfile, set thecloudantProxyUrlto your MobileFirst Data Proxy Server location. - In the
worklight.plistfile, make sure to check all the values and update them to match the MobileFirst Server instance that you have deployed.
Now you can run the sample on the simulators that are provided by Xcode or on a supported iOS device.
NEW: Enabling encryption
It is possible to encrypt the local data stores in order to secure data that is being stored on the device.
Prerequisite: To use the encryption functionality as explained here, you must have the IMFDataLocal/SQLCipher pod installed.
To begin the process of encrypting the local databases, you must first edit the podfile to include the IMFDataLocal/SQLCipher pod. This pod replaces the IMFDataLocal reference in the current podfile. Here is an example of the modified podfile:
source 'https://github.com/CocoaPods/Specs.git'
platform :ios, '7.0'
pod 'IMFDataLocal/SQLCipher'
A pod install must be completed after these changes have been made in order to have the correct encryption dependencies configured. To accomplish this, navigate to the Xcode project directory in terminal (in the sample: /BlueList-On-Premise/iOS/objective-c/) and run the following command:
$ pod install
Now the project has the dependencies that are required to encrypt the local databases correctly. To encrypt these databases in your client-side code, first create an CDTEncryptionKeyProvider and then create a local data store with this keyProvider:
//Initialize a key provider
id<CDTEncryptionKeyProvider> keyProvider = [CDTEncryptionKeychainProvider providerWithPassword:@"password" forIdentifier:@"user"];
//Initialize a local store
self.datastore = [manager localStore:dbname withEncryptionKeyProvider:keyProvider error:&dbCreateError];
You must also use the CDTEncryptionKeyProvider that you defined when you created CDTPullReplication and CDTPushReplication:
//pull replication
self.pullReplication = [[IMFDataManager sharedInstance] pullReplicationForStore:dbname withEncryptionKeyProvider:keyProvider];
//push replication
self.pushReplication = [[IMFDataManager sharedInstance] pushReplicationForStore:dbname withEncryptionKeyProvider:keyProvider];
In the sample application, the encryption code is already provided in the TableViewController. By default, encryption is not enabled until an encryptionPassword is provided in the bluelist.plist file. After encryptionPassword is configured, the application uses this password to encrypt the local data store by using the above mechanisms. If encryptionPassword is left blank in the bluelist.plist file, encryption does not occur.
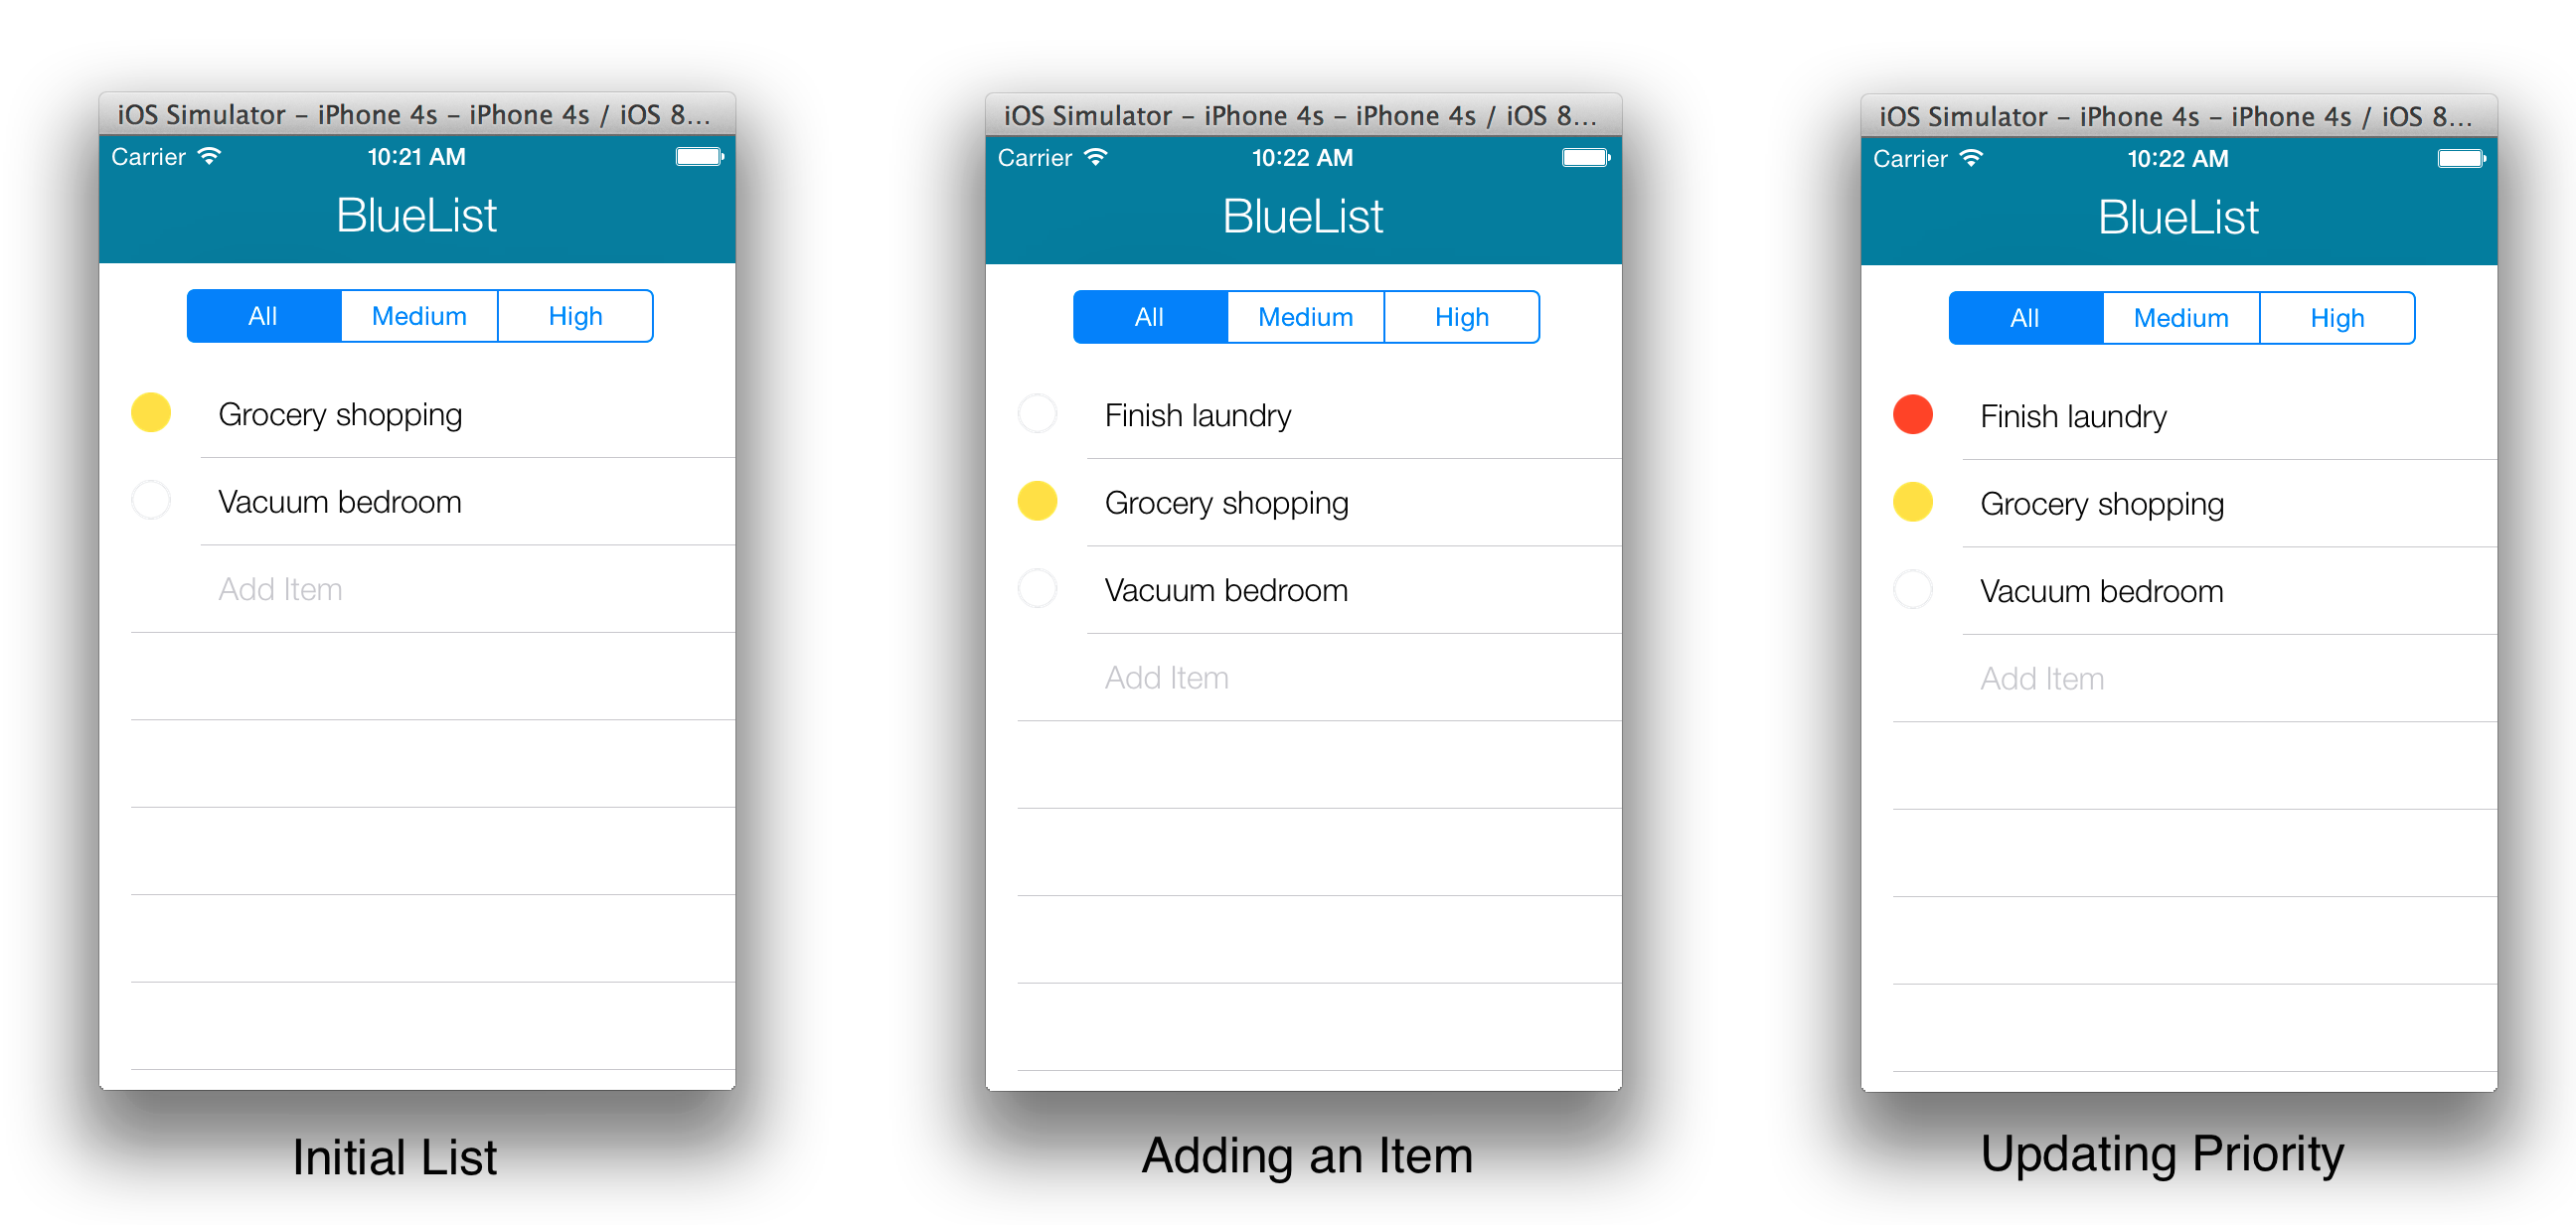
BlueList application flow
When the application starts, the AppDelegate instance initializes the connection to MobileFirst Server. After initialization, the application creates and registers the BlueListChallangeHandler handler.
- (BOOL)application:(UIApplication *)application didFinishLaunchingWithOptions:(NSDictionary *)launchOptions {
    WLClient *wlClient = [WLClient sharedInstance];
    // Register the Challenge Handler
    BlueListChallengeHandler *challengeHandler = [[BlueListChallengeHandler alloc] init];
    [wlClient registerChallengeHandler: challengeHandler];
    return YES;
}
The sample silently authenticates a user by calling CloudantAutheticationAdapter with the correct username and password parameters. This is completed in the BlueListChallengeHandler.
-(void) handleChallenge:(WLResponse *)response {
    NSLog(@"Inside handleChallenge - silently loggin in");
    WLProcedureInvocationData *invocationData = [[WLProcedureInvocationData alloc]initWithAdapterName:@"CloudantAuthenticationAdapter" procedureName:@"submitAuthentication"];<
    invocationData.parameters = @[@"james", @"42"];
    [self submitAdapterAuthentication: invocationData options: nil];
}
After authentication, the database is configured in the setupIMFDatabase method in the TableViewController. This database configuration consists of the following steps:
- Initializing the SDK
- Creating the local and remote databases.
- Setting permissions for the user that was created.
- Setting the
replicatorFactory,pullReplicationandpushReplication. - Registering the
TodoItemclass and data type with theCDTDataObjectMapper.
Note: For simplicity, the name of the database that gets created is currently set to the variable IBM_DB_NAME in the TableViewController. By design, the setupIMFDatabase method allows you to pass any database name as a parameter.
The TableViewController class provides functions for creating, updating, deleting, and listing items, and functions for push and pull replication.
After completing initialization, the application does an initial pull from the remote database. The user can now add, delete, and modify list items in the application, and update the corresponding priority (red = high, yellow = medium, white = low). By design, the application starts synchronization only when the user manually pulls down the list. On pull down, the application first completes a pull replication from the remote database to the local. After this operation has completed, push replication occurs, which sends any updated local data to the remote database. The local and remote databases are then synchronized.
Inclusive terminology note: The Mobile First Platform team is making changes to support the IBM® initiative to replace racially biased and other discriminatory language in our code and content with more inclusive language. While IBM values the use of inclusive language, terms that are outside of IBM's direct influence are sometimes required for the sake of maintaining user understanding. As other industry leaders join IBM in embracing the use of inclusive language, IBM will continue to update the documentation to reflect those changes.