Location services in hybrid applications
improve this page | report issueThis tutorial covers the following topics:
- Architecture
- Basic API
- Acquisition policy
- Triggers
- Events
- Testing hybrid applications
- Location Services permissions in Android
- Sample application
Architecture

The application code on the mobile device, in the form of an acquisition policy, controls the collection of data from device sensors.
The collected data is referred to as the device context.
When a change occurs in the device context, such as a change in the geolocation of the device or the fact that it entered a Wi-Fi zone, triggers can be activated.
The triggers specify that an action should occur: either a callback function is called, or an event is sent to the server, based on the device context.
Events are created by triggers and application code, and include a snapshot of the device context at the time of their creation.
Events are buffered on the client, and then transmitted to the server periodically.
The server might process the event later.
During the event transmission process, the device context is synchronized transparently to the server.
To handle the events, the server uses adapter application code.
This code sets up event handlers on the server. These handlers filter event data and pass matching events to a callback function.
The code also accesses the client device context (its location and Wi-Fi network information), and sets an application context.
Server activities and received events are logged, together with the device and application contexts, for future reporting and analytics.
Basic API
Client JavaScript
Note: Call the following functions after the IBM MobileFirst Platform Foundation framework is initialized (within or after the wlCommonInit() function).
WL.Device.startAcquisition(policy, triggers, onFailure)
policy: How do you acquire the sensor data?triggers: What do you act on and how?onFailure: How do you handle acquisition failures?
Server JavaScript code
WL.Server.setEventHandlers(eventHandlers);
eventHandlers: What events do you act on and how?
Acquisition policy
An acquisition policy defines how acquisition takes place.
var policy = {
    Geo: WL.Device.Geo.Profiles.LiveTracking(),
    Wifi: {
        interval: 10000,
        accessPointFilters: {
            [{
                SSID: "Net1"
            }, {
                SSID: "Net2",
                MAC: "*"
            }]
        }
    }
};
Geo acquisition policy
Geo: WL.Device.Geo.Profiles.LiveTracking(),
LiveTracking is a preset profile that uses the most accurate settings to track the device.
Additional configuration options:
RoughTrackingPowerSaving- Custom settings
For more information, see the topic about setting an acquisition policy, in the user documentation.
Wi-Fi acquisition policy
Wifi: {
    interval: 10000,
    accessPointFilters: {
        [{
            SSID: "Net1"
        }, {
            SSID: "Net2",
            MAC: "*"
        }]
    }
}
The interval parameter is the polling interval, in milliseconds; Wi-Fi polling is performed at each interval.
The accessPointFilters parameter are access points of interest.
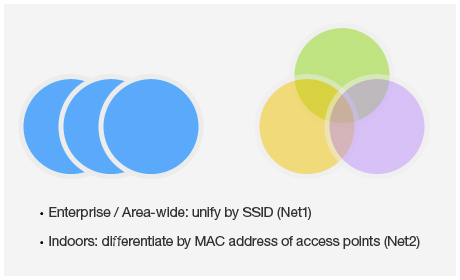
In the example above, the acquisition policy works as follows:
- Ignores everything except
Net1 andNet2– This setting assists in dynamic environments, such as mobile hotspots. - Considers all
Net1access points as one single access point. - Differentiates
Net2access points by their MAC address.
For more information, see the topic about setting an acquisition policy, in the user documentation.
Triggers
var triggers = {
    Geo: {
        trigger1: {
            type: "Enter",
            circle: {
                longitude: -74.04444,
                latitude: 40.689167,
                radius: 100
            },
            callback: libertyAtLast,
            eventToTransmit: {
                event: {
                    bring: "me",
                    your: "huddledMasses"
                }
            }
        }
    }
};
You can setup triggers for the following effects:
- Geo/Wi-Fi fences:
Enter,Exit,Dwell Inside,Dwell Outside - Movement: Geo:
PositionChange, Wi-Fi:VisibleAccessPointsChange - Wi-Fi:
Connect/Disconnect
In this example, trigger1 is an Enter trigger which is activated when the device enters the defined circle (longitude, latitude, and radius).
When a trigger activates, it can call a callback function and/or create an event to be sent to the server.
For more information, see the topic about triggers, in the user documentation.
Events
Client side
Events are generated by triggers (as explained in section Triggers).
eventToTransmit: {
    event: {
        bring: "me",
        your: "huddledMasses"
    }
}
You can also generate events manually by calling this API:
WL.Client.transmitEvent(event,immediate);
Server side
In the adapter code, create event handlers:
WL.Server.createEventHandler(filter, handlerFunction);
Events that match the filter parameter are passed to handlerFunction.
Filter examples:
{status: "platinum"}– Handle platinum members only{hotel: { country: "USA" } }– Hotels in the USA{}– All events
Register the event handlers:
WL.Server.setEventHandlers([...]);
For more information, see the topic about working with geofences and triggers, in the user documentation.
Testing hybrid applications
To test your application, you might want to test the various triggers and the error handling logic that your application uses.
The Mobile Browser Simulator provides capabilities to simulate sensor data and errors.
To access it, right-click an application environment and select Run As > Preview.
Geo testing
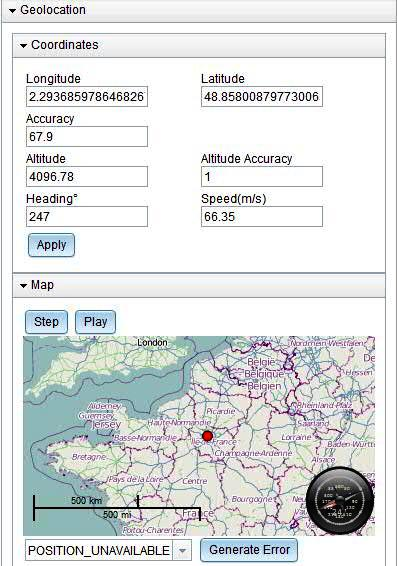
You can use the Geolocation widget to set a specific position through a manual entry or by a click on the map.
A simple simulation mode is also provided by the Step and Play buttons, which move the position in the simulated device at the given speed and in the direction of the given heading.
You can also simulate the generation of errors.
Wi-Fi testing

You can use the Network widget to define simulated access points, configure their signal strengths, and simulate the connection or disconnection to an access point.
You can also simulate the generation of errors.
Scenarios
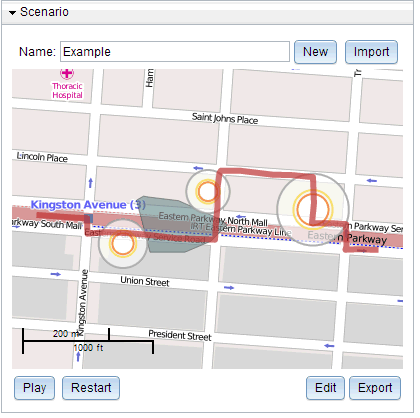
You can use the Scenario widget to automatically simulate a user moving through an environment in a complex way.
A scenario consists of:
- The path of the user, and the point when the user reaches each path point
- Wi-Fi access points
- No-GPS coverage zones
To open the scenario editor, click Edit.
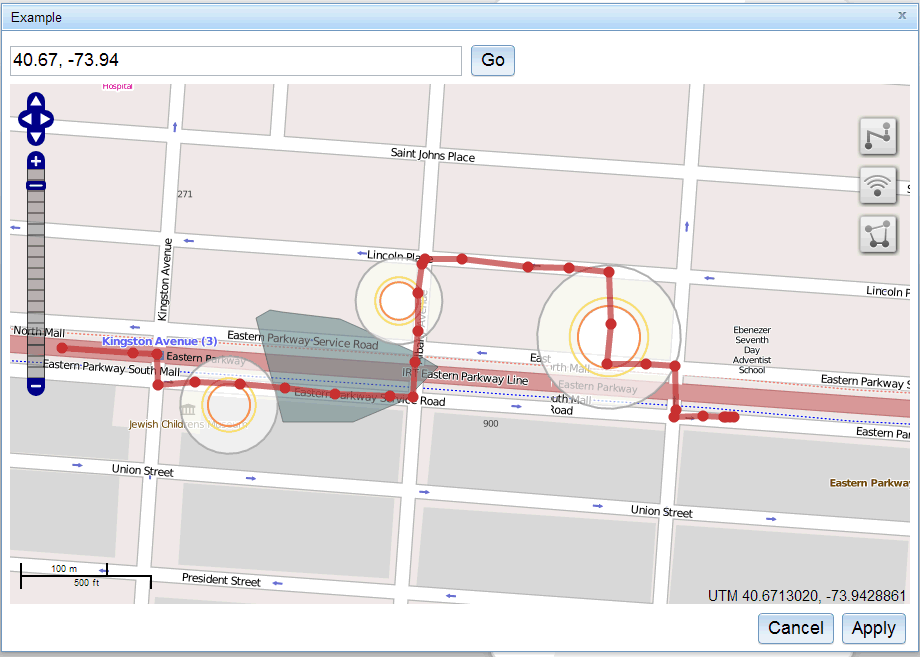
Enter a geolocation directly to move the map, or use the arrows to pan and +/- track to zoom.
- Click
 to define the path of the user.
- Click on the map to add each path point. Double-click to add the last point.
You can drag points to new locations. - Click on a point to set the user's arrival time to that point, or to delete the whole path.
- Click
 to add Wi-Fi access points.
- Click on the map and drag to set the area covered by the access point.
- Click an existing access point to change its SSID and MAC.
After clicking, drag to move or resize. - Click
 to add no-GPS zones.
- Click on the map to add each vertex of the zone. Double-click to add the last point.
After clicking an existing zone, you can drag to move, resize, or rotate.
When a scenario is played, the position of the user is displayed on the map ( ![]() ) and is automatically updated. The position that is available to the device is shown in the Geolocation widget (and does not change in a no-GPS zone).
) and is automatically updated. The position that is available to the device is shown in the Geolocation widget (and does not change in a no-GPS zone).
Wi-Fi access point visibility and signal strengths are automatically updated. You can see these updates in the Network widget.
You can import and export scenarios to support test reuse.
Location Services permissions in Android
Android Marshmallow requires user permissions to be granted at runtime. Since runtime code written in Javascript does not have access to the Android api, these permissions must be requested and checked by the native code before launching the Cordova Web Framework. The file [application name].java in the native folder is responsible for loading the web resources. The code for requesting and checking permissions for Location Services should be called within this file, for example in onInitWebFrameworkComplete.
public void onInitWebFrameworkComplete(WLInitWebFrameworkResult result) {
    if (result.getStatusCode() == WLInitWebFrameworkResult.SUCCESS) {
	    super.loadUrl(WL.getInstance().getMainHtmlFilePath());
    } else {
	    handleWebFrameworkInitFailure(result);
    }

    if (!(WLClient.getInstance().getContext().checkSelfPermission(android.Manifest.permission.ACCESS_FINE_LOCATION)== PackageManager.PERMISSION_GRANTED)) {
	    requestPermissions(new String[]{android.Manifest.permission.ACCESS_FINE_LOCATION}, 0);
    }
}
This code requests permission if the permission has not already been granted.
If the permission is not subsequently granted all requests for location services from the Web Framework will fail.
for more information, please refer to https://developer.android.com/preview/features/runtime-permissions.html
Sample application
Click to download the MobileFirst project.
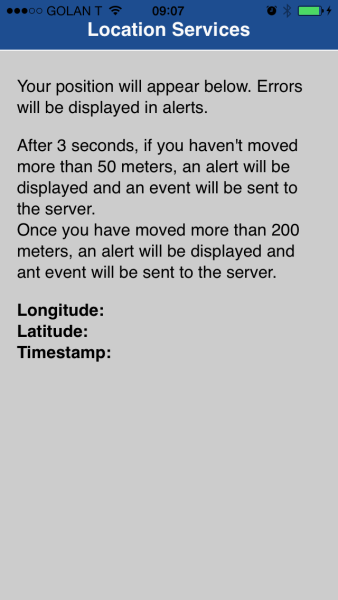
The LocationServices sample demonstrates:
- Acquiring an initial position
- Using a Geo profile
- Geo triggers for DwellInside, Exit area, and PositionChange
- Transmitting events to the server on DewllInside and Exit area
- Ongoing acquisition
Inclusive terminology note: The Mobile First Platform team is making changes to support the IBM® initiative to replace racially biased and other discriminatory language in our code and content with more inclusive language. While IBM values the use of inclusive language, terms that are outside of IBM's direct influence are sometimes required for the sake of maintaining user understanding. As other industry leaders join IBM in embracing the use of inclusive language, IBM will continue to update the documentation to reflect those changes.