Location services in native Android applications
improve this page | report issueThis tutorial covers the following topics:
- Architecture
- Acquisition policy
- Triggers
- Start acquisition
- Events
- Allowing access to Location Services
- Sample application
Architecture

The application code on the mobile device, in the form of an acquisition policy, controls the collection of data from device sensors.
The collected data is referred to as the device context.
When a change occurs in the device context, such as a change in the geolocation of the device or the fact that it entered a Wi-Fi zone, triggers can be activated.
Triggers specify that an action occurs: either a callback function is called, or an event is sent to the server, based on the device context.
Events are created by triggers and application code, and include a snapshot of the device context at the time of their creation.
Events are buffered on the client and are transmitted to the server periodically.
The server might process the event later.
During the event transmission process, the device context is synchronized transparently to the server.
To handle the events, the server uses adapter application code.
This code sets up event handlers on the server. These handlers filter event data and pass matching events to a callback function.
The code also accesses the client device context (its location and Wi-Fi network information) and sets an application context.
Server activities and received events are logged, together with the device and application contexts, for future reporting and analytics.
Acquisition policy
An acquisition policy defines how acquisition takes place.
WLAcquisitionPolicy policy = new WLAcquisitionPolicy();
Geo acquisition policy
To enable geolocation, make sure to update your AndroidManifest.xml file to enable the following permissions:
<uses-permission android:name="com.google.android.c2dm.permission.ACCESS_COARSE_LOCATION"/>
<uses-permission android:name="com.google.android.c2dm.permission.ACCESS_FINE_LOCATION"/>
Then in your Java code:
policy.setGeoPolicy(WLGeoAcquisitionPolicy.getLiveTrackingProfile());
LiveTracking is a preset profile that uses the most accurate settings to track the device.
Additional configuration options:
RoughTrackingPowerSaving- Custom settings
For more information, see the topic about setting an acquisition policy, in the user documentation.
Wi-Fi acquisition policy
To enable Wi-Fi tracking, make sure to update your AndroidManifest.xml file to enable the following permissions:
<uses-permission android:name="android.permission.ACCESS_WIFI_STATE"/>
<uses-permission android:name="android.permission.CHANGE_WIFI_STATE"/>
Then, in your Java code:
policy.setWifiPolicy(new WLWifiAcquisitionPolicy()
    .setInterval(10000)
    .setAccessPointFilters(
        Arrays.asList(
            new WLWifiAccessPointFilter("Net1"),
            new WLWifiAccessPointFilter("Net2","*")
        )
    )
);
The interval parameter is the polling interval, in milliseconds. Wi-Fi polling is performed at each interval.
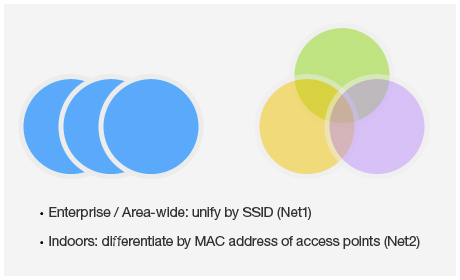
The accessPointFilters parameter lists access points of interest.
In the above example, the acquisition policy:
- Ignores everything except
Net1andNet2– Helpful in dynamic environments, such as mobile hotspots. - Considers all
Net1access points as one single access point. - Differentiates
Net2access points by MAC address.
For more information, see the topic about setting an acquisition policy, in the user documentation.
Triggers
You can set up triggers as follows:
- Geo/Wi-Fi fences:
Enter,Exit,Dwell Inside,Dwell Outside) - Movement: Geo:
PositionChange, Wi-Fi:VisibleAccessPointsChange - Wi-Fi:
Connect/Disconnect
WLTriggersConfiguration triggers = new WLTriggersConfiguration();
triggers.getGeoTriggers().put(
    "trigger1",
    new WLGeoEnterTrigger()
    .setArea(new WLCircle(new WLCoordinate(40.68917,-74.04444),100))
    .setCallback(libertyAtLast)
    .setEvent(new JSONObject().put("bring","me").put("your","huddledMasses"))
);
In the above example, trigger1 is an Enter trigger which is activated when the device enters the defined circle (longitude, latitude, and radius).
When a trigger activates, it can call a callback function and/or create an event to be sent to the server.
For more information, see the topic about triggers, in the user documentation.
Start acquisition
Use the policy and triggers defined above to start the acquisition.
WLLocationServicesConfiguration config = new WLLocationServicesConfiguration();
config.setPolicy(policy);
config.setTriggers(triggers);
WLClient.getInstance().getWLDevice().startAcquisition(config);
Events
Client side
Events are generated by triggers, as explained in section Triggers.
.setEvent(new JSONObject().put("bring","me").put("your","huddledMasses"))
Events can also be generated manually by calls to the API:
WLClient.getInstance().transmitEvent(event,immediate)
Where the event parameter is a JSONObject and the immediate parameter is a boolean value.
Server side
In the adapter code, create event handler:
WL.Server.createEventHandler(filter, handlerFunction);
Events that match the filter value are passed to handlerFunction.
Filter examples:
{status: "platinum"}– Handle platinum members only{hotel: { country: "USA" } }– Hotels in the USA{}– All events
Register the event handlers:
WL.Server.setEventHandlers([...]);
For more information, see the topic about working with geofences and triggers, in the user documentation.
Allowing access to Location Services
Android 6.0 ("Marshmallow") introduced a new permissions model. Rather than defining permissions during installation users can now allow or disallow access to different features at runtime. The developer is now responsible to check whether permission has already been granted and request permission if needed before accessing location services (in addition of the manifest permission).
Before calling methods for accessing the GPS functionalities of the WLDevice interface check whether permissions have been requested and granted.
If permissions have not been requested or not granted, the MF API will fail to get a provider and return an error along with a message about the requested accuracy level.
Checking for permissions
Two levels of access permission are available from AndroidManifest.xml:
<android.Manifest.permission.ACCESS_FINE_LOCATION/>
<android.Manifest.permission.ACCESS_COARSE_LOCATION/>
Checking if permissions are granted
In the examples below and in the provided sample application, these methods are inherited by the MainActivity from the android.app.Activity class.
To check the status of the permissions call checkSelfPermission with the appropriate access level:
getContext().checkSelfPermission(android.Manifest.permission.ACCESS_FINE_LOCATION)
If permission has already been granted, this returns the value PackageManager.PERMISSION_GRANTED.
Asking for permissions
To ask the user for permission for the appropriate level of access use the inherited requestPermissions method:
requestPermissions(new String[]{Manifest.permission.ACCESS_FINE_LOCATION}, 0);
Calling this Android 6.0 ("Marshmallow") will shows the user a dialog box asking if the app can have permission and invoke onRequestPermissionsResult() when the choice is done.
Once this permission has been granted to the system startAcquisition, stopAcquisition, and acquireGeoPosition will be granted access to the location services.
For more information, please refer to android documentation: https://developer.android.com/preview/features/runtime-permissions.html.
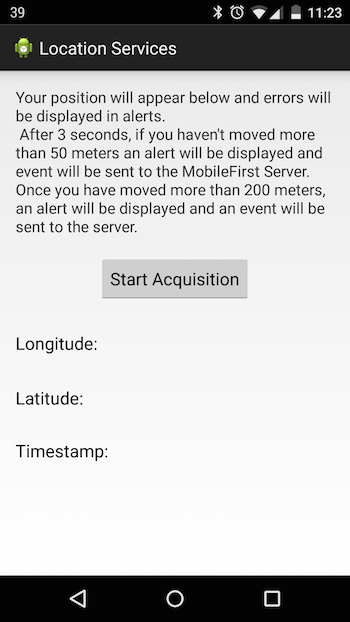
Sample application
Click to download the MobileFirst project.
Click to download the Native project.
The LocationServices sample demonstrates:
- Acquiring an initial position
- Using a Geo profile
- Using Geo triggers for DwellInside, Exit area, and PositionChange
- Transmitting event to the server on DwellInside and Exit area
- Ongoing acquisition
Inclusive terminology note: The Mobile First Platform team is making changes to support the IBM® initiative to replace racially biased and other discriminatory language in our code and content with more inclusive language. While IBM values the use of inclusive language, terms that are outside of IBM's direct influence are sometimes required for the sake of maintaining user understanding. As other industry leaders join IBM in embracing the use of inclusive language, IBM will continue to update the documentation to reflect those changes.