Configuring a native Android application with the MobileFirst Platform SDK
improve this page | report issueOverview
Unlike MobileFirst Hybrid applications, which get autogenerated with the MobileFirst JavaScript SDK built-in and are thus capable to communicate with the MobileFirst Server out-of-the-box, native apps are not bundled with the MobileFirst Native SDK by default.
In this tutorial, you learn how to add the MobileFirst Native SDK to a native Android application and set it up with additional required configuration files.
By using MobileFirst Native SDK, you can implement various features, such as: connecting to the MobileFirst Server instance, calling adapter procedures, implementing authentication methods, certificate pinning, using push notifications, and more.
For a request from a native app to be recognized by MobileFirst Server, the client application must be registered to the MobileFirst Server instance.
In this tutorial, you learn how to deploy the server-side entity for the native Android application.
Prerequisite
- Proficiency with the Google Android Studio
- If you haven't gone through the Command Line Interface tutorial, do so now.
Agenda
- Adding the MobileFirst Native SDK to an application
- Deploying the server-side entity to MobileFirst Server
- Inside a native application containing the MobileFirst Native SDK
- Tutorials to follow next
Adding the MobileFirst Native SDK to an application
The MobileFirst Native SDK can be added in several ways: from a remote MavenCentral repository, ensuring you always use the latest available version, or locally by using either MobileFirst Studio plug-in for Eclipse or the MobileFirst CLI tool. The preferred method is by using Jcenter, explained next. For the "Classic" local method, see the local method section.
- Create an Android Studio project or use an existing one.
- In Project > Gradle scripts, select build.gradle (Module: app).
- Add the following lines below
apply plugin: 'com.android.application':
repositories{ jcenter() } - Add the following inside
android:
packagingOptions { pickFirst 'META-INF/ASL2.0' pickFirst 'META-INF/LICENSE' pickFirst 'META-INF/NOTICE' } - Add the following lines inside
dependencies:
compile group: 'com.ibm.mobile.foundation', name: 'ibmmobilefirstplatformfoundation', version: '7.1.0.0', ext: 'aar', transitive: true - Add the following permissions to the
AndroidManifest.xmlfile:
<uses-permission android:name="android.permission.INTERNET"/> <uses-permission android:name="android.permission.ACCESS_WIFI_STATE"/> <uses-permission android:name="android.permission.GET_TASKS" /> - Add the MobileFirst UI activity:
<activity android:name="com.worklight.wlclient.ui.UIActivity" />
Deploying the server-side entity to MobileFirst Server
Now that the native application is set up with the MobileFirst Native SDK, it is also required that MobileFirst Server recognize it after the SDK is used in the application. For this, you need a MobileFirst Server instance and a MobileFirst project:
Creating a project and server instance
In Terminal, navigate to the location where you want to create the MobileFirst Backend project and run the following commands:
mfp create your-project-name-here
cd your-project-name
mfp start
After the project is created and the server is running, the server-side entity can be created and deployed to the server.
The next step adds the following files to the native project, as explained in Inside a native application containing the MobileFirst Native SDK: wlclient.properties, application-descriptor.xml, mobilefirst folder.
Deploying the server-side entity
- In Terminal, navigate to the root of the Android Studio project.
- Run the command:
mfp push
The command asks to which MobileFirst Server you want to deploy the artifacts and update thewlclient.propertiesfile accordingly with the server address. You can later edit these settings again manually if necessary. You can also edit the files by using the CLI commandmfp config.
Inside a native application containing the MobileFirst Native SDK
In addition to the reconfigured project, now containing the MobileFirst Native SDK, three artifacts were added:
wlclient.properties
The wlclient.properties file, located in the android-studio-project\app\src\main folder, holds server configuration properties and is user-editable:
wlServerProtocol– The communication protocol to MobileFirst Server, which can be eitherhttporhttps.wlServerHost– The hostname of MobileFirst Server.wlServerPort– The port of MobileFirst Server.wlServerContext– The context root path of the application on MobileFirst Server.wlAppId– The application ID as defined in theapplication-descriptor.xmlfile.wlAppVersion– The application version.wlEnvironment– The target environment of the native application.wlUid– The property used by MTWW, the test workbench, to identify this as a MobileFirst application.wlPlatformVersion– The MobileFirst SDK version.languagePreferences– The list of preferred locales.GcmSenderId– This property defines the Google Cloud Message (GCM) Sender ID to be used for push notifications. By default, this property is commented out.
Application descriptor
The application-descriptor.xml file, located at the root of the project, is a metadata file that is used to define various aspects of the application, such as user identity realms and push notifications support, security settings that MobileFirst Server enforces, and more.
mobilefirst folder
The mobilefirst folder, located at the root of the project contains .wlapp files. These are the server-side entities that are deployed to the MobileFirst Server.
Tutorials to follow next
Now that your application contains the Native API library, you can follow the tutorials in the Native Android Development section to learn more about authentication and security, server-side development, advanced client-side development, notifications and more.
"Classic" local method to add the MobileFirst Native SDK to an application
When using the local method, this means that the SDK files will be generated from the existing local resources in the installed version of MobileFirst Platform Foundation. In the "Classic" method, the SDK files are referred to as "NativeAPI". Follow the instructions below for either the MobileFirst Studio plug-in for Eclipse or MobileFirst CLI.
Using either Studio or CLI, create and deploy the NativeAPI server-side entity:
-
Studio
- In MobileFirst Studio, create a MobileFirst project and add a MobileFirst Native API.
- In the New MobileFirst Native API dialog, enter your application name and select Android for the Environment field.
- Right-click the generated NativeAPI folder (located in
your-projects/apps/your-nativeapi-app-name) and select Run As > Deploy Native API.
Note: This action is required for MobileFirst Server to recognize the application when a request reaches the server.
-
CLI
- In the terminal with the CLI installed, create a new MobileFirst project:
$ mfp create HelloWorldNative - Go to the newly created project directory:
$ cd HelloWorldNative/ - Add a new Android native API:
$ mfp add api AndroidHelloWorld -e android - navigate to the Android project and run the command:
$ mfp push.
This action is required for MobileFirst Server to recognize the application if it attempts to connect.
- In the terminal with the CLI installed, create a new MobileFirst project:
- Copy the
worklight-android.jar,uicandroid.jar,bcprov.jar, andandroid-async-http.jarfiles from the generated NativeAPI folder to the new native Android application, in the/libsdirectory. - [Android Studio only] Right-click any of the added
.jarfiles and select Add as library to add all libraries. - [Android Studio only] Create an
assetsfolder undersrc\main. - Copy the
wlclient.propertiesfile from the previously created MobileFirst native API folder to the new native Android application, in the/assetsdirectory. - Add the following permissions to the
AndroidManifest.xmlfile:<uses-permission android:name="android.permission.INTERNET"/> <uses-permission android:name="android.permission.ACCESS_WIFI_STATE"/> <uses-permission android:name="android.permission.GET_TASKS" /> - Add the MobileFirst UI activity:
<activity android:name="com.worklight.wlclient.ui.UIActivity" />
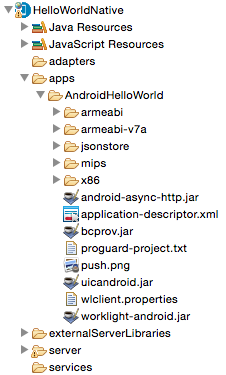
The NativeAPI contains the following components:
- The
wlclient.propertiesfile contains the connectivity settings that a native Android application uses. - The
worklight-android.jarfile is the MobileFirst API library. - The
push.pngfile is used for displaying an image for an incoming push notification. - The
proguard-project.txtfile contains configuration settings for using Android ProGuard with Android Native API. - The
JSONStorefolder is for optional JSONStore support in native applications. - The
armabi,armabi-v7a,mips, andx86folders are for application authenticity protection (optional) in native applications. - As with any MobileFirst project, you create the server configuration by modifying the files that are in the
server\conffolder. - You use the
application-descriptor.xmlfile to define application metadata and to configure security settings that MobileFirst Server enforces.
▲For more information, see the topic about developing native applications for Android, in the user documentation.
Inclusive terminology note: The Mobile First Platform team is making changes to support the IBM® initiative to replace racially biased and other discriminatory language in our code and content with more inclusive language. While IBM values the use of inclusive language, terms that are outside of IBM's direct influence are sometimes required for the sake of maintaining user understanding. As other industry leaders join IBM in embracing the use of inclusive language, IBM will continue to update the documentation to reflect those changes.