Configuring a native iOS application with the MobileFirst Platform SDK
improve this page | report issueOverview
Unlike MobileFirst Hybrid applications, which get autogenerated with the MobileFirst JavaScript SDK built-in, and can thus communicate with MobileFirst Server with no special customization, native apps are not bundled with the MobileFirst Native SDK by default.
In this tutorial, you learn how to add the MobileFirst Native SDK to a native iOS application and set it up with additional required configuration files.
With the MobileFirst Native SDK, you can implement various features, such as connecting to the MobileFirst Server instance, calling adapter procedures, implementing authentication methods, certificate pinning, using push notifications, and more.
For a request from a native app to be recognized by MobileFirst Server, the client application must be registered to the MobileFirst Server instance.
In this tutorial, you learn how to deploy the server-side entity for the native iOS application.
Prerequisites
- Proficiency with Apple Xcode IDE
- If you haven't gone through the Command Line Interface tutorial, do so now.
Note: The Keychain Sharing capability is mandatory while running iOS apps in the iOS Simulator when using Xcode 8. You need to enable this capability manually before building the Xcode project.
Topics
- Adding the MobileFirst Native SDK to an application
- Deploying the server-side entity to MobileFirst Server
- Inside a native application containing the MobileFirst Native SDK
- Configuring a Swift application
- Tutorials to follow next
Adding the MobileFirst Native SDK to an application
The MobileFirst Native SDK can be added using the following way:
- Locally: Use either the MobileFirst Studio plug-in for Eclipse or the MobileFirst CLI tool.
"Classic" local method to add the MobileFirst Native SDK to an application
If you use the local method, SDK files are generated from the existing local resources in the installed version of MobileFirst Platform Foundation. In the "Classic" method, the SDK files are referred to as "NativeAPI". Follow the instructions below for either the MobileFirst Studio plug-in for Eclipse or the MobileFirst CLI.
Using either Studio or CLI, create and deploy the NativeAPI server-side entity:
-
Studio
- In MobileFirst Studio, create a MobileFirst project and add a MobileFirst Native API.
- In the New MobileFirst Native API dialog, enter your application name and select iOS for the Environment field.
- Right-click the generated
NativeAPIfolder (located inyour-projects/apps/your-nativeapi-app-name) and select Run As > Deploy Native API.
This action is required for MobileFirst Server to recognize the application if it attempts to connect.
-
CLI
- Using the CLI, create a new MobileFirst project:
$ mfp create HelloWorldNative - Navigate to the newly created project directory:
$ cd HelloWorldNative/ - Add a new iOS native API:
$ mfp add api iOSHelloWorld -e ios - Navigate to the Xcode project and run the command:
$ mfp push.
Note: This action is required for MobileFirst Server to recognize the application if it attempts to connect.
- Using the CLI, create a new MobileFirst project:
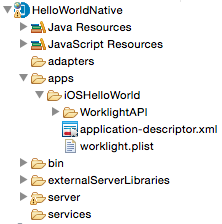
- Copy the files to the native iOS application:
- Copy the previously-created
WorklightAPIfolder and theworklight.plistfile from Eclipse or the CLI-generated folder to the root of the native project in Xcode.
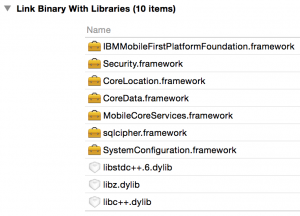
- In the Xcode Build Phases section, link the following libraries in your native iOS application:
- SystemConfiguration.framework
- MobileCoreServices.framework
- CoreData.framework
- CoreLocation.framework
- Security.framework
- SQLCipher.framework (from WorklightAPI/Frameworks)
- openssl.framework (from WorklightAPI/Frameworks)
- IBMMobileFirstPlatformFoundation.framework (from WorklightAPI/Frameworks)
- libstdc++.6.tbd
- libz.tbd
- libc++.tbd
- In Xcode Build Settings:
- In Framework Search Paths, add the following path:
$(SRCROOT)/WorklightAPI/Frameworks - In Other Linker Flags, add
-ObjC. - In the Deployment section, for the iOS Deployment Target field, select a value that is greater than, or equal to, 6.0.
- In Framework Search Paths, add the following path:
- Copy the previously-created
For more information, see the topics about developing native applications for iOS, in the user documentation.
Deploying the server-side entity to MobileFirst Server
Now that the native application is set up with the MobileFirst Native SDK, it is also required that MobileFirst Server recognize it after the SDK is used in the application. For this, a MobileFirst Server instance and a MobileFirst project are needed.
Creating a project and server instance
In Terminal, navigate to the location where you want to create the MobileFirst Backend project and run the following commands:
mfp create your-project-name-here cd your-project-name mfp start
After the project is created and the server is running, the server-side entity can be created and deployed to the server.
The next step adds the following files to the native directory, as explained in the next section: worklight.plist,
application-descriptor.xml, mobilefirst folder.
Make sure to add worklight.plist to your XCode project: Right-click the project and select Add Files To [ProjectName], select the worklight.plist, located in the root folder of the Xcode project.
Deploying the server-side entity
- In Terminal, navigate to the Xcode project.
- Run the command:
mfp push
The command asks to which MobileFirst Server instance you want to deploy the artifacts and update thewlclient.propertiesfile accordingly with the server address.An Interactive menu guides you, prompting you to provide the required values: application name, initial version number, and which bundle ID to use. You can edit these values again later in the
worklight.plistandapplication-descriptor.xmlfiles. You can also edit them by using the CLI commandmfp config.
Inside a native application containing the MobileFirst Native SDK
In addition to the reconfigured project, now containing the MobileFirst Native SDK, three artifacts were added: the worklight.plist file, the application descriptor, and the mobilefirst folder.
worklight.plist
The worklight.plist file, located at the root of the project, holds server configuration properties and is user-editable:
protocol– The communication protocol to MobileFirst Server, which is eitherhttporhttps.host– The hostname of the MobileFirst Server instance.port– The port of the MobileFirst Server instance.wlServerContext– The context root path of the application on the MobileFirst Server instance.application id– The application ID as defined in theapplication-descriptor.xmlfile.application version– The application version.environment– The target environment of the native application (“iOSnative”).wlUid– This property is used by Mobile Test Workbench (deprecated feature) to identify it as a MobileFirst application.wlPlatformVersion– The MobileFirst Studio version.
Application descriptor
The application-descriptor.xml file, located at the root of the project, is a metadata file that you use to define various aspects of the application, such as user identity realms and push notifications support, security settings that MobileFirst
Server enforces, and more.
The mobilefirst folder
The mobilefirst folder, located at the root of the project contains .wlapp files. These files are the server-side entities that are deployed to the MobileFirst Server.
Configuring a Swift application
Because Apple Swift is designed to be compatible with Objective-C, you can use the MobileFirst SDK from within an iOS Swift project, too.
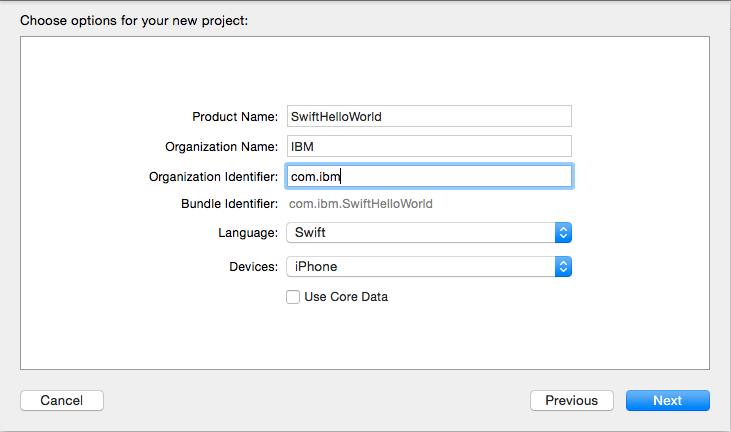
- Create a Swift project and follow the same steps, as described at the beginning of the tutorial, to install the MobileFirst SDK into an iOS native application.
-
Use
import IBMMobileFirstPlatformFoundationin any class that needs to use the MobileFirst SDK.
All the MobileFirst classes are now available from any of your Swift files.
XCode provides code autocompletion, converted to the Swift style.

Tutorials to follow next
Now that your application contains the Native API library, you can follow the tutorials in the Native iOS development category to learn more about authentication and security, server-side development, advanced client-side development, notifications, and more.
▲Inclusive terminology note: The Mobile First Platform team is making changes to support the IBM® initiative to replace racially biased and other discriminatory language in our code and content with more inclusive language. While IBM values the use of inclusive language, terms that are outside of IBM's direct influence are sometimes required for the sake of maintaining user understanding. As other industry leaders join IBM in embracing the use of inclusive language, IBM will continue to update the documentation to reflect those changes.