Integrating IBM MobileFirst Platform Foundation SDK in Cordova applications
improve this page | report issueOverview
You can use the IBM MobileFirst Platform Command Line Interface (CLI) to leverage MobileFirst features in Cordova applications. This is made possible by packaging the MobileFirst SDK as a plug-in for Cordova named cordova-plugin-mfp.
Use this tutorial as a guide to create Cordova applications by using the MobileFirst CLI, add supported platforms to the application, and add MobileFirst features and 3rd-party Cordova plug-ins.
The tutorial also explains the initialization flow of IBM MobileFirst Platform Foundation in a Cordova application, and how to register the application to MobileFirst Server.
Notes:
- MobileFirst CLI contains an instance of Cordova CLI v5.0.0, Android platform version 3.6.4, and iOS platform version 3.7.0. It is not possible to upgrade or replace these embedded versions. Therefore, it is not a requirement for you to install Cordova on your developer workstation.
- Only Android and iOS are supported for creating Cordova apps by using the MobileFirst CLI.
Topics
- Cordova CLI commands
- Creating a Cordova project
- Cordova project structure
- MobileFirst Platform initialization flow
- Previewing the application web resources
- Testing an application on an emulator or device
- Managing Cordova platforms
- Managing Cordova plug-ins
- Registering applications
- Supported MobileFirst features
- Sample application
Cordova CLI commands
You can create a Cordova-based project with the MobileFirst plug-in by using the MobileFirst CLI. For more information about downloading and using the MobileFirst CLI, see the Using CLI to create, build, and manage MobileFirst project artifacts tutorial.
To see a list of the available Cordova commands, open Terminal and run the following command: mfp cordova.
NAME
     mobilefirst cordova
SYNOPSIS
     mfp cordova <command> [options]
DESCRIPTION
     IBM MobileFirst Platform Command Line Interface (CLI) for Cordova specific
     actions.
     Specific help for each command is available. For example:
     mfp help cordova create
GLOBAL COMMANDS
     config .............................. View or alter configuration settings
PROJECT COMMANDS
     cordova create .............................. Creates a new Cordova project
     cordova emulate .................................. Emulates Cordova project
     cordova platform ................................ Manages project platforms
     cordova plugin .................................... Manages project plugins
     cordova prepare ............................... Prepares a Cordova project
     cordova preview ......................... Previews existing Cordova project
     cordova run .......................................... Runs Cordova project
COMMAND-LINE FLAGS/OPTIONS
     -v, --version ...............Prints out the version number of this utility
     -d, --debug ........................Debug mode produces a debug log output
     -dd, --ddebug ................... Debug mode produces a verbose log output
EXAMPLE USAGE
     $ mfp cordova create myapp --platform android
     $ cd myapp
     $ mfp cordova preview
     $ mfp cordova emulate --platform android
Creating a Cordova project
To create a Cordova application, run the command: mfp cordova create.
You can use either the Interactive Mode as detailed below, or the Direct Mode (see mfp help cordova create).
- Enter the application name, package ID, application version, and desired platforms:
- A default set of Cordova plug-ins, including
cordova-plugin-mfp, are automatically added to the application. You can also add additional standard Cordova plug-ins. - You can use an application template for your project. The CLI provides the default template cordova-hello-world-mfp. You can create your own repository of app templates to speed up your development process and point the path to the application template that you want to use.
- The Cordova project is generated with the selected platforms and plug-ins.
[?] Enter name of app: MyCordovaApp
[?] Enter the package ID: (com.ibm.MyCordovaApp)<
[?] Enter the app version: (1.0.0)
[?] Select platforms to be supported by your app: (Press <space> to select)
 ❯⬢ android
  ⬢ ios
[?] The following plugins are automatically added to your app:<br />
cordova-plugin-mfp
org.apache.cordova.device
org.apache.cordova.dialogs
org.apache.cordova.geolocation
org.apache.cordova.globalization
org.apache.cordova.inappbrowser
org.apache.cordova.network-information
Please press enter to continue...
[?] Select additional plugins you would like to add:
 ❯⬡ cordova-plugin-mfp-jsonstore
  ⬡ cordova-plugin-mfp-push
  ⬡ org.apache.cordova.battery-status
  ⬡ org.apache.cordova.camera
  ⬡ org.apache.cordova.console
  ⬡ org.apache.cordova.contacts
  ⬡ org.apache.cordova.device-motion
  ⬡ org.apache.cordova.device-orientation
  ⬡ org.apache.cordova.file
  ⬡ org.apache.cordova.file-transfer
  ⬡ org.apache.cordova.media
  ⬡ org.apache.cordova.media-capture
  ⬡ org.apache.cordova.splashscreen
  ⬡ org.apache.cordova.statusbar
  ⬡ org.apache.cordova.vibration
[?] Enter a path to an app template to be added: (cordova-hello-world-mfp)
To learn more about Cordova application templates, see the topic about developing Cordova client apps, in the user documentation.
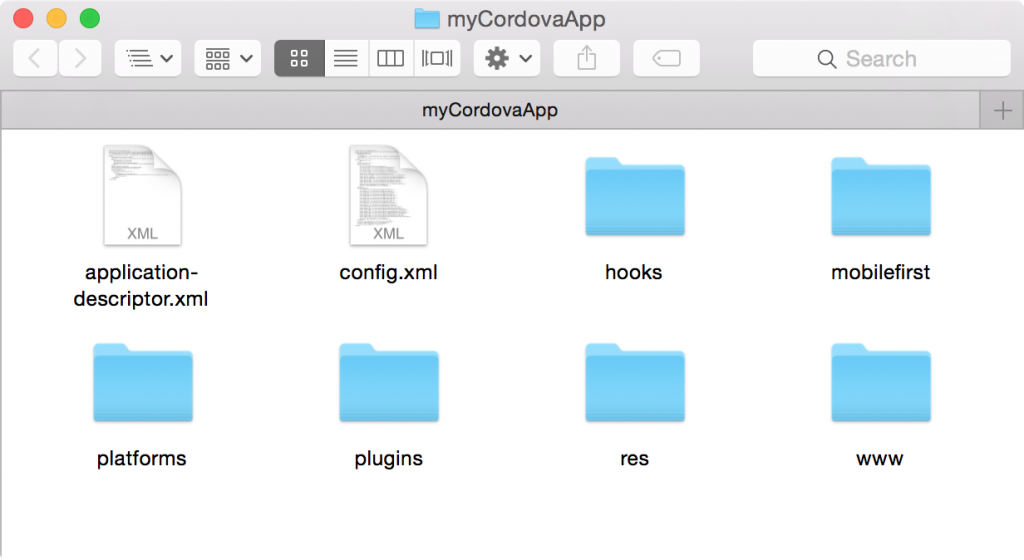
Cordova project structure
After the Cordova project is created, the following files and folders are generated. This project structure follows the standard Cordova project structure:
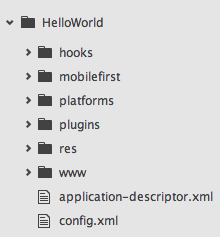
- application-descriptor.xml - Application metadata for MobileFirst
- config.xml - The Cordova configuration file with extended MobileFirst-related preferences
- hooks - The Cordova hooks folder
- mobilefirst - The folder that contains MobileFirst artifacts:
.wlappfiles that MobileFirst Server needs to recognize applications, as explained below - platforms - The folder that contains Cordova platforms support
- plugins - The folder that contains Cordova plug-ins
- www - The folder that contains the application web resources
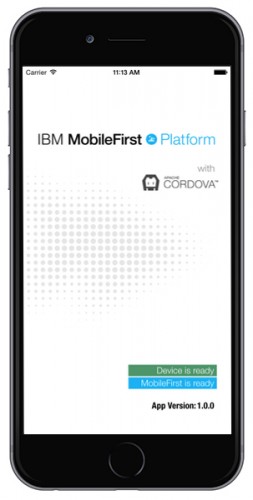
MobileFirst Platform initialization flow
The initialization flow is similar to the flow of a MobileFirst Hybrid app. During initialization, the MobileFirst Cordova Plugin runs WL.Client.init(wlInitOptions). After initialization completes, the function wlCommonInit() is called.
The wlInitOptions object and the wlCommonInit function are available inside the index.js file, which is part of the cordova-hello-world-mfp template. You can use the standard Cordova deviceready event to handle Cordova initialization, but the function wlCommonInit is the recommended way to identify that MobileFirst features are ready to be used.
var Messages = {
    // Add here your messages for the default language.
    // Generate a similar file with a language suffix containing the translated messages.
    // key1 : message1,
};
var wlInitOptions = {
    // Options to initialize with the WL.Client object.
    // For initialization options please refer to IBM MobileFirst Platform Foundation Knowledge Center.
};
// Called automatically after MFP framework initialization by WL.Client.init(wlInitOptions).
function wlCommonInit(){
	// Common initialization code goes here
    document.getElementById('app_version').innerText = WL.Client.getAppProperty("APP_VERSION");
    document.getElementById('mobilefirst').setAttribute('style', 'display:block;');
}
var app = {
    // Application Constructor
    initialize: function() {
        this.bindEvents();
    },
    // Bind any events that are required on startup. Common events are:
    // 'load', 'deviceready', 'offline', and 'online'.
    bindEvents: function() {
        document.addEventListener('deviceready', this.onDeviceReady, false);
    },
    // The scope of 'this' is the event. In order to call the 'receivedEvent'
    // function, 'app.receivedEvent(...);' must be explicitly called.
    onDeviceReady: function() {
        app.receivedEvent('deviceready');
    },
    // Update the DOM on a received event.
    receivedEvent: function(id) {
        var parentElement = document.getElementById(id);
        var listeningElement = parentElement.querySelector('.listening');
        var receivedElement = parentElement.querySelector('.received');
        listeningElement.setAttribute('style', 'display:none;');
        receivedElement.setAttribute('style', 'display:block;');
        console.log('Received Event: ' + id);
    }
};
<p>app.initialize();
Previewing the applications web resources
You might want to preview the web resources of your application outside any specific platform, for example to debug common JavaScript logic.
Before you can preview application web resources, you must have a MobileFirst Development Server running. If a MobileFirst Server instance is not yet available, use the mfp create command to setup a new MobileFirst back-end project, followed by the mfp start command to initialize MobileFirst Server.
mfp create MyMFPProject
cd MyMFPProject
mfp start
When previewing the Cordova app, you can make selections by using either the MobileFirst Operations Console Simple Browser Rendering, or Mobile Browser Simulator.
After MobileFirst Server is started, navigate to the Cordova application folder and use the mfp cordova preview command to preview the application:
mfp cordova preview
[?] Select how to preview your app: (Use arrow keys)
❯ browser: Simple browser rendering
  mbs: Mobile Browser Simulator
[?] Select platform(s) to be previewed: (Press <space> to select)
❯⬡ ios
 ⬡ android
Testing an application on an emulator or device
To run the application by using the Android Emulator or the iOS Simulator, use the emulate command:
mfp cordova emulate
Alternately, you can plug a device into your computer and test the app directly on it by using the run command:
mfp cordova run
Note: If you do not have a device plugged and execute the run command, this command starts an emulator/simulator, so that the behavior is the same as that of the emulate command.
[?] What platforms do you want to run on? (Use arrow keys)
   android
 ❯ ios
Managing Cordova platforms
You can manage the available platforms in the Cordova project by using the platform command: mfp cordova platform [option].
- Add a new platform to Cordova app:
mfp cordova platform add
mfp cordova platform add< [?] Select platforms to be supported by your app: (Press <space> to select) ❯⬡ android ⬡ ios - List available platforms in Cordova app:
mfp cordova platform list
mfp cordova platform list Installed Platforms: ios 3.7.0 Available Platforms: android - Remove a platform:
mfp cordova platform remove
mfp cordova platform remove [?] Select the configured platform(s) to remove from this app: (Press <space> to select) ❯⬡ ios 3.7.0 - Update Cordova assets for each platform in Cordova app:
mfp cordova platform update
Managing Cordova plug-ins
You can manage the plug-ins used in the Cordova project by running the command:
mfp cordova plugin [option]
- Add
[?] Select plugins(s) to be added to your app: (Press <space> to select) ❯⬡ cordova-plugin-mfp-jsonstore ⬡ org.apache.cordova.battery-status ⬡ org.apache.cordova.camera ⬡ org.apache.cordova.console ⬡ org.apache.cordova.contacts ⬡ org.apache.cordova.device-motion ⬡ org.apache.cordova.device-orientation ⬡ org.apache.cordova.file ⬡ org.apache.cordova.file-transfer ⬡ org.apache.cordova.media ⬡ org.apache.cordova.media-capture ⬡ org.apache.cordova.splashscreen ⬡ org.apache.cordova.statusbar ⬡ org.apache.cordova.vibration ⬡ Add 3rd party plugin - List
cordova-plugin-mfp 7.1.0 "IBM MobileFirst Platform Foundation" org.apache.cordova.device 0.2.13 "Device" org.apache.cordova.dialogs 0.2.11 "Notification" org.apache.cordova.geolocation 0.3.11 "Geolocation" org.apache.cordova.globalization 0.3.3 "Globalization" org.apache.cordova.inappbrowser 0.5.4 "InAppBrowser" org.apache.cordova.network-information 0.2.14 "Network Information" - Remove
mfp cordova plugin remove org.apache.cordova.camera - Search
mfp cordova plugin search barcode - Update
mfp cordova plugin update
Registering applications
Registering applications to a local development server
The mfp push command is used to register client applications and deploy required application and adapter assets to MobileFirst Server.
mfp push
If you are previewing an app in the Browser, you can refresh the browser after the push command to preview the new version pushed.
Registering applications to a remote development server
It is also possible to register an application to an existing remote MobileFirst Server, such as a QA, UAT, preproduction or production server. The mfp push command can be used with the remote server name specified.
Create a remote server definition by using the command: mfp server add.
You are prompted to provide a name, a fully qualified server address (protocol://host-or-ip-address:port), admin username and password, and additional details.
mfp server add
[?] Enter name of new server definition: myserver
[?] Enter the fully qualified URL of this server: http://192.168.0.1:10080
[?] Enter the MFP admin login id: admin
[?] Enter the MFP admin password: *****
[?] Save admin password for this server?: No
[?] Enter the context root of the MobileFirst administration services: worklightadmin
[?] Make this server the default?: (Y/n) n
To push to the newly defined remote server, run the command: mfp push myserver.
The push command connects to the server and retrieves the list of available back-end projects to be selected.
After pushing an application to the remote server, the application configuration (worklight.plist/wlclient.properties, config.xml files) are updated to point to the remote server as the back-end server for the app.
By default, the mfp push command points to a local development server. Use mfp server info to list all defined servers and default servers.
To learn more, see the Using CLI to create, build, and manage MobileFirst project artifacts tutorial.
Supported MobileFirst features
Not all MobileFirst features are currently supported by the MobileFirst SDK in Pure Cordova applications.
Supported features
- Direct Update
- Push Notifications
- JSONStore
- 3rd-party Cordova plug-ins
Note: 3rd-party plug-ins are plug-ins that are developed outside the Apache Cordova core plugins.
IBM provides customer support for the core plug-ins provided by Apache Cordova.
IBM does not provide customer support for 3rd-party Cordova plug-ins. Support for these plug-ins is provided by their developers.
Unsupported features
- FIPS 140-2
- Tealeaf
- Cloudant
- Shell applications
- Swappable Cordova CLI and platform versions
- Swappable WebViews (CrossWalk)
For more details about what features are supported by MobileFirst Cordova plug-in, see the product user documentation.
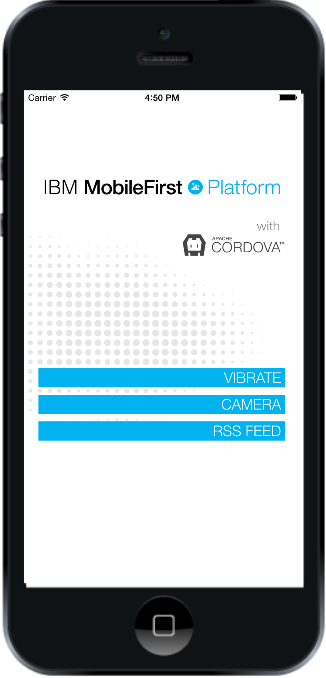
Sample application
Click to download the MobileFirst project.
The provided Cordova application contains a single screen with three buttons which exemplify possible uses of Cordova plug-ins and MobileFirst features:
- The VIBRATE button uses the Cordova plug-in
org.apache.cordova.vibrationto make the device vibrate. - The CAMERA button opens the device camera and presents the picture taken.
- The RSS FEED button uses a MobileFirst adapter to retrieve data from a RSS feed and presents an alert message with the total of topics obtained from the feed.
Running the sample
- Download and extract the sample
.zipfile. - From the command line, navigate to the
RSSAdapterfolder and run the commandmfp startto start the MobileFirst Server. - Navigate to the
CordovaAppfolder and run the following commands:mfp cordova platform add, then follow the interactive instructions to add the iOS and Android platformsmfp cordova plugin add
, then select the
cordova-plugin-mfp, org.apache.cordova.camera and org.apache.cordova.vibration plugins
mfp push- Run the application by using the command
mfp cordova runand follow the interactive instructions to select the device to run. If no device is present, an emulator is used instead.
to register the Cordova application in the MobileFirst Server
Building the sample step by step
Follow these instructions to implement the sample application.
-
Create the Cordova application
-
Add the Vibration and Camera Plug-ins
-
Edit the index.html file
-
Edit the index.css file
Edit the file
your-app-name/www/css/index.cssto update the visual of the app.body { position: absolute; height: 100%; width: 100%; text-align: right; font-family: "HelveticaNeue-Light", "Helvetica Neue Light", "Helvetica Neue", Helvetica, Arial, "Lucida Grande", sans-serif; font-weight: 300; background: url(../img/bg-portrait.png); background-size: cover; background-repeat: no-repeat; overflow: auto; } body, p, div{ margin: 0; } p { padding-right: 5px; } div { position: relative; margin-right: 20px; margin-left: 20px; padding-right: 2px; clear: both; display:block; } a{ display:block; font-size: 20px; text-transform: none; background-color:#00B2EF; color:#FFFFFF; margin-bottom: 10px; margin-top: 2px; padding-right: 5px; } li { font-size:15px; border-bottom: 1px solid #ccc; text-align: center; } .version_label { font-weight: bold; background-color:#FFFFFF; } #app_version { padding-left: 2px; } #deviceready { width: 160px; } #image{ width: 140px; } #menu { top: 50%; } #div_rss{ display: none; text-align: center; } .blink { animation:fade 3000ms infinite; -webkit-animation:fade 3000ms infinite; -moz-animation:fade 3000ms infinite; } @-webkit-keyframes fade { from { opacity: 1.0; } 50% { opacity: 0.4; } to { opacity: 1.0; } } @keyframes fade { from { opacity: 1.0; } 50% { opacity: 0.4; } to { opacity: 1.0; } } .event { color:#FFFFFF; } .listening { background-color:#333333; display:block; } .received { background-color:#4B946A; display:none; } /* Landscape layout (with min-width) */ @media screen and (min-aspect-ratio: 1/1) and (min-width:400px) { body { background: url(../img/bg-landscape.png); background-size: cover; background-repeat: no-repeat; max-height: 400px; } } -
Edit the index.js file
- For the VIBRATE button, use the function
navigator.vibrate(time)to trigger the vibration. - For the CAMERA button, use the function
navigator.camera.getPicture(onSuccess,onFailure,options)to open the camera. - For the RSS FEED button, use the
WLResourceRequestAPI method to call the adapter proceduregetStories, as described in the Invoking adapter procedures from hybrid client applications tutorial. -
Create a MobileFirst Project and adapter
For the RSS feed, it is necessary to create a MobileFirst adapter procedure that returns a JSON object containing a retrieved data.
- Change to a different folder (outside of the Cordova project) and create a MobileFirst back-end project by using the
mfp create MFPServercommand.This command creates a MobileFirst project inside the
MFPServerfolder. - Navigate into the
MFPServerfolder and create the new HTTP adapter by runnin themfp add adapter RSSAdapter -t httpcommand. This command creates the RSS adapter inside theMFPServer/adapters/RSSAdapterfolder. The HTTP adapter contains a sample procedure namedgetStorieswhich retrieves data from the CNN RSS feed. - Start the MobileFirst Server with the
mfp startcommand. The new adapter is pushed to the server during the server initialization.
You can test the
getStoriesprocedure with themfp adapter call RSSAdapter/getStoriescommand.Note: For more details about HTTP adapters, see the JavaScript HTTP Adapter tutorial.
- Change to a different folder (outside of the Cordova project) and create a MobileFirst back-end project by using the
-
Run the app
- Navigate back to the application folder.
- Register the Cordova application to the MobileFirst Server with the command
mfp push. - Execute the application with the command
mfp cordova run. - Follow the interactive instructions to select the device or emulator to run.
Create a Cordova project by running the mfp cordova create command. Provide a name for it, and accept all the other default values. The application folder is created, with the default application template.
To add the Cordova Vibration and Camera plug-ins to the Cordova project, run the following commands:
mfp cordova plugin add org.apache.cordova.vibration
mfp cordova plugin add org.apache.cordova.cameramfp cordova plugin add and select the vibration and camera plugins from the list presented.
Edit the your-app-name/www/index.html file to add the three buttons: VIBRATE, CAMERA, and RSS FEED, a list to present the results from RSS FEED, and an image to present the result from the camera plug-in:
<body>
    <div id="menu" >
        <img alt="missing_alt" id="image" />
        <a onclick="app.vibrate()">VIBRATE</a>
        <a onclick="app.getPicture()">CAMERA</a>
        <a onclick="app.getRSSFeed()">RSS FEED</a>
        <div id="div_rss">
            <h1>RSS FEED ITEMS</h1>
            <ul id="list_rss"></ul>
        </div>
    </div>
</body>
Edit the file your-app-name/www/js/index.js to implement the behavior of the buttons.
var Messages = {
    // Add here your messages for the default language.
    // Generate a similar file with a language suffix containing the translated messages.
    // key1 : message1,
};
var wlInitOptions = {
    // Options to initialize with the WL.Client object.
    // For initialization options please refer to IBM MobileFirst Platform Foundation Knowledge Center.
};
// Called automatically after MFP framework initialization by WL.Client.init(wlInitOptions).
function wlCommonInit(){
	// Common initialization code goes here
    document.getElementById('menu').setAttribute('style', 'display:block;');
}
var app = {
    // Application Constructor
    initialize: function() {
        this.bindEvents();
    },
    // Bind any events that are required on startup. Common events are:
    // 'load', 'deviceready', 'offline', and 'online'.
    bindEvents: function() {
        document.addEventListener('deviceready', this.onDeviceReady, false);
    },
    // The scope of 'this' is the event. In order to call the 'receivedEvent'
    // function, 'app.receivedEvent(...);' must be explicitly called.
    onDeviceReady: function() {
        app.receivedEvent('deviceready');
    },
    // Update the DOM on a received event.
    receivedEvent: function(id) {
    },
    // Trigger the vibration
    vibrate: function(){
        WL.Logger.info("vibrating");
        navigator.vibrate(3000);
    },
    // Trigger the camera
    getPicture: function(){
        navigator.camera.getPicture(app.getPictureSuccess, app.getPictureFail, { quality: 50,
            destinationType: Camera.DestinationType.FILE_URI });
    },
    // Receive the result from the camera
    getPictureSuccess: function(imageURI){
        WL.Logger.info("getPicture success "+imageURI);
        document.getElementById("image").src=imageURI;
    },
    // Called when some error occur with the camera
    getPictureFail: function(){
        WL.Logger.error("getPicture failed");
    },
    // Execute a request to RSSAdapter/getStories
    getRSSFeed: function(){
        var resourceRequest = new WLResourceRequest(
                    "/adapters/RSSAdapter/getStories",
                    WLResourceRequest.GET);
        resourceRequest.send().then(app.getRSSFeedSuccess,app.getRSSFeedError);
    },
    // Receive the response from RSSAdapter
    getRSSFeedSuccess:function(response){
        WL.Logger.info("getRSSFeedsSuccess");
        //The response.responseJSON element contains the data received from the back-end
        alert("Total RSS Feed items received:"+response.responseJSON.rss.channel.item.length);
    },
    // Called when some error occurs during the request to RSSAdapter
    getRSSFeedError:function(response){
        WL.Logger.error("Response ERROR:"+JSON.stringify(response));
        alert("Response ERROR:"+JSON.stringify(response));
    }
};
app.initialize();
Inclusive terminology note: The Mobile First Platform team is making changes to support the IBM® initiative to replace racially biased and other discriminatory language in our code and content with more inclusive language. While IBM values the use of inclusive language, terms that are outside of IBM's direct influence are sometimes required for the sake of maintaining user understanding. As other industry leaders join IBM in embracing the use of inclusive language, IBM will continue to update the documentation to reflect those changes.