Client X.509 Certificate Authentication and User Enrollment
improve this page | report issueOverview
The X.509 User Certificate Authentication feature is a user realm that establishes user identity with a X.509 client certificate. The user identity is established for a particular user on a specific device and application.
This feature provides SSL client-side certificate authentication and user enrolment capabilities. SSL client-side certificate authentication consists of establishing a two-way SSL handshake the between MobileFirst client and server which, in turn, enables the client and server both to present their identities and therefore establish mutual trust through the SSL/TLS protocol.
You can enrol new users to the MobileFirst Platform Mobile Application Management system and your PKI of choice with the user enrolment capabilities. A basic embedded PKI is provided with this feature which is meant to get you started quickly for educational and non-production environments only. For production environments, this feature makes it easy to integrate with your existing PKI. You can use either the PKI Bridge Java interface or built-in MobileFirst adapters to delegate certificate management functions down to an external PKI system.
In this tutorial, you learn how to enable and configure the User Certificate Authentication.
Agenda:
- Prerequisites
- Understanding how user certificate authentication works
- X.509 certificate and certificate authorities (CAs)
- Configuring IBM WebSphere Application Server Liberty profile (Liberty)
- Configuring the authenticationConfig.xml file
- Configuring the application-descriptor.xml file
- Installing the root CA on iOS and Android
- Installing and testing the application
- Sample application
Prerequisites
You must have a general understanding of MobileFirst user realms and adapters.
It is assumed that you follow these instructions by using an application that currently supports form-based authentication.
- The form-based authentication module uses non-validating login modules. These login modules are not recommended for production environments
- Use other user authentication realms, like WASLTPA in production.
Understanding how user certificate authentication works
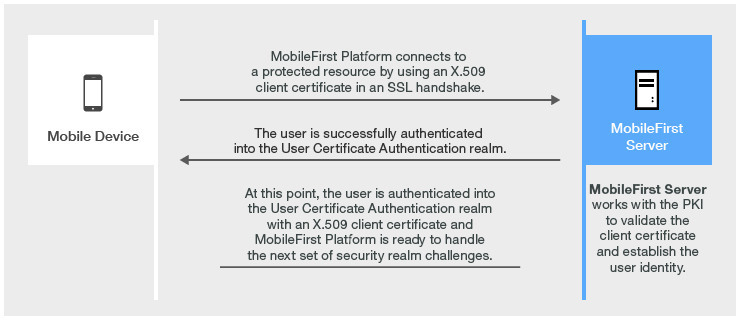
User certificate authentication is the process in which a X.509 certificate is issued by an existing PKI through the MobileFirst server to a specific user on a specific application and device. The relevant user information is obtained during the user enrolment process with the specified dependent user realm.
The user enrolment process relies on a dependent user realm to help it establish the initial user identity to which the X.509 certificate is issued.
IBM MobileFirst Platform Foundation then provisions the device with the X.509 client certificate for use in subsequent connections to the server.
The first time a user connects to the MobileFirst server, that user must authenticate through the dependent realm to initiate the enrolment process. After a user is enrolled into the User Certificate Authentication realm, subsequent connections to the server occur through the two way SSL/TLS handshake, where the client certificate is presented as the SSL client entity.
User enrollment flow

Client certificate authentication flow
X.509 certificate and certificate authorities (CAs)
For security reasons, during testing, it is not recommended to use an established CA that uses an embedded PKI in your infrastructure. It is possible to create a self-signed CA that can sign both a server certificate and user certificates.
This module uses the OpenSSL command-line utility.
OpenSSL is included in most Linux distributions and in Mac OS X. Windows users can obtain an OpenSSL binary from the OpenSSL website.
The commands that are shown in this module work on Linux and Mac OS X. For Windows, use the equivalent MS-DOS commands.
Create an OpenSSL configuration file
- Create an empty directory and navigate to that path in your system terminal.
- Create a basic OpenSSL configuration file that is named
openSSL.cnf. - Move this file to the directory that you created.
If you want different policy requirements, see the OpenSSL configuration documentation for instructions on how to configure the various options.
openSSL.cnf sample file:
[ req ]
    default_bits           = 2048                      # size of keys
    default_keyfile        = key.pem                   # name of generated keys
    default_md             = sha1                      # message digest algorithm
    string_mask            = nombstr                   # permitted characters
    distinguished_name     = req_distinguished_name

[ req_distinguished_name ]
0.organizationName = Organization Name (company)
organizationalUnitName = Organizational Unit Name (department, division)
emailAddress = Email Address
emailAddress_max = 40
localityName = Locality Name (city, district)
stateOrProvinceName = State or Province Name (full name)
countryName = Country Name (2-letter code)
countryName_min = 2
countryName_max = 2
commonName = Common Name (hostname, IP, or your name)
commonName_max = 64

[ policy_match ]
countryName                  = optional
stateOrProvinceName          = optional
localityName                 = optional
organizationName             = optional
organizationalUnitName       = supplied
commonName                   = optional
emailAddress                 = optional
Create a root CA
Append the following section to the openSSL.cnf configuration file to set up the root CA requirements.
[ root_authority ]
basicConstraints          = CA:TRUE
subjectKeyIdentifier      = hash

[ root_authority_ca_config ]
dir                = ./rootca
certs              = $dir/certs
new_certs_dir      = $dir/newcerts
database           = $dir/index.txt
certificate        = $dir/root_ca.crt
private_key        = $dir/root_ca_key.pem
serial             = $dir/serial
RANDFILE           = $dir/.rand
policy             = policy_match
- Create the folder structure and requirements for the root CA:
- Create a root CA certificate directory structure:
mkdir rootca mkdir rootca/certs rootca/crl rootca/newcerts touch rootca/serial export HEXOUT=0123456789ABCDEF - Create a serial list of random numbers:
for y in {1..2048}
do
export output="";
for i in {1..16}
do
    export randomnum=$RANDOM%16;
    export output=$output${HEXOUT:$randomnum:1};
done
echo "$output" >> rootca/serial
done
touch rootca/index.txt
- Create a root CA certificate directory structure:
- Generate an RSA key pair and then self-sign a root CA certificate:
The password must remain secure, even for a test environment. For the following example, the password is passRoot.- Create the RSA key pair:
The parameter, 2048, represents the key length.
openssl genrsa -des3 -out rootca/root_ca_key.pem -passout pass:passRoot 2048 - Sign a certificate with the key pair:
export ROOT_CA_SUBJECT="Development Root CA"
openssl req -new -x509 -nodes -sha1 -days 365 -key rootca/root_ca_key.pem -out rootca/root_ca.crt -config openssl.cnf -subj "/CN=$ROOT_CA_SUBJECT" -extensions root_authority -passin pass:passRoot
- Create the RSA key pair:
- Create the folder structure and requirements for the root CA:
- Create a root CA certificate directory structure:
MKDIR rootca MKDIR rootca\certs MKDIR rootca\crl MKDIR rootca\newcerts - Create a serial list of random numbers:
openssl rand -hex -out rootca\serial 8 - Create an index for the root CA:
COPY NUL rootca\index.txt
- Create a root CA certificate directory structure:
- Generate an RSA key pair and then self-sign a root CA certificate:
The password must remain secure, even for a test environment. For the following example, the password is passRoot.- Create the RSA key pair:
The parameter, 2048, represents the key length.
openssl genrsa -des3 -out rootca\root_ca_key.pem -passout pass:passRoot 2048 - Sign a certificate with the key pair:
openssl req -new -x509 -nodes -sha1 -days 365 -key rootca\root_ca_key.pem -out rootca\root_ca.cert -config openssl.cnf -subj "/CN=Development Root CA" -extensions root_authority -passin pass:passRoot
- Create the RSA key pair:
Create a signing CA
To set up the signing CA configuration options, edit the openssl.conf file that you created earlier and append the following configuration:
[ signing_authority ]
basicConstraints            = CA:TRUE,pathlen:0
subjectKeyIdentifier        = hash
authorityKeyIdentifier      = keyid:always, issuer:always

[ signing_authority_ca_config ]
dir            = ./signingca
certs          = $dir/certs
new_certs_dir  = $dir/newcerts
database       = $dir/index.txt
certificate    = $dir/signing_ca.crt
private_key    = $dir/signing_ca_key.pem
serial         = $dir/serial
RANDFILE       = $dir/.rand
policy         = policy_match
email_in_dn    = false
- Create the folder structure and requirements for the signing CA:
Run these commands from the base directory.- Create a signing CA certificate directory structure:
mkdir signingca mkdir signingca/certs signingca/crl signingca/newcerts touch signingca/serial export HEXOUT=0123456789ABCDEF - Create a serial list of random numbers:
for y in {1..2048}
do
export output="";
for i in {1..16}
do
    export randomnum=$RANDOM%16;
    export output=$output${HEXOUT:$randomnum:1};
done
echo "$output" >> signingca/serial
done
touch signingca/index.txt
- Create a signing CA certificate directory structure:
- Generate an RSA key pair and then sign a signing CA CSR with the root CA:
For this example, the password is passSigning.export SIGNING_CA_SUBJECT="Development Signing CA" openssl genrsa -des3 -out signingca/signing_ca_key.pem -passout pass:passSigning 2048 openssl req -new -key signingca/signing_ca_key.pem -out signingca/signing_ca.csr -config openssl.cnf -subj "/CN=$SIGNING_CA_SUBJECT" -passin pass:passSigning openssl ca -in signingca/signing_ca.csr -out signingca/signing_ca.crt -keyfile rootca/root_ca_key.pem -cert rootca/root_ca.crt -config openssl.cnf -name root_authority_ca_config -extensions signing_authority -md sha512 -days 365 -passin pass:passRoot
- Create the folder structure and requirements for the signing CA:
Run these commands from the base directory.- Create a signing CA certificate directory structure:
MKDIR signingca MKDIR signingca\certs MKDIR signingca\crl MKDIR signingca\newcerts - Create a serial list of random numbers for the signing CA:
openssl rand -hex -out signingca\serial 8 - Create index for signing CA:
COPY NUL signingca\index.txt
- Create a signing CA certificate directory structure:
- Generate an RSA key pair and then sign a signing CA CSR with the root CA.
For this example, the password is passSigning. Run these commands from the base directory.openssl genrsa -des3 -out signingca\signing_ca_key.pem -passout pass:passSigning 2048 openssl req -new -key signingca\signing_ca_key.pem -out signingca\signing_ca.csr -config openssl.cnf -subj "/CN=Development Signing CA" -passin pass:passSigning openssl ca -in signing_ca.csr -out signingca\signing_ca.crt -keyfile rootca\root_ca_key.pem -cert rootca\root_ca.crt -config openssl.cnf -name root_authority_ca_config -extensions signing_authority -md sha512 -days 365 -passin pass:passRoot
Create a server certificate
Edit the openssl.cnf file that you created earlier and append the following configuration to set up the server certificate configuration options.
[ server_identity ]
basicConstraints        = CA:TRUE
subjectKeyIdentifier    = hash
authorityKeyIdentifier  = keyid:always;issuer:always
- Generate an RSA key pair and sign the new certificate with the signing CA:
This certificate is your server identity certificate. The example uses passServer as the password. Run these commands from the base directory.- Use the full host name of your MobileFirst Platform server (if you don't provide a full host name or use an IP address - SSL will break):
export SERVER_FULL_HOSTNAME=dev.yourcompany.com mkdir server - Create the RSA key pair and generate a CSR:
openssl genrsa -des3 -out server/server_key.pem -passout pass:passServer 2048 openssl req -new -key server/server_key.pem -out server/server.csr -config openssl.cnf -subj "/CN=$SERVER_FULL_HOSTNAME" -passin pass:passServer - Sign the CSR with the signing CA:
openssl ca -in server/server.csr -out server/server.crt -keyfile signingca/signing_ca_key.pem -cert signingca/signing_ca.crt -config openssl.cnf -name signing_authority_ca_config -extensions server_identity -md sha512 -days 365 -passin pass:passSigning
- Use the full host name of your MobileFirst Platform server (if you don't provide a full host name or use an IP address - SSL will break):
- Generate an RSA key pair and sign the new certificate with the signing CA:
This certificate is your server identity certificate. The example uses passServer as the password. Run these commands from the base directory.- Use the full host name of your MobileFirst Platform server (if you don't provide a full host name or use an IP address - SSL will break):
REM mkdir server - Create the RSA key pair and generate a CSR:
REM openssl genrsa -des3 -out server\server_key.pem -passout pass:passServer 2048 openssl req -new -key server\server_key.pem -out server\server.csr -config openssl.cnf -subj "/CN=%HOSTNAME%" -passin pass:passServer - Sign the CSR with the signing CA:
REM openssl ca -in server\server.csr -out server\server.crt -keyfile signingca\signing_ca_key.pem -cert signingca\signing_ca.crt -config openssl.cnf -name signing_authority_ca_config -extensions server_identity -md sha512 -days 365 -passin pass:passSigning
- Use the full host name of your MobileFirst Platform server (if you don't provide a full host name or use an IP address - SSL will break):
Create a certificate chain for the server certificate
- Send a full certificate chain all the way up to the trust anchor (root CA) for iOS and Android environments:
You can concatenate the certificate files to the trust anchor (root CA).- Create a chain for the signing CA:
cat signingca/signing_ca.crt rootca/root_ca.crt > signing_ca_chain.crt - Create a chain for the server certificate:
cat server/server.crt signingca/signing_ca.crt rootca/root_ca.crt > server_chain.crt
- Create a chain for the signing CA:
- Send a full certificate chain all the way up to the trust anchor (root CA) for Windows environments:
You can concatenate the certificate files to the trust anchor (root CA).- Create a chain for the signing CA:
copy rootca\root_ca.crt+signingca\signing_ca.crt signing_ca_chain.crt - Create a chain for the server certificate:
copy rootca\root_ca.crt+signingca\signing_ca.crt+server\server.crt server_chain.crt
- Create a chain for the signing CA:
Export a PKCS12 file for the signing CA
Export the private key and certificate for the signing CA into a .p12 keystore file so that the embedded PKI can sign the user certificates with the signing CA.
openssl pkcs12 -export -in signingca/signing_ca.crt -inkey signingca/signing_ca_key.pem -out signingca/signing_ca.p12 -passin pass:passSigning -passout pass:passSigningP12
Export a PKCS12 file for the server certificate
Export the private key and certificate for the server into a .p12 keystore file so that the server can send the client a valid server certificate.
openssl pkcs12 -export -in server_chain.crt -inkey server/server_key.pem -out server/server.p12 -passout pass:passServerP12 -passin pass:passServer
Configuring IBM WebSphere Application Server Liberty profile (Liberty)
Enable the ssl-1.0 and appSecurity-2.0 features in the server.xml file:
<featureManager>
   <feature>ssl-1.0</feature>
   <feature>appSecurity-2.0</feature>
</featureManager>
Liberty requires setting up the keystore and truststore to establish trust for the generated client certificates. For more information, see the WebSphere Application Server Network Deployment documentation.
- Set up your server keystore to use the
server.p12file that was generated earlier. - Set up your truststore to use the
signing_ca.p12file that was generated earlier. - Configure your server HTTP endpoint and allow (but do not require) client-side certificates. To make this configuration available, set the
clientAuthenticationSupported="true"property in the Liberty SSL element.
The following example shows the updated SSL configuration:
<!-- default SSL configuration is defaultSSLSettings -->
<sslDefault sslRef="defaultSSLSettings"/>
<ssl clientAuthenticationSupported="true" id="defaultSSLSettings" keyStoreRef="defaultKeyStore" trustStoreRef="defaultTrustStore"/>
<keyStore id="defaultKeyStore" location="server.p12" password="passServerP12" type="PKCS12" />
<keyStore id="defaultTrustStore" location="signing_ca.p12" password="passSigningP12" type="PKCS12"/>
Configuring the authenticationConfig.xml file
- Uncomment the
UserCertificate Login Modulesection of theauthenticationConfig.xmlfile, as shown below.
<!-- Login Module for User Certificate Authentication --> <loginModule name="WLUSERCertificateLoginModule"> <className>com.worklight.core.auth.ext.UserCertificateLoginModule</className> </loginModule> - Uncomment the
wl_userCertificateAuthRealmsection, as shown below.
<!-- Login Module for User Certificate Authentication --> <realm name="wl_userCertificateAuthRealm" loginModule="WLUserCertificateLoginModule"> <className>com.worklight.core.auth.ext.UserCertificateAuthenticator</className> <parameter name="dependent-user-auth-realm" value="SampleAppRealm"/> <parameter name="pki-bridge-class" value="com.worklight.core.auth.ext.UserCertificateEmbeddedPKI"/> </realm><br /> - Update the value of the
embedded-pki-bridge-ca-p12-file-pathelement to the full path of your signing CA.p12file. - Update the value of the
embedded-pki-bridge-ca-p12-passwordelement to thepassSigningP12password that was used to create the.p12file. - Update the value of the
dependent-user-auth-realmrealm to the dependent realm that you want to use (SampleAppRealm).You cannot change the realm name (
wl_userCertificateAuthRealm).
The following examples shows the updates made above.
<!--For User Certificate Authentication --> <realm name="wl_userCertificateAuthRealm" loginModule="WLUserCertificateLoginModule"> <className>com.worklight.core.auth.ext.UserCertificateAuthenticator</className> <parameter name="dependent-user-auth-realm" value="SampleAppRealm"/> <parameter name="pki-bridge-class" value="com.worklight.core.auth.ext.UserCertificateEmbeddedPKI"/> <parameter name="embedded-pki-bridge-ca-p12-file-path" value="YOUR_BASE_DIRECTORY/signing_ca.p12"/> <parameter name="embedded-pki-bridge-ca-p12-password" calue="passSigningP12"/> </realm> - Define a security test that uses
wl_userCertificateAuthRealm.
<!--For User Certificate Authentication -->
<customSecurityTest name="customx509Tests">
   <test realm="wl_antiXSRFRealm" step="1"/>
   <test realm="wl_authenticityRealm" step="1"/>
   <test realm="wl_directUpdateRealm" mode="perSession" step="1"/>
   <test realm="wl_userCertificateAuthRealm" isInternalUserID="true" step="1"/>
   <test realm="wl_deviceNoProvisioningRealm" isInternalUserID="true" step="2"/>
</customSecurityTest>
Configuring the application-descriptor.xml file
- Ensure that you added the iOS or Android environment to your MobileFirst application.
- Protect your application or environment with your custom security test.
<!--For User Certificate Authentication --> <android securityTest="customx509Tests" version="1.0"> <iPhone bundleId="com.SampleApp" securityTest="customx509Tests" version="1.0"> - Build and deploy your application and adapters to MobileFirst Server.
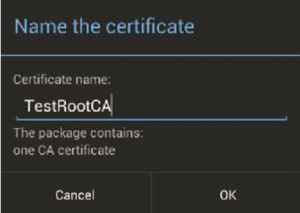
Installing a root CA on iOS and Android
You must install the root CA that you generated in the previous steps onto your client devices for your devices to trust MobileFirst Server over SSL. Email or host the root_ca.crt file, and then open the file on your device. The iOS and Android devices ask for approval when you manually attempt to install certificates.
Installing and testing the application
- Deploy your application to MobileFirst Server by selecting Run as > Run on server_name.
- Update the deploy target for HTTPS.
- Select Run as > Build Settings and Deploy Target.
- Select Build the application to work with a different MobileFirst Server.
- Enter the server HTTPS address:
https://host:https port# - Enter the context path:
/path.
- Build the application with the updated deploy target by selecting Run as > Build All Environments.
- Run the application on the specified environments.
Sample application
Click to download the MobileFirst project.
To confirm a successful configuration, ensure that you see a log-in form the first time that you try to access a protected resource. If WL.Client.connect() is uncommented in the main.js file, the log-in form is displayed when the application starts. Otherwise, WL.Client.connect() must be invoked before you call an adapter procedure to see a log-in form after the adapter is called.
After you log in through the dependent realm, a successful response from the adapter invocation indicates that the user was successfully enrolled.
On subsequent connections to the server, you are no longer asked to log in and the adapter calls continue to return successfully.
▲For more information, see the "User certificate authentication" topic in the user documentation.
Inclusive terminology note: The Mobile First Platform team is making changes to support the IBM® initiative to replace racially biased and other discriminatory language in our code and content with more inclusive language. While IBM values the use of inclusive language, terms that are outside of IBM's direct influence are sometimes required for the sake of maintaining user understanding. As other industry leaders join IBM in embracing the use of inclusive language, IBM will continue to update the documentation to reflect those changes.