Custom authentication
improve this page | report issueOverview
This tutorial describes how to create a custom authenticator and a login module, and define a realm. More specifically, you learn:
- How to implement a custom authenticator that collects the username and password by using a request to a predefined URL.
- How to implement a custom login module that checks credentials that are received from the authenticator.
- How to define a realm that uses your custom authenticator and login module.
- How to use this realm to protect resources.
This tutorial covers the following topics:
- Introduction
- Configuring the authenticationConfig.xml file
- Creating a custom Java authenticator
- WorklightProtocolAuthenticator
- Creating a custom Java login module
- Protecting a JavaScript adapter
- Protecting a Java adapter
- Creating the client-side authentication components
Introduction
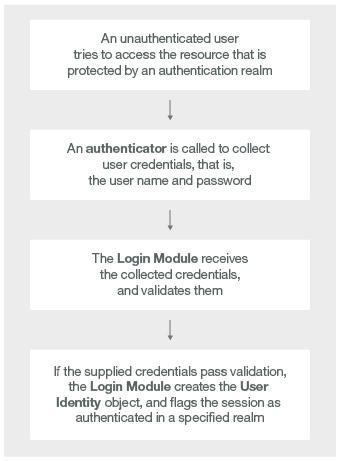
The authentication process can be interactive (for example, based on a username and password), or non-interactive (for example, header-based authentication).
This process can involve a single step (a simple user name/password form) or multiple steps (it might have to add a challenge after it issued the first password).
An authentication realm includes the class name of an authenticator and a reference to a login module.
- An authenticator is an entity that collects user information, such as a login form.
- A login module is a server entity that validates the retrieved user credentials and builds the user identity.
Authentication settings such as realms, authenticators, and login modules are configured in the authenticationConfig.xml file that is generated for every MobileFirst project.
The authenticator, login module, and user identity instances are stored in a session scope. Therefore they exist as long as the session is alive.
You can write custom login modules and authenticators when the ones that are provided by default do not match your requirements.
In previous tutorials, form-based authentication was implemented in the form of a non-validating login module. Adapter-based authentication was also implemented without the developer having to add login modules, and credentials were valided manually.
In some cases, though, when credentials validation cannot be run at the adapter level and requires more complex code, you can implement an extra login module.
For example: When credentials validation must be customized for a specific enterprise, or when more information must be retrieved from each client request, such as cookie, header, or user-agent.
Configuring the authenticationConfig.xml file
- In the
realmssection of theauthenticationConfig.xmlfile, define a realm calledCustomAuthenticatorRealm. - Make sure that it uses
CustomLoginModule. - Specify
MyCustomAuthenticatoras the name of the class, which you implement later.<realm name="CustomAuthenticatorRealm" loginModule="CustomLoginModule"> <className>com.mypackage.MyCustomAuthenticator</className> </realm> - In the
loginModulessection, add aloginModuleinstance calledCustomLoginModule. - Specify
MyCustomLoginModuleas the class name, which you implement later.<loginModule name="CustomLoginModule"> <className>com.mypackage.MyCustomLoginModule</className> </loginModule> - In the
securityTestssection, add a security test.
Later, you use this security test to protect a JavaScript adapter. Therefore, use acustomSecurityTestelement and remember the security test name.
Note: If you use Java adapters, this step is not required.<customSecurityTest name="AuthAdapter-securityTest"> <test isInternalUserID="true" realm="CustomAuthenticatorRealm" /> </customSecurityTest>
Creating a custom Java authenticator
API overview
The WorkLightAuthenticator API includes the following methods:
- The
initmethod is called when the authenticator instance is created. It takes the parameters that are specified in the definition of the realm in theauthenticationConfig.xmlfile.
void init(Map<String, String> options) - The
processRequestmethod is called for each request from an unauthenticated session.
AuthenticationResult processRequest(HttpServletRequest request, HttpServletResponse response, boolean isAccessToProtectedResource)< - The
processAuthenticationFailuremethod is called if the login module returns a failure of credentials validation.
AuthenticationResult processAuthenticationFailure(HttpServletRequest request, HttpServletResponse response, String errorMessage) -
The
processRequestAlreadyAuthenticatedmethod is called for each request from an already authenticated session.
AuthenticationResult processRequestAlreadyAuthenticated(HttpServletRequest request, HttpServletResponse response)Important: When using the new OAuth flow, this method will not be called as long as the access token is valid.
- The
getAuthenticationDatamethod is used by a login module to get the credentials that are collected by an authenticator.
Map<String, Object> getAuthenticationData() - The
changeResponseOnSuccessmethod is called after authentication success. It is used to add data to the response after authentication is successful.
Boolean changeResponseOnSuccess (HttpServletRequest request, HttpServletResponse response) - The
clonemethod is used to create a deep copy of class members.
WorkLightAuthenticator clone()
Walkthrough
- Create a
MyCustomAuthenticatorclass in theserver\javafolder
Make sure that this class implements theWorkLightAuthenticatorinterface.public class MyCustomAuthenticator implements WorkLightAuthenticator{The
WorkLightAuthenticatorinterface extends thejava.io.Serializableinterface, and therefore so does the custom authenticator. This means that the custom authenticator should not have any nonserializable fields. Moreover, it is recommended to include aserialVersionUIDvalue in accordance to thejava.io.Serializabledocumentation. - Add the credentials fields to your authenticator to hold the credentials information.
These objects will be filled to the authentication data map ingetAuthenticationData()and used by a login module.private String username; private String password; - Add a dependency on the server runtime libraries to use server-related classes, for example,
HttpServletRequest. In Eclipse:- Right-click your MobileFirst project and select Properties.
- Select Java Build Path → Libraries and click Add Library.
- Select Server Runtime and click Next.
You see a list of server runtimes that are installed in your Eclipse IDE. - Select one and click Finish.
- Click OK.
- Add calls to the following methods as appropriate.
- The
initmethod is called when the authenticator is created. As its parameter, this method takes the map of options that is specified in a realm definition in theauthenticationConfig.xmlfile.public void init(Map<String, String> options) throws MissingConfigurationOptionException { logger.info("MyCustomAuthenticator initialized"); } - The
clonemethod of the authenticator creates a deep copy of the object members.public WorkLightAuthenticator clone() throws CloneNotSupportedException { MyCustomAuthenticator otherAuthenticator = (MyCustomAuthenticator) super.clone(); return otherAuthenticator; } - The
processRequestmethod is called for each unauthenticated request to collect credentials.public AuthenticationResult processRequest(HttpServletRequest request, HttpServletResponse response, boolean isAccessToProtectedResource) throws IOException, ServletException { if (request.getRequestURI().contains("my_custom_auth_request_url")){ String username = request.getParameter("username"); String password = request.getParameter("password"); if (null != username && null != password && username.length() > 0 && password.length() > 0){ this.username = request.getParameter("username"); this.password = request.getParameter("password"); return AuthenticationResult.createFrom(AuthenticationStatus.SUCCESS); } else { response.setContentType("application/json; charset=UTF-8"); response.setHeader("Cache-Control", "no-cache, must-revalidate"); response.getWriter().print("{\"authStatus\":\"required\", \"errorMessage\":\"Please enter username and password\"}"); return AuthenticationResult.createFrom(AuthenticationStatus.CLIENT_INTERACTION_REQUIRED); } } if (!isAccessToProtectedResource) return AuthenticationResult.createFrom(AuthenticationStatus.REQUEST_NOT_RECOGNIZED); response.setContentType("application/json; charset=UTF-8"); response.setHeader("Cache-Control", "no-cache, must-revalidate"); response.getWriter().print("{\"authStatus\":\"required\"}"); return AuthenticationResult.createFrom(AuthenticationStatus.CLIENT_INTERACTION_REQUIRED); }The
processRequest()method takes therequest,response, andisAccessToProtectedResourcearguments. The method can retrieve data from a request and write data to a response, and must return a specificAuthenticationResultstatus as described later.
Reminder: The authenticator collects the credentials for a login module; it does not validate them.public AuthenticationResult processRequest(HttpServletRequest request, HttpServletResponse response, boolean isAccessToProtectedResource) throws IOException, ServletException {The application sends an authentication request to a specific URL. This request URL contains a
my_custom_auth_request_urlcomponent, which is used by the authenticator to verify whether this request is an authentication request. It is recommended to have a different URL component in each authenticator.if (request.getRequestURI().contains("my_custom_auth_request_url")){The
authenticatorretrieves the username and password that are passed as request parameters.this.username = request.getParameter("username"); this.password = request.getParameter("password");The authenticator checks the credentials for basic validity, creates an
authenticationDataobject, and returnsSUCCESS.
TheSUCCESSreturn value means only that the credentials were successfully collected; after that, the login module is called to validate the credentials.if (null != username && null != password && username.length() > 0 && password.length() > 0){ return AuthenticationResult.createFrom(AuthenticationStatus.SUCCESS); }If a problem occurs with the received credentials, the authenticator adds an error message to the response and returns
CLIENT_INTERACTION_REQUIRED. The client must still supply authentication data.else { response.setContentType("application/json; charset=UTF-8"); response.setHeader("Cache-Control", "no-cache, must-revalidate"); response.getWriter().print("{\"authStatus\":\"required\", \"errorMessage\":\"Please enter username and password\"}"); return AuthenticationResult.createFrom(AuthenticationStatus.CLIENT_INTERACTION_REQUIRED); }The
isAccessToProtectedResourceargument specifies whether an access attempt was made to a protected resource.
If not, the method returnsREQUEST_NOT_RECOGNIZED, which means that the authenticator treatment is not required, and can proceed with the request as is.if (!isAccessToProtectedResource) return AuthenticationResult.createFrom(AuthenticationStatus.REQUEST_NOT_RECOGNIZED);If the request made to a protected resource does not contain authentication data, the authenticator adds an
authStatus:requiredproperty to the response, and also returns aCLIENT_INTERACTION_REQUIREDstatus.response.setContentType("application/json; charset=UTF-8"); response.setHeader("Cache-Control", "no-cache, must-revalidate"); response.getWriter().print("{\"authStatus\":\"required\"}"); return AuthenticationResult.createFrom(AuthenticationStatus.CLIENT_INTERACTION_REQUIRED); - The authenticator
getAuthenticationDatamethod is used by a login module to get collected credentials.
After the authenticated session is established, all requests are transported through thechangeResponseOnSuccessandprocessRequestAlreadyAuthenticatedmethods. You can use these methods to retrieve data from requests and to update responses.public Map<String, Object> getAuthenticationData() { logger.info("getAuthenticationData"); Map<String, Object> authenticationData = new HashMap<String, Object>(); authenticationData.put("username", username); authenticationData.put("password", password); return authenticationData; } - The
changeResponseOnSuccessmethod is called after credentials are successfully validated by the login module. You can use this method to modify the response before you return it to the client. This method must returntrueif the response was modified. Otherwise, it returnsfalse.
Use it to notify a client application about the authentication success.public boolean changeResponseOnSuccess(HttpServletRequest request, HttpServletResponse response) throws IOException {<br /> if (request.getRequestURI().contains("my_custom_auth_request_url")){ response.setContentType("application/json; charset=UTF-8"); response.setHeader("Cache-Control", "no-cache, must-revalidate"); response.getWriter().print("{\"authStatus\":\"complete\"}"); return true; } return false; } - The
processRequestAlreadyAuthenticatedmethod returnsAuthenticationResultobjects for authenticated requests.public AuthenticationResult processRequestAlreadyAuthenticated(HttpServletRequest request, HttpServletResponse response) throws IOException, ServletException { return AuthenticationResult.createFrom(AuthenticationStatus.REQUEST_NOT_RECOGNIZED); } - If the login module returns an authentication failure, the
processAuthenticationFailuremethod is called. This method writes an error message to a response body, and returns theCLIENT_INTERACTION_REQUIREDstatus.public AuthenticationResult processAuthenticationFailure(HttpServletRequest request, HttpServletResponse response, String errorMessage) throws IOException, ServletException { response.setContentType("application/json; charset=UTF-8"); response.setHeader("Cache-Control", "no-cache, must-revalidate"); response.getWriter().print("{\"authStatus\":\"required\", \"errorMessage\":\"" + errorMessage + "\"}"); return AuthenticationResult.createFrom(AuthenticationStatus.CLIENT_INTERACTION_REQUIRED); }
- The
WorklightProtocolAuthenticator
Optionally, you can use the Worklight Protocol to simplify your authentication implementation.
The Worklight protocol can be used when the challenges and challenge responses are represented as JSON objects. In that case, the framework combines all the challenges that conform to the Worklight protocol in a single HTTP request, therefore reducing the number of trips between the server and the client.
For your Custom Authenticator to use the Worklight protocol, make it extend WorklightProtocolAuthenticator instead of WorkLightAuthenticator.
Note: the WorklightProtocolAuthenticator implementation is visible. In Eclipse, click the name and select Open Declaration to see its implementation.
WorklightProtocolAuthenticator provides you with default implementation for most of the required API, and you can choose which ones to override. The interface also provides a helper method called getChallengeResponse to extract the challenge response from the HTTP request.
WorklightProtocolAuthenticator also knows the name of the realm it belongs to and you can retrieve it by using the getRealmName method.
For an example that uses
WorklightProtocolAuthenticator, see the Remember Me tutorial or this video blog post.
Creating a custom Java login module
API overview
The WorkLightAuthLoginModule API includes the following methods:
- The
initmethod of the login module is called when the login module instance is created. This method takes the options that are specified in the login module definition of theauthenticationConfig.xmlfile.void init(Map<String, String> options) - The
loginmethod of the login module is used to validate the credentials that are collected by the authenticator.boolean login(Map<String, Object> authenticationData) - The
createIdentitymethod of the login module is used to create auserIdentityobject after validation of the credentials succeeds.UserIdentity createIdentity(String loginModule) - The
logoutandabortmethods are used to clean up cached data after a logout or authentication aborts.void logout() void abort() - The
clonemethod is used to create a deep copy of the class members.
WorkLightLoginModule clone()
Walkthrough
- Create a
MyCustomLoginModuleclass in theserver\javafolder. - Make sure that this class implements the
WorkLightAuthLoginModuleinterface.public class MyCustomLoginModule implements WorkLightAuthLoginModule {The
WorkLightAuthLoginModuleinterface extends thejava.io.Serializableinterface, and therefore so does your custom login module. This means that it should not have any nonserializable fields. Moreover, it is recommended to include aserialVersionUIDvalue in accordance tojava.io.Serializabledocumentation. - Add two private class members,
USERNAMEandPASSWORD, to hold the user credentials.private String USERNAME; private String PASSWORD; - Add calls to the following methods as appropriate.
- The
initmethod is called when the login module instance is created. As its parameter, it takes the map of options that are specified in a login module definition in theauthenticationConfig.xmlfile.public void init(Map<String, String> options) throws MissingConfigurationOptionException { } - The
clonemethod of the login module creates a deep copy of the object members.public MyCustomLoginModule clone() throws CloneNotSupportedException { return (MyCustomLoginModule) super.clone(); } - The
loginmethod is called after the authenticator returns theSUCCESSstatus.
When called, theloginmethod gets anauthenticationDataobject from the authenticator.
Theloginmethod retrieves the username and password that theauthenticatorpreviously stored.In this example, the login module validates the credentials against hardcoded values. You can implement your own validation rules.
- If the credentials are valid, the
loginmethod returnstrue. - If validation fails, the
loginmethod can either returnfalseor throw aRuntimeExceptionexception. The exception string is returned to the authenticator as anerrorMessageparameter.public boolean login(Map<String, Object> authenticationData) { USERNAME = (String) authenticationData.get("username"); PASSWORD = (String) authenticationData.get("password"); if (USERNAME.equals("user") && PASSWORD.equals("password")) return true; else throw new RuntimeException("Invalid credentials");<br /> }<br />
- If the credentials are valid, the
- The
createIdentitymethod is called when theloginmethod returnstrue. It is used to create aUserIdentityobject. You can store your own custom attributes in it to use them later in Java or adapter code.public UserIdentity createIdentity(String loginModule) { HashMap<String, Object> customAttributes = new HashMap<String, Object>(); customAttributes.put("AuthenticationDate", new Date()); UserIdentity identity = new UserIdentity(loginModule, USERNAME, null, null, customAttributes, PASSWORD); return identity; }The
UserIdentityobject contains user information. Its constructor is:public UserIdentity(String loginModule, String name, String displayName, Set<String> roles Map<String, Object> attributes, Object credentials) - The
logoutandabortmethods are used to clean up class members after the user logs out or aborts the authentication flow.public void logout() { USERNAME = null; PASSWORD = null; } public void abort() { USERNAME = null; PASSWORD = null; }
- The
Protecting a JavaScript adapter
- Create an adapter and name it
AuthAdapter. - Add a
getSecretDataprocedure and protect it with the security test that you created when you configured the authenticationConfig.xml file.<procedure name="getSecretData" securityTest="AuthAdapter-securityTest"/>In this module, the
getSecretDataprocedure returns some hardcoded value:function getSecretData(){ return { secretData: '123456' }; }
Protecting a Java adapter
- Create a Java adapter.
- Add a
getSecretDatamethod and protect it with the realm that you created when you configured the authenticationConfig.xml file.
In this module, thegetSecretDataprocedure returns some hardcoded value:@GET @Produces("application/json") @OAuthSecurity(scope="CustomAuthenticatorRealm") public JSONObject getSecretData(){ JSONObject result = new JSONObject(); result.put("secretData", "123456"); return result; } - To set the new realm as the default user identity for the application, in the application descriptor, add this option:
<userIdentityRealms>CustomAuthenticatorRealm</userIdentityRealms>
To learn more about application descriptor properties, see the user documentation.
To learn more about custom authenticators, see the topic about implementing custom authenticators, in the user documentation.
Related content: Video blog post on Custom Authentication
Creating the client-side authentication components
▲- Custom Authentication in hybrid applications
- Custom Authentication in native Android applications
- Custom Authentication in native Windows 8 applications
- Custom Authentication in native Windows Phone 8 applications
- Custom Authentication in native iOS applications
Inclusive terminology note: The Mobile First Platform team is making changes to support the IBM® initiative to replace racially biased and other discriminatory language in our code and content with more inclusive language. While IBM values the use of inclusive language, terms that are outside of IBM's direct influence are sometimes required for the sake of maintaining user understanding. As other industry leaders join IBM in embracing the use of inclusive language, IBM will continue to update the documentation to reflect those changes.