Custom device provisioning
improve this page | report issueOverview
This tutorial explains how to enable and configure custom device provisioning.
Custom device provisioning is an extension of auto device provisioning.
With custom device provisioning, you can validate:
- Certificate Signing Requests during an initial provisioning flow.
- Certificates at every application start.
Prerequisite: Make sure that you understand the topics discussed in Device Provisioning Concepts because this tutorial is fully based on those concepts.
This tutorial covers the following topics:
- Understanding custom device provisioning
- Configuring the authenticationConfig.xml file
- Implementing server-side components
- Implementing client-side components
- Sample application
Understanding custom device provisioning
First application start
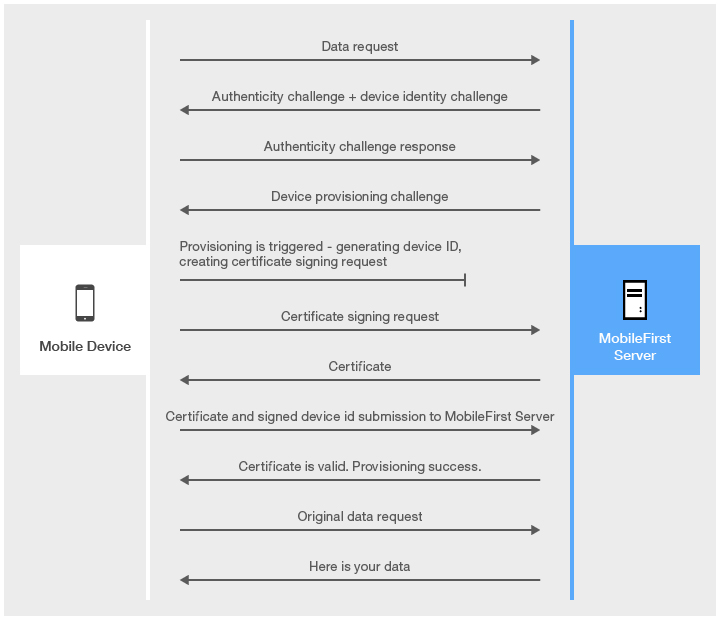
Authenticity check is a proprietary IBM MobileFirst Platform Foundation technology, which makes sure that the application is the authentic one and was not modified by anyone.
The main difference between auto and custom provisioning consists in two functions that are provided for custom provisioning:
- Custom validation of CSR during the provisioning process
- Custom validation of certificate during each application start
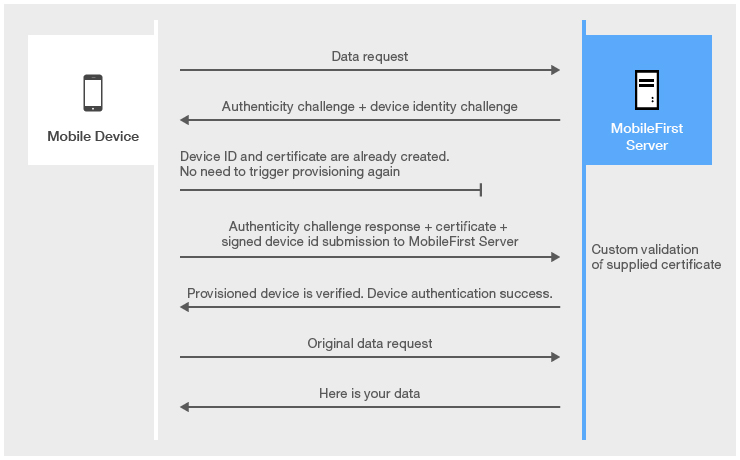
Subsequent application starts
Keystore
By default, MobileFirst Server uses its internal keystore to issue a certificate.
You can make the server use your own keystore by adjusting the worklight.properties file.
Note: The wl.ca.keystore.path property value can be either relative to the /server/ folder of the MobileFirst project or absolute to the file system.
#######################################################################################################################
#    Worklight Default Certificate (For device provisioning)
#######################################################################################################################
# You can change the default behavior with regard to CA certificates. You can also implement custom provisioning.
# If you want to change the auto-provisioning mechanism to use different granularity (application, device or group) or a
# different list of pre-required realms, you can create your own customized authenticator, login module and challenge handler.
# For more information, see the "Custom Authenticator and Login Module" Getting Started training module.
#The path to the keystore, relative to the server folder in the Worklight Project, for example: conf/my-cert.jks
#wl.ca.keystore.path=
#The type of the keystore file. Valid values are jks or pkcs12.
#wl.ca.keystore.type=
#The password to the keystore file.
#wl.ca.keystore.password=
#The alias of the entry where the private key and certificate are stored, in the keystore.
#wl.ca.key.alias=
#The password to the alias in the keystore.
#wl.ca.key.alias.password=
#######################################################################################################################
#    Worklight SSL keystore
#######################################################################################################################
#SSL certificate keystore location.
ssl.keystore.path=conf/default.keystore
#SSL certificate keystore type (jks or PKCS12)
ssl.keystore.type=jks
#SSL certificate keystore password.
ssl.keystore.password=worklight
Configuring the authenticationConfig.xml file
Realm
- Add a realm that is named
CustomDeviceProvisioningRealmto theauthenticationConfig.xmlfile. - Use
CustomDeviceProvisioningLoginModule. - Use the auto provisioning authenticator
classNameparameter. - Add a
validate-csr-functionparameter.
The value of this parameter points to an adapter function that performs CSR validation.
<realm name="CustomDeviceProvisioningRealm" loginModule="CustomDeviceProvisioningLoginModule">
  <className>com.worklight.core.auth.ext.DeviceAutoProvisioningAuthenticator</className>
  <parameter name="validate-csr-function" value="ProvisioningAdapter.validateCSR" />
</realm>
Login module
- Add a
CustomDeviceProvisioningLoginModuleinstance. - Use the auto provisioning login module
classNameparameter. - Add a
validate-certificate-functionparameter.
The value of this parameter points to an adapter function that performs certificate validation.
<loginModule name="CustomDeviceProvisioningLoginModule">
  <className>com.worklight.core.auth.ext.DeviceAutoProvisioningLoginModule</className>
  <parameter name="validate-certificate-function" value="ProvisioningAdapter.validateCertificate" />
</loginModule>
Security test
- Create a
mobileSecurityTestinstance. - Add a mandatory
testAppAuthenticitytest. - Add a mandatory
testDeviceIdtest. - Specify
provisioningType="custom". - Specify
realm="CustomDeviceProvisioningRealm".
<mobileSecurityTest name="CustomDeviceProvisioningSecurityTest">
  <testAppAuthenticity/>
  <testDeviceId provisioningType="custom" realm="CustomDeviceProvisioningRealm" />
</mobileSecurityTest>
Implementing server-side components
- Create an adapter that is named
ProvisioningAdapter. - Add two functions with the following signatures to the JavaScript file of the adapter.
validateCSR (clientDN, csrContent)– This function is invoked only during initial device provisioning. It is used to check whether the device is authorized to be provisioned. After the device is provisioned, this function is not invoked again.validateCertificate (certificate, customAttributes)– This function is invoked every time that the mobile application establishes a new session with MobileFirst Server. It is used to validate that the certificate that the application/device possesses is still valid and that the application/device is allowed to communicate with the server.
Note: These functions are called internally by the MobileFirst authentication framework. Therefore, do not declare them in the XML file of the adapter XML file.
validateCSR
function validateCSR(clientDN, csrContent){
    WL.Logger.info("validateCSR :: clientDN :: " + JSON.stringify(clientDN));
    WL.Logger.info("validateCSR :: csrContent :: " + JSON.stringify(csrContent));</p>
    var activationCode = csrContent.activationCode;
    var response;
    // This is a place to perform validation of csrContent and update clientDN if required.
    // You can do it using adapter backend connectivity
    if (activationCode === "mobilefirst"){
        response = {
            isSuccessful: true,
            clientDN: clientDN + ",CN=someCustomData",
            attributes: {
                customAttribute: "some-custom-attribute"
            }
        };
    } else {
        response = {
            isSuccessful: false,
            errors: ["Invalid activation code"]
        };
    }
    return response;
}
The csrContent.activationCode property is a custom property that you add to CSR on the client side.
You can use adapter functionality, such as access to http web services, to validate CSR information. For simplicity, the activationCode is checked against a predefined hardcoded string.
- If CSR validation is successful, the
validateCSRfunction returns aclientDN. In addition, it is possible to specify custom attributes to be saved in certificate. After thevalidateCSRfunction returnsisSuccessful:true, the server generates a certificate and returns it to the application.
Note: The function can be modified with more custom data. - If CSR validation fails, the function must return
isSuccessful:falseand supply an error message.
validateCertificate
function validateCertificate(certificate,customAttributes){
    WL.Logger.info("validateCertificate :: certificate :: " + JSON.stringify(certificate));
    WL.Logger.info("validateCertificate :: customAttributes :: " + JSON.stringify(customAttributes));
    // Additional custom certificate validations can be performed here.
    return {
        isSuccessful: true
    };
}
You can perform certificate validations according to your custom rules here. You can use adapter functionality, such as access to http web services, to validate the certificate. If the certificate is valid, the function must return isSuccessful:true.
The isSuccessful:false return value means that the application cannot operate and the only thing that can be done is to reinstall the application so that it can be provisioned again.
Implementing client-side components
Create an application and add an iPhone, iPad, or Android environment to it.
Application descriptor
- Add the security test that you created in the Security tests section to protect the created environment.
<iphone applicationId="CustomDeviceProvisioning" bundleId="com.CustomDeviceProvisioning" securityTest="CustomDeviceProvisioningSecurityTest" version="1.0"> <worklightSettings include="false" /> <security> <encryptWebResources enabled="false" /> <testWebResourcesChecksum enabled="false" ignoreFileExtensions="png, jpg, jpeg, gif, mp4, mp3" /> </security> </iphone> - If required, configure your application for an application authenticity test as described in Application Authenticity Protection.
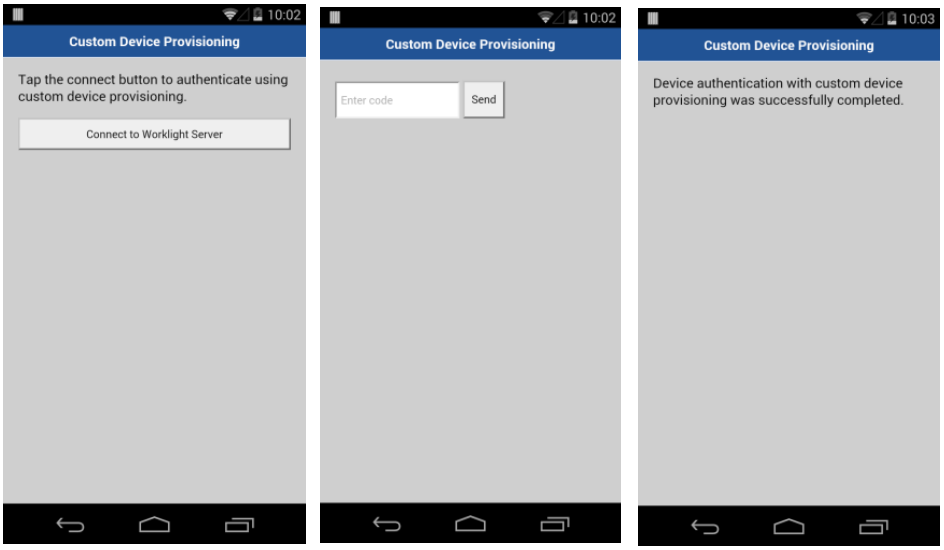
HTML
The AppBody element holds application content.
The ProvBody element holds device provisioning-related content.
Note: The AppBody element has a button for connection to the server.
<div id="wrapper">
  <div id="AppBody">
    <p id="beforeProv">
      Tap the connect button to authenticate using custom device provisioning.
    </p>
    <input type="button" id="connectToServerButton" class="appButton" value="Connect to MobileFirst Server" />
    <p id="provisioningError" style="display: none"></p>
  </div>
  <div id="ProvBody" style="display: none">
    <p id="provisioningError">
      <input id="provisioningCode" placeholder="Enter code" type="text" />
      <input type="button" id="submitProvCodeButton" class="formButton" value="Send" />
    </p>
  </div>
</div>
main.js
- Add a listener to the
connectToServerButtonobject. - Use the
WL.Client.connect()API to connect to MobileFirst Server.
function wlCommonInit(){
    $("#connectToServerButton").click(function(){
        WL.Client.connect({
              onFailure: onConnectFailure
        });
    });
}
Challenge handler
- Add a
CustomDeviceProvisioningRealmChallengeHandler.jsfile and reference it in the main HTML file.
For a challenge handler for device provisioning, implement the following methods:handler.createCustomCsr (challenge)– This method is responsible for returning custom properties that are added to CSR. Here you add a customactivationCodeproperty, which is used in the adaptervalidateCSRfunction. This method is asynchronous to allow collecting custom properties via native code or separate flow.handler.processSuccess(identity)– This method is invoked when certificate validation is successfully completed by thevalidateCertificateadapter function that you implemented in the validateCertificate section.handler.handleFailure()– This method is invoked when certificate validation fails and thevalidateCertificatefunction returnsisSuccessful:false.
var customDevProvChallengeHandler = WL.Client.createProvisioningChallengeHandler("CustomDeviceProvisioningRealm"); - Create a device provisioning challenge handler by using the
WL.Client.createProvisioningChallengeHandler()API. Specify a realm name as parameter.customDevProvChallengeHandler.createCustomCsr = function(challenge){ WL.Logger.debug("createCustomCsr :: " + JSON.stringify(challenge)); $("#AppBody").hide(); $("#ProvBody").show(); $("#provisioningCode").val(""); if (challenge.error) { $("#provisioningError").html(new Date() + " " + challenge.error); } else { $("#provisioningError").html(new Date() + " Enter activation code."); } $("#submitProvCodeButton").click(function(){ var customCsrProperties = { activationCode: $("#provisioningCode").val() }; customDevProvChallengeHandler.submitCustomCsr(customCsrProperties, challenge); }); }; - When MobileFirst Server triggers device provisioning, the
createCustomCsrfunction is invoked.
Use it to manipulate your UI, for example to hide the application screen and show device provisioning-related components.
You can use information that is returned in the authentication challenge, for example, error messages. - When the required custom properties are collected, invoke the
submitCustomCsr()API.
Adding custom properties to CSR is optional. If you do not want to add custom properties, supply an empty JSON object as a parameter.customDevProvChallengeHandler.processSuccess = function(identity) { WL.Logger.debug("processSuccess :: " + JSON.stringify(identity)); $("#connectToServerButton").hide(); $("#AppBody").show(); $("#ProvBody").hide(); $("#AppBody").html("<p>Device authentication with custom device provisioning was successfully completed.</p>"); }; - The
processSuccessfunction is called each time the certificate successfully passes validation. You can use it for UI manipulations.customDevProvChallengeHandler.handleFailure = function(){ WL.Logger.debug("handleFailure"); $("#AppBody").show(); $("#ProvBody").hide(); $("#wrapper").text("MobileFirst Server rejected your device. You will need to re-install the application and perform device provisioning again."); }; - The
handleFailurefunction is called each time that the certificate fails validation. You can use it for UI manipulations and to notify the user that the application cannot connect to the server.
Sample application
Click to download the MobileFirst project.
Inclusive terminology note: The Mobile First Platform team is making changes to support the IBM® initiative to replace racially biased and other discriminatory language in our code and content with more inclusive language. While IBM values the use of inclusive language, terms that are outside of IBM's direct influence are sometimes required for the sake of maintaining user understanding. As other industry leaders join IBM in embracing the use of inclusive language, IBM will continue to update the documentation to reflect those changes.