Adapter-based authentication in native iOS applications
improve this page | report issueOverview
This tutorial explains how to implement the client-side of adapter-based authentication in native iOS.Prerequisite: Make sure that you read the Adapter-based authentication tutorial first.
Implementing the client-side authentication
Create a native iOS application and add the MobileFirst native APIs as explained in the Configuring a native iOS application with the MobileFirst Platform SDK tutorial.
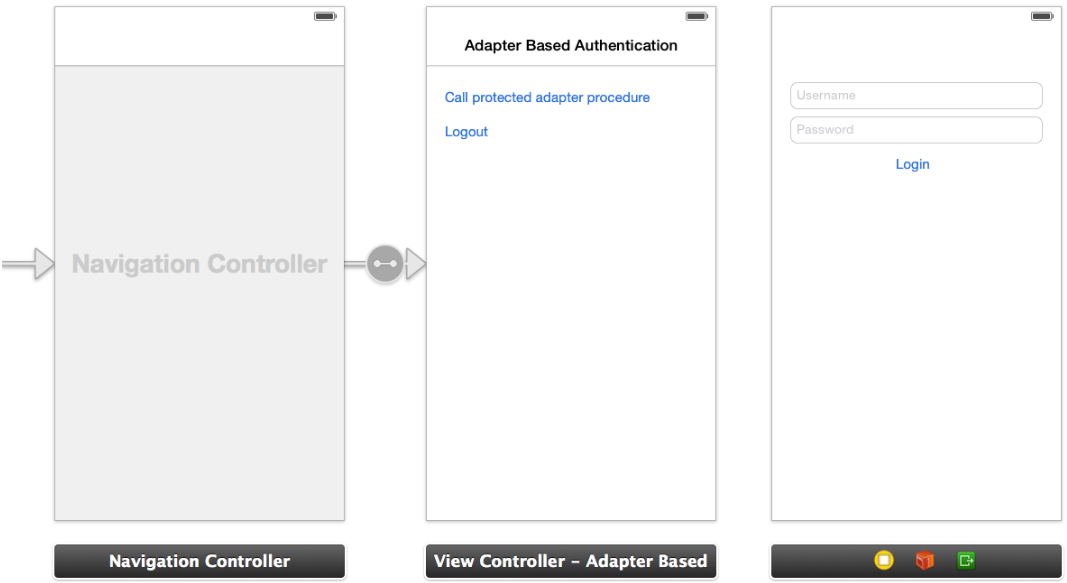
Storyboard
In your storyboard, add a view controller containing a login form.
Challenge Handler
- Create a
MyChallengeHandlerclass as a subclass ofChallengeHandler.
@interface MyChallengeHandler : ChallengeHandler - Call the
initWithRealmmethod:
@implementation MyChallengeHandler //... -(id)init:{ self = [self initWithRealm:@"AuthRealm"]; return self; } - Add implementation of the following
ChallengeHandlermethods to handle the adapter-based challenge:-
isCustomResponsemethod:
TheisCustomResponsemethod is invoked each time a response is received from the MobileFirst Server. It is used to detect whether the response contains data that is related to this challenge handler. It must return eithertrueorfalse.-(BOOL) isCustomResponse:(WLResponse *)response { if(response && response.responseJSON){ if ([response.responseJSON objectForKey:@"authStatus"] != nil) { return true; } } return false; } -
handleChallengemethod:
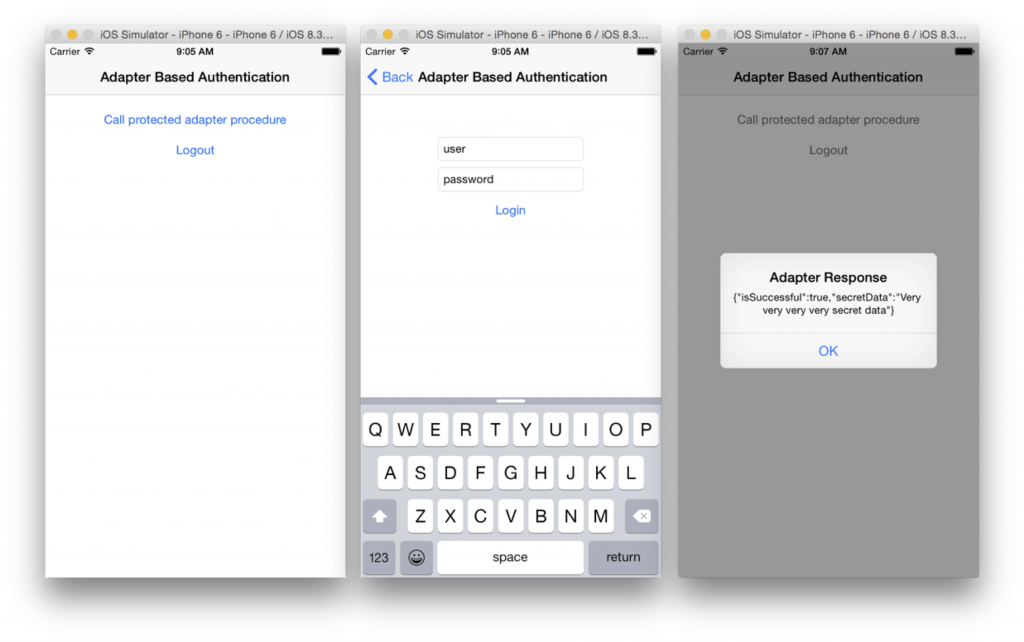
IfisCustomResponsereturnstrue, the framework calls thehandleChallengemethod. This function is used to perform required actions, such as hiding the application screen and showing the login screen.-(void) handleChallenge:(WLResponse *)response { NSString* authStatus = (NSString*) [response.responseJSON objectForKey:@"authStatus"]; if([authStatus isEqual:@"complete"]){ [self.vc.navigationController popViewControllerAnimated:YES]; [self submitSuccess:response]; } else{ // Check if login form is already visible /> if([self.vc.navigationController.visibleViewController isKindOfClass:[LoginViewController class]]){> dispatch_async(dispatch_get_main_queue(), ^(void){ LoginViewController* loginController = (LoginViewController*) self.vc.navigationController.visibleViewController; loginController.errorMsg.hidden = NO; }); } else{ [self.vc performSegueWithIdentifier:@"showLogin" sender:self.vc]; dispatch_async(dispatch_get_main_queue(), ^(void){ LoginViewController* loginController = (LoginViewController*) self.vc.navigationController.visibleViewController; loginController.challengeHandler = self; loginController.errorMsg.hidden = YES; }); } } } -
onSuccessandonFailuremethods:
At the end of the authentication flow,onSuccessoronFailurewill be triggered
Call thesubmitSuccessmethod in order to inform the framework that the authentication process completed successfully and for theonSuccesshandler of the invocation to be called.
Call thesubmitFailuremethod in order to inform the framework that the authentication process failed and for theonFailurehandler of the invocation to be called.-(void) onSuccess:(WLResponse *)response { NSLog(@"Challenge succeeded"); [self.vc.navigationController popViewControllerAnimated:YES]; [self submitSuccess:response]; } -(void) onFailure:(WLFailResponse *)response { NSLog(@"Challenge failed"); [self submitFailure:response];< }
-
submitAdapterAuthentication
In your login View Controller, when the user taps to submit the credentials, call the submitAdapterAuthentication method to send the credentials to the adapter procedure.
@implementation LoginViewController
//...
- (IBAction)login:(id)sender {
    WLProcedureInvocationData *myInvocationData = [[WLProcedureInvocationData alloc]<
                               initWithAdapterName:@"AuthAdapter"
                               procedureName:@"submitAuthentication"];
    myInvocationData.parameters = @[self.username.text, self.password.text];
    [self.challengeHandler submitAdapterAuthentication:myInvocationData options:nil];
}
The Main ViewController
In the sample project, in order to trigger the challenge handler we use the WLClient invokeProcedure method.
The protected procedure invocation triggers MobileFirst Server to send the challenge.
- Create a
WLClientinstance and use theconnectmethod to connect to the MobileFirst Server:
MyConnectListener *connectListener = [[MyConnectListener alloc] init]; [[WLClient sharedInstance] wlConnectWithDelegate:connectListener]; - In order to listen to incoming challenges, make sure to register the challenge handler by using the
registerChallengeHandlermethod:
[[WLClient sharedInstance] registerChallengeHandler:[[MyChallengeHandler alloc] initWithViewController:self] ];<br /> - Invoke the protected adapter procedure:
    NSURL* url = [NSURL URLWithString:@"/adapters/AuthAdapter/getSecretData"];
    WLResourceRequest* request = [WLResourceRequest requestWithURL:url method:WLHttpMethodGet];
    [request sendWithCompletionHandler:^(WLResponse *response, NSError *error) {
    ...
    }];
Sample application
Click to download the MobileFirst project.
Click to download the Objective-C project.
Click to download the Swift project.
- The
AdapterBasedAuthproject contains a MobileFirst native API that you can deploy to your MobileFirst server. - The
AdapterBasedAuthObjCandAdapterBasedAuthSwiftprojects contains a native iOS application that uses a MobileFirst native API library. - Make sure to update the
worklight.plistfile in the native project with the relevant server settings.
Inclusive terminology note: The Mobile First Platform team is making changes to support the IBM® initiative to replace racially biased and other discriminatory language in our code and content with more inclusive language. While IBM values the use of inclusive language, terms that are outside of IBM's direct influence are sometimes required for the sake of maintaining user understanding. As other industry leaders join IBM in embracing the use of inclusive language, IBM will continue to update the documentation to reflect those changes.